| Construction Rating: | starstarstarstarstar_border |
| Flight Rating: | starstarstarstarstar_border |
| Overall Rating: | starstarstarstarstar_border |
| Manufacturer: | InFlight Rockets  |
Brief: Construction: Part quality was high all around. Clean laser cut balsa fins, reasonably smooth balsa NC, and the smoothest white body tube I've ever seen. The spirals are almost invisible, a coat or 2 of primer will fill them in nicely. The red plastic streamer was from Hartle Engineering and measured 2" x 54". While plenty long for this light kit, I'm tempted to try to pack a longer one simply for easier sight. How much can I fit in a BT-55? The only curious part was a 3/16" launch lug instead of the original 1/8". I emailed InFlight, and they felt a 3/16" is safer for a D powered model. I built it with a 1/8" launch lug for nostalgic reasons. Oh, a minor nit would be the engine hook, it was a bit on the thin side (though still much better than early Quest hooks) and is not as springy as some I've used. I put a little pre-bend in it, and it should work just fine. The kit came with an 8 page assembly instruction manual with numbered steps and illustrations. It was quite comprehensive. A separate instruction sheet came packaged with the Kevlar cord, which apparently is an option, although it was bagged inside my kit. Two very minor errors on the instruction sheet was listing a D12-3/D12-5 instead of the D12-5/D12-7 listed on the header card and listing a 48" shock cord instead of the 36" cord included, which is plenty long when used with the Kevlar. The instructions came complete with a fin marking guide and shock cord mount to cut out, if not using the Kevlar and a copy of the NAR safety code. Assembly was straightforward. I just followed the instructions, deviating where told for the optional Kevlar kit. I didn't use the included fin marking guide, since I use one of those plastic Estes pyramid style guides for 3FNC/4FNC birds. The only step yet to complete is #14, paint and decals. The instructions do not mention any sort of filling or priming in the finishing step. My experience with yellow is that a white undercoat really helps.
Finishing: The decals were of good quality. The black color was a flat black, I'm guessing this is due to laser printer toner. I was tempted to put on a coat of Microscale Decal Film, but the instructions didn't call for it. No fear, the decals were plenty thick for positioning. They only needed 15 seconds in the water vs the suggested 20-30 seconds. The edges of the decals laid down nice and flat using Microscale decal setting solution. After drying for a day, I put on a coat of Future Floor Polish to protect the decals and give a moderate gloss. The fluorescent yellow really glows!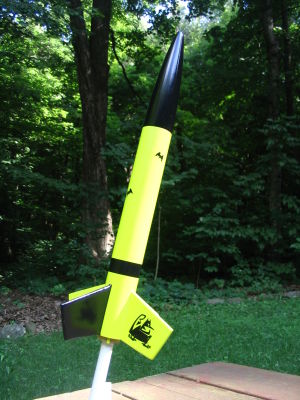
This is a clone kit of the Estes K55 Goblin. It is a single stage high flying D powered kit.
The kit was bagged with a nice color header card. Most of the parts were in separate smaller clear plastic packs, including a fin pack, cord/streamer/LL pack, streamer pack, decal pack, and engine mount pack. Very nice.
The instructions simply state to paint with a base coat of yellow. I chose my usual method, which uses Elmer's Wood Filler on the fins and NC, followed by a few light coats of Rustoleum sandable gray primer. I then painted the whole kit Krylon gloss white (old formula). Instead of the standard yellow that most Goblins are painted, I chose a fluorescent yellow to aid visibility. My brother's Goblin has been this color for over 30 years, so it just seemed "right" to me. I then masked with 3M #2080 blue tape to finish the NC and 1 fin with Krylon gloss black. Since the fluorescent paint is flat, I put on a light coat of Krylon clear to help the decals adhere.
The reason I gave 4 was due to the lack of mention of any balsa sealing or filling and no mention of a white undercoat for the yellow paint.
Construction Rating: 4 out of 5
Flight:
The recommended motors are the C11-5, D12-5, or D12-7. I didn't want to lose this on its first flight, so I put her up on a B6-4 using a standard 18mm to 24mm adapter. It was a straight, low altitude flight with deployment near apogee, and recovery was a short walk.
On the second flight, I wanted a bit more altitude. I recently came across a bunch of C11-7 motors, so thought I would try one of those. This was a very nice straight flight, easily twice the altitude, maybe a bit more. The -7 delay worked well, deployment seemed just about right at apogee. While I will put her up on a D12-7, I think the C11-7 will be my motor of choice until I run out of them.
Recovery:
The streamer is a good size to slow descent just enough but not drift too far. A bit brighter colored streamer would be easier to see, and I'm partial to mylar streamers for this reason. The included streamer is a non-reflective red plastic material. It was singed a bit on the first flight when using 3 squares of wadding so I put in 4 squares of wadding for the second flight. The combination Kevlar cord and braided shock cord were plenty long enough to avoid any BT or fin dents.
Flight Rating: 4 out of 5
Summary:
This kit is very nicely put together and is one of those numerous kits I wanted as a kid but never got a chance to own. InFlight fills a nice hole that was left when Thrustline put their business on hold. Let's hope they add more classic clone kits (an A-20 Demon would nicely round out the early 70s "D" powered fleet).
Overall Rating: 4 out of 5
 |
 |
Flights
|
|