| Construction Rating: | starstarstarstarstar_border |
| Flight Rating: | starstarstarstarstar |
| Overall Rating: | starstarstarstarstar |
| Manufacturer: | Estes  |
 Brief:
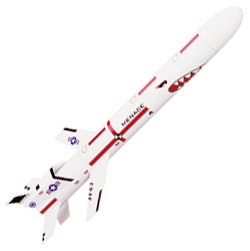
This is a new kit from Estes with cruise missile styling. It is also a rather
large diameter rocket (BT-60). It flies on A-C motors and uses a parachute for
recovery.
Construction:
The kit came in a plastic bag with a front panel showing the finished rocket
with two possible trim schemes. Decals for both are included. The kit included
the body and motor mount tubes, centering rings, retention hook, launch lug,
shock cord, nose cone, die-cut paper scoop, die-cut fin sheet, 18 inch
assembled plastic parachute and decals. After checking that all the components
were accounted for and damage free, I was ready to began construction.
The instructions came complete with illustrations and text. Also included were the fin alignment template and the shock cord mount. This is a skill level 2 kit, so the builder is assumed to have some previous modeling experience. With that in mind, I began construction.
I started with the motor mount. This was very easy to assemble. After it dried and after adding some fillets for strength, I glued it into the body tube.
I then fine sanded the die-cut fin sheet with fine sandpaper. I next carefully cut out the fins. You should have four small fins for the lower portion and two top wings for the top portion. I rounded all leading and trailing edges for better aerodynamic performance. I cut out the fin alignment template and marked all alignment lines. This is a critical alignment. Next I attached the lower fins one at a time with a few minutes drying time between each.
I then punched out the die-cut scoop from its card. I attached it between fins #2 and #4. I found this step just a tad tricky. I now attached the two top wings four inches from the top of fins #2 and #4. In my opinion this is the most critical alignment. If done correctly, you shouldn't have any problems. If not, you will most likely experience some spiraling. After the glue dried, I applied glue to those and to the exterior of the scoop for more strength.
Next I attached the launch lug. I also applied two fillets after it dried. I now assembled the shock cord mount. I was pleased when I found that the shock cord was longer than normally found. Thanks, Estes.
Finally, I trimmed the nose cone and sanded it to remove the molding lines. The instructions called for the parachute to be attached at this time but I always install my chutes after the rocket is finished.
PROS: Easy and rapid construction, Good parts fit.
CONS: Scoop is somewhat tricky to attach and no way to attach interrior fillets.
Finishing:
I started the finishing by spraying the model with white automotive primer and
sanding between coats. I chose the white sharks mouth scheme. I sprayed the
model with gloss white spray enamel. Since no striping material is included,
the instructions reccommend striping tape. Instead, I used Top Flite Monokote
red and black trim sheets along with the supplied decals. Man, I love that
sinister sharks mouth.
I finished the model by spraying the model with gloss clear enamel to protect and seal everything. I decided to use a 12 inch chute that I stole from one of my X-Flyers rather than the 18 inch one. I felt that it was too big for this light of a rocket.
PROS: Decals provided for two trim schemes, Fantastic finished appearance.
CONS: No striping material provided. Striping tape is a tad pricey.
Construction Rating: 4 out of 5
Flight:
Reccommended motors are the A8-3, B4-4 (first flight(, B6-4, C6-5. This rocket
uses recovery wadding to protect the chute and the clip retains the motor. The
chute is packed in the normal manner.
For my first flight, I used an A8-3 since I was flying on a high school football field. The rocket flew straight off the pad and flew to about 120 feet. I felt that it was low, slow and OK but I felt that more power was needed. For the second flight, my friend insisted that I try some of his cellouse wadding istead of the Estes wadding that I normally used. I also loaded up a B6-4. That was a good choice. The rocket flew perfectly to about 300 feet.
PROS: Excellent flight performance.
CONS: None found.
Recovery:
I used a 12 inch chute, so both recoveries were recovered very close to the
pad. I felt that the provided chute was just a tad too big. It may be fine if
you have a lot of space and/or love to run a long distance. On the second
flight, the wadding worked perfectly. Thanks, Dan.
The 12 inch chute also worked well enough to bring the rocket back without any damage. I would highly recommend this.
PROS: Recovers close on a 12 inch chute
CONS: Stock chute just a tad too big.
Flight Rating: 5 out of 5
Summary:
Priced at $10.99, I felt that this kit was a good buy. It was also fun to build
and fly. I feel that Estes did a really good job on this kit. I also feel that
they should keep it in production for a long time. I very highly recommend this
kit.
Main PROS: Good price, Easy construction, Good parts fit, Good instructions, Excellent flight performance. Fantastic appearance.
Main CONS: Should have a 12 inch chute instead of an 18 inch one.
Overall Rating: 5 out of 5
 |
 |
Flights
|
|