| Construction Rating: | starstarstarstarstar |
| Overall Rating: | starstarstarstarstar |
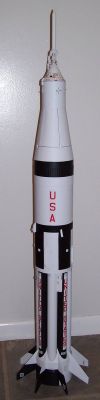
| Diameter: | 3.94 inches |
| Length: | 37.00 inches |
| Manufacturer: | Semroc  |
| Skill Level: | 4 |
| Style: | Clone, Scale |
Brief:
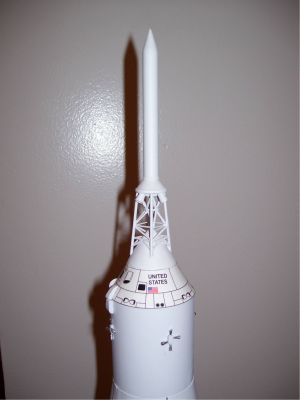
After teasing the rocketry community for nearly a year, Semroc finally released the reproduction 1/70th scale Saturn 1B just in time for Christmas. Faithfully reproduced based upon the 1967 Estes design (K-29), this kit is a very challenging but rewarding build. This is not for the faint hearted, nor for the rocketeer looking for a weekend project. Standard design calls for the original 4x18mm cluster although you can wimp out and use a 24mm single motor option as well.Don't expect it to be an exact match of the original though--the K-39 listed for $9.95 and currently fetches well above $100 on the open market today. The Semroc offering is available for a relatively modest $55.
Construction:
In a surprising break from the usual Semroc kit, this one comes in a box, not a bag. The reason for this is the extensive quantity of parts. The highlights of what you'll find unpacking the special box:
- Apollo capsule kit
- 8 BT-51 body tubes
- BT-70 upper body tube
- BT-100 main body tube
- BT-101 fin can tube
- 2 ST-990 inner tubes
- 4 18mm motor tubes
- 1 24mm motor tube (optional)
- 5 embossed/corrugated wraps
- Cardstock fin skins
- Cardstock/glossy shroud
- Laser-cut balsa fins, assorted details
- Fiber centering rings, details
- 32" plastic chute, elastic shock cord
- Waterslide decals
Building this is quite a project, comparable in complexity to the Apogee Saturn 1B. The instructions are about 30 pages and nearly 100 steps. This is described as a skill level 4 kit and I would say it's at least that, if not a 5. The steps are clearly written and well illustrated so as long as you're careful, you can get through this build without major problems.
One feature to the kit I found to be very helpful: with a number of scaled dimensions getting down to the third decimal place and not exactly working to the nearest 1/16th or even 1/32nd of an inch, Semroc decided to include a preprinted ruler with every dimension already marked, including the construction step number. Now that's convenient!
Before beginning construction, it is essential that you thoroughly read all instructions first all the way through to the paint notes. I say this because if you build exactly as the instructions say, you'll find painting to be a pain and there are alternatives you can pursue along the way that make for a better finish.
 Then comes joining a pair of inside stuffer tubes (ST-990, roughly 24mm) using a coupler. Since the cluster or 24mm motor tube is designed to plug into this tube, a removable mount could be trickier than the typical SLS designs.
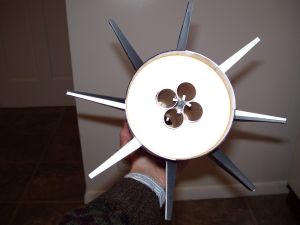
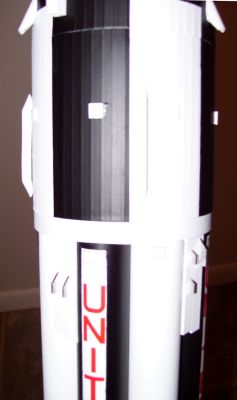
Next up is the 8-tube cluster assembly (these are not actual motor tube clusters as the actual 1B fired a full cluster). If you went with 4x18 motor cluster, 4 of the BT-51 tubes need to have slots cut out a bit to fit around the motor tubes. The cluster assembly starts with a couple of star-pattern centering rings mounted to the stuffer tube, followed by bonding the 8 BT-51 tubes in the corresponding slots in the centering rings. This is one of those steps where, once you've bonded the tubes, you'll be asking yourself, "How am I going to paint those alternating white and black?". I chose to paint my tubes first and bond later, however, that did require some creativity to retro-fit other painted details (I applied many of the techniques from the Apogee kit).
 The aft end of the 8-tube cluster is beefed up a bit with small ribs to which a BT-101 body tube is bonded. Just forward of the BT-101 you bond balsa fairing support pieces. These are a very helpful way to deal with bonding the rolled paper fairing shroud. After rolling/forming the fairing shroud, it slides down the tube assembly from above and bonds to the BT-101. This will be another point at which you're going to wonder how to mask off the black and white patterns plus deal with a potentially nasty seam between the fairing shroud and the BT-101. I wound up bonding my fin can, fins, and fairing shroud offline, painting, then fitting it in after bonding the 8 BT-51 tubes.
At the forward end of the stuffer tube, a couple of centering rings are attached to support the upper BT-70 body tube, which is also the main chute tube. First though, you slide one the BT-101 main body tubes until it slightly overlaps the fuel tanks.
The last of the body construction consists of rolling a cardstock shroud. The shroud has a glossy side, which is very handy if you happen to smear a little extra glue as it can be wiped off easily with a damp cloth.
There are a total of 5 embossed/corrugated wraps. It is best to apply a very thin smearing of white glue to the edges and pull them fairly tightly as you wrap them around the tubes. I found they fit extremely close--one was a little short and the others fit perfectly without trimming. Be sure to fill the tube spirals before applying the wraps though as this is tough to do once the wrap has been applied. Otherwise, you'll wind up sanding right up against the edge of the wrap.
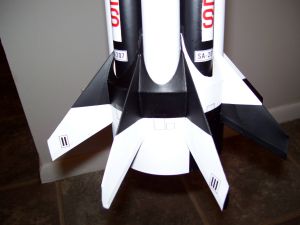
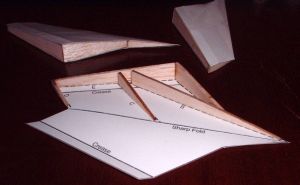 Your second construction choice comes regarding the fins. There are laser-cut 1/8" balsa fins, which are somewhat scale-like and happen to be the easy route. There is also a "built up fin" option made by assembling balsa ribs/frames, then wrapping skins over them. This built up approach is more difficult but offers a much better looking tapered fin. Obviously, if you're building a kit of this magnitude, you're no wimp, and the built-up fins are the only true option...
With the main construction done, it is now time to turn to the details. This is an amazing aspect of this kit and was a pleasant surprise for me (as I'd never built the original Estes). There are a good number of fiber details for tunnels, camera targets, antennae, sensors, latch pads, and covers. There is also a neat little technique for making the 3 discharge tubes. You start by cutting a launch lug at a tapered angle to serve as inner support, then wrap/glue a rolled pattern over it, and finally cutting away a small scallop. See photos for close-up of these and other details.
The last phase of the main rocket construction is the 4 service module nozzles. These are a pain to build but look pretty nice when complete. The main/center body is laser-cut balsa. That's the easy part. The hard part is the nozzles themselves, all 16 of them, cut from a wood dowel that's been cut to a taper via a pencil sharpener. 3/64" on one end and growing to 3/32" at the "fat" end, we're dealing very close to the sharpest tip of the point.
 If you've still got energy and ambition, you're ready for the finishing touch of the construction:building the Apollo capsule. See my Little Joe review for details on this. Suffice it to say I found this a very tedious and overly challenging build and will definitely be looking for a source of 0.041" and 0.058" diameter dowels/wire somewhere before building another Semroc Apollo capsule.
Finishing:
Painting Saturns is about as hard as rocket painting gets. You've got roll patterns, masking around corrugations, and if you followed the directions to letter, you'll find yourself masking over some awkward details.
I'm not going to get into a detailed rehashing of the paint scheme, but I will offer up some of the tips/techniques I applied to get a satisfactory finish.
First, the emphasis is on very light, very thin coats. I used flat white and flat black, which is unforgiving, so I couldn't pile on 4-5 coats without globbing over the corrugations. I used white primer, so could get by with just two base coats, sanding away most of the first one.
When masking, I let the base white coat dry for a full week then used the expensive low tack purple masking tape. Before applying the black, I shot one more light white coat so that it would seal off any miniscule gaps in the masking job. I then followed up with two coats of black.
For the occasional blemish, I was able to touch up using a black Sharpie, which was especially helpful sharpening lines along the corrugations.
Before bonding the details, I also checked the color scheme. It's a lot easier to paint a small fiber panel white then tack it on using CA, than it is to try ot mask it off and paint around it.
The finishing touches are the decals. They apply beautifully but are slightly glossy and therefore noticable against my flat background.

Construction Rating: 5
Flight:
I'll hate to do this, but I wound up picking up two of these kits. The first one was built for display, not for flight, so the flight report is going to have to wait until I've had a chance to build the second one.
With the oversized fins, I have no doubt that this will be a stable flyer.
Summary:
I think I might need to update my Saturn comparative review, as this one definitely stands out in the crowded field. It's almost as detailed as the Apogee but nowhere near as expensive. It's about the same money as the Saturn Press (Peter Alway) Saturn V but much larger and offers more details, albeit it many you have to construct by hand. Overall, I'd have to say this is an even better bang for the buck than a Zooch and that's really saying something. Not that there's anything wrong with these other models (they're all outstanding kits), but this one is hands down the best balance of value and scale detail on the market.
The only con I can offer up the the overly difficult Apollo capsule. It's a good value (sells as a separate kit for $10 if you want a spare), but I'd much rather have dropped another $5 to avoid spending a couple hours sanding down dowels.
Overall Rating: 5
Other Reviews
- Semroc Saturn 1B By Duane and Keith Boldt (October 25, 2009)
Brief: 1/70 scale, 18mm cluster of 4 motors or single 24mm motor mount Construction: 18 body tubes + Apollo capsule kit 8 laser cut balsa fins or more advanced cardstock over balsa frame Choice of single 24mm motor mount of cluster of four 18mm motors 10 centering rings Various dowels for sanding and building capsule escape tower Many other laser cut parts for ...
- Semroc Saturn 1B By Frank Casey
Brief: This is a Retro-Repro kit by Semroc. What is a Retro-Repro? As quoted from Semroc Saturn 1B Instruction Manual: "It is a reproduction of an out-of-production model rocket kit. It is a close approximation of a full scale model of an early historically significant model rocket kit from one of the many companies that pioneered the hobby over the past half century. It is not ...
 |
 |
Flights
|
|
R.M.G. (March 8, 2008)
|
|
D.W.M. (February 4, 2007)