| Construction Rating: | starstarstarstarstar_border |
| Flight Rating: | starstarstarstar_borderstar_border |
| Overall Rating: | starstarstarstarstar_border |
| Manufacturer: | FlisKits  |
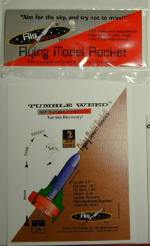
FlisKits is the newest company in town (opened in September 2002) and from my vantage point, they have come in with a big banner-like entrance. I have built kits from 22 different manufacturers and when I received the (3) FlisKits I had ordered, I was initially amazed at the packaging. They are so professional looking that if hanging in a hobby store you would think they were mass-produced in some factory somewhere.
The packaging includes a "hanger" section with a nice FlisKits logo and age recommendation on the front and, on the back, the saying "FlisKits are the Best kits," address and a warning about plastic bags being dangerous. Inside the bag you will find a Full One-Year Warranty with a Limited Liability Statement and the NAR flying code all neatly placed in a separate quarter-folded insert. The other kit I purchased even had a plastic parachute with FlisKits' name and logo on it. Like I said, very professional.
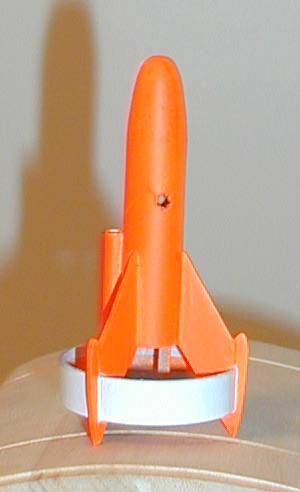 This particular kit is K-SP002, Tumble Weed. It is FlisKits' smallest kit standing only 3.6" tall and using a 13mm body tube. You might place this kit in amongst the Estes Mosquito, Estes Quark, and Rogue Gnat for doing comparisons. The only real problem in the comparisons is that the Tumble Weed is a bit more than three fins and a nose cone. In fact, it has strong resemblances to the old Estes Astron Sprite.
The Tumble Weed kit includes a 13mm body tube and balsa nose cone. There is a sheet of balsa to cut out the fins and a fin template. The tail ring tube finalizes the outer structure. The support items include a motor hook and gauze for mounting the motor hook. Finally there is a 1/8" launch lug.
CONSTRUCTION:
The instructions are printed on both sides of a single sheet of paper. They include an introduction and then 13 steps of assembly instruction with an illustration for nearly every step. At the end of the assembly instructions are some finishing tips. You will need a sharp hobby knife, white glue, fine and medium grit sand paper, a pencil and scissors.
Assembly is straightforward however there are some challenges associated with this rocket due to its small size.
 It is interesting to know that I have serial number #28 as marked on the packaging card. I like the fact it is numbered and if there are problems reported, FlisKits would have a good idea of the number of kits impacted. I did run into three problems with the kit.
One of these problems was identified by an extra sticker placed on the outside of the packaging. It was the fact that the nose cone shoulder needed to be cut down to 1/4" length. The other two problems were not pointed out with a notice and were discovered during the build.
The two problems involve step 1 of the rocket assembly. The instructions mention that there is a port hole pre-cut into the body tube, which was not the case. In addition, the fin marking guide did not fully wrap around the body tube and if used to mark the fins would have caused a misalignment. I caught both of these and resolved them by cutting my own hole and using an Estes fin marking guide to get the three fins equally spaced. FlisKits must have ID'd these just before or while I was building, because when I notified them they pointed me to a correction sheet that was posted under the kit on their website. All of these items were addressed and they included a new fin marking guide.
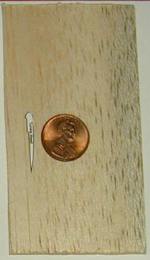 Moving on with assembly, the fins need to be cut out from 1/16" balsa using a card stock template. The large fins are not a problem to cut out, however, the smaller fin tips were challenging. The primary reason is because they were so small (see picture)! FlisKits recognized that some may mistake in cutting the fins and provided at least double the required balsa to be successful. Very thoughtful. Note: Picture to left is the remaining balsa after cutting out my fins.
Once my fins were on, I slid the tail ring down. It did not fit right away and I had just a tad bit of sanding to do on the fins. Once complete, it slid (and was glued) in place. Once in place, I used a block and sandpaper to sand off the excess balsa that stuck out beyond the tail ring. Next, I cut fin tips, held all three together and did the final shaping with sandpaper. These were then glued on.
The motor hook is glued in place and the provided gauze is used to secure it to the body. This is done between two fins. The launch lug is glued between another set of fins, while the vent port is between the last set of fins.
I didn't get too fancy in finishing. I hit the rocket with about 3 coats of primer, sanding in between and then used Krylon Gloss White on the whole rocket. Once dry I taped off the tail ring and nose cone and then painted the exposed rocket with Krylon Fluorescent Orange. Not too bad looking. The kit does not come with any decals.
Overall, for CONSTRUCTION I would rate this kit 4 points. The instructions were fine and the extra balsa was a nice touch. Having to cut out balsa fins has never bothered me, however, it does add a level of challenge to the kit especially the tiny, tiny fin tips. Also, I understand the need for the gauze on the outside of the body, but I don't like its looks.
FLIGHT/RECOVERY:
FlisKits recommends the 1/2A2-3 and the A3-4 motors. They indicate the finished weight is 0.2 ounces, so you know even the 1/2A is going to put some distance between you and the rocket quickly ... so you better have more than 1 spotter. I was able to create a rocksim of the Tumble Weed™ and below is my 3D image and flight simulation from RockSim results.

 The rocket is prepped by simply placing the motor into the bottom and sliding it up until it hits the nose cone shoulder. There is a motor hook, however, it is there to catch the motor upon ejection so that the motor is hanging way back. This makes the rocket unstable so that it will tumble on recovery.
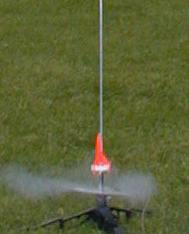
I did all three of my launches on a 1/4A3-2. I really didn't want to loose this little Tumble Weed. The first flight showed just how fast this rocket will come off the pad (I missed the picture, in fact, I missed all 3 flights). Yes, it is very fast. I was able to follow the rocket up, which was not straight but like a very large corkscrew, and I did see ejection. The ejection, with a big "flame-pop", seemed to send the rocket away fast and on another trajectory. The rocket came in stable and hard into the road (didn't tumble) and dented nose cone. The motor had kicked out upon ejection.
For the next 1/4A flight, I bent the motor hook inward a bit to try to prevent the motor from kicking out. This flight was much more straight and it did tumble back. I assumed it tumbled because the motor casing was still in, but I was wrong; the motor kicked out again.
For the third 1/4A flight, I bent the motor hook inward a bit more to try to prevent the motor from kicking out. This flight was also more straight than the first and it tumble recovered. But, the motor kicked on this flight too.
 For FLIGHT/RECOVERY, I would rate this kit 3 ½ points. The rocket, as designed, is not stable unless a motor is in place. If the motor stays in place then it will not tumble during recovery. The motor hook is supposed to keep it in place, however, on my three attempts it did not. Could it be the placement and size of the vent port? Maybe. Is the Tumble Weed a good flier. Yes, in comparison to Estes Mighty Mites, Mosquito, Quark and the likes. And I did find it all three times. On a 1/2A or an A, I would be very afraid of loosing it.
I give the kit an OVERALL rating of 4 points. As FlisKits "mini" entry it definitely competes in looks with the Estes Mosquito and Quark. You'll pay almost double of those kits, but for the distinctive look, it is worth it. I don't understand the motor hook issue I had and I would love to see some set of decals. Building it requires some nimble fingers and patience. Make this rocket an "add-on" when you call FlisKits to purchase any other rocket and you will find it to be a nice rainy day build kit. Also, I will now watch for who converts this one to Quest MicroMaxx motors...maybe it will be me (Idea: get rid of the motor hook, add MMaxx motor mount, add needed nose weight to make stable).
Other Reviews
- FlisKits Tumble Weed By Al Duprey
Brief: I am partial to ring fin rockets. The Sprite was the first rocket I built at 11 years old. This kit will not disappoint with its fine materials, classic form, and good looks but has a little higher price than that Sprite I built. Supposed to be a tumble recovery but more on that later. Construction: The kit includes a small body tube, balsa nose cone, balsa sheet, ...
- FlisKits Tumble Weed By Carl Tulanko
(by Carl Tulanko - 05/20/03) Brief: The FlisKits "Tumble Weed" Model Rocket Kit had caught my eye on the FlisKits website when I was looking to purchase a Nomad, so I had it added to my order. It's by far the smallest rocket in their line, resembling somewhat a dressed up Mosquito and it is designed to fly on 13mm motors. However, upon arrival I knew this was much more than ...
 |
 |
Flights
|
|
K.R.E. (June 28, 2003)
M.J.S. (October 5, 2003)
|
|
FlisKits (October 31, 2002)