| Construction Rating: | starstarstarstarstar_border |
| Flight Rating: | starstarstarstar_borderstar_border |
| Overall Rating: | starstarstarstarstar_border |
| Manufacturer: | Mercury Engineering  |
 Brief:
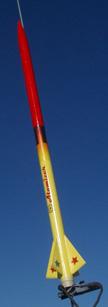
The Atomizer is a long, thin single-stage rocket designed for high performance. Its slender minimum-diameter profile
allows it to reach great heights on a 24mm motor. Normally I don't go for 3FNC or 4FNC designs. However, I had recently
bought some long-burning Apogee Medalist motors and I wanted something that would really take advantage of them. The
Atomizer has attractive styling combined with the high performance that I was looking for.
Construction:
Parts List:
- 24" BT-50 BT
- Balsa Nose Cone
- 4 Laser-cut balsa fins
- 1/4" screw eye
- Twin 30" nylon streamers
- 36" x 1/4" elastic shock cord
- 2" x 3/16" launch lug
- 2 24mm engine blocks
- Decals
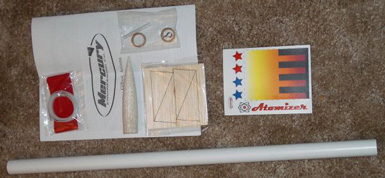 The materials provided all appeared to be high quality. The
white body tube had only very light spirals. The nose cone was made of good dense balsa, and the fins were cleanly cut.
The materials provided all appeared to be high quality. The
white body tube had only very light spirals. The nose cone was made of good dense balsa, and the fins were cleanly cut.
Unfortunately, my body tube had a kink in it about 10 inches from one end. I won't blame Mercury for this since there is a good chance I damaged it while it was buried in my build pile. I did not want the tube to buckle during flight so I cut the tube at the kink and installed a balsa bulkhead, thus creating a payload bay.
The instructions are printed on three full-sized sheets. The line art illustrations and clearly written text compare well with Estes. I had two minor quibbles:
- The shock cord anchor is printed on the back of some instructions. If it had been moved to another page, it could be cut out without ruining any text.
- The tube marking guide is just an end view. I prefer wrap-around guides.
The first step is to install two engine block spacers into the rear of the tube, spaced 3/4-inch apart. Why two? According to Solomon at Mercury Engineering, the front ring helps to strengthen the tube from damage during hard landings. The longer E and F motors that I wanted to use would not fit with the rear ring in places, so I skipped the rear ring and only installed the front one.
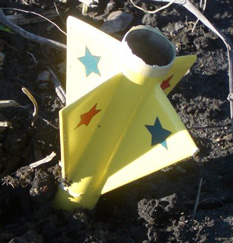
The fins are standard surface-mounted balsa fins. Because I planned to exceed the recommended motor size, I chose to reinforce the fins. First After sanding an airfoil onto the fin, I coated it with a thin layer Great Plains Yellow Glue. I then immediately wrapped typing paper around the fin and pressed it under a stack of magazines to hold it flat. After the glue dried, I soaked the paper with thin CA. When that dried, I sanded the fin smooth. The resulting fin is very strong and has an almost plastic-like finish.
The directions call for the fins to be glued flush with the rear of the tube. Because there is no engine hook in this minimum diameter design, I mounted the fins 1/2 inch up to leave myself a surface for taping the motor in place.
To provide extra strength to the fin bond, I used FixIt clay epoxy from Apogee to create fillets. The resulting fillets were very strong and quite smooth.
The rest of the build is typical of most Skill Level 1 kit: glue on the launch lug; attach the shock cord with a tri-fold paper mount; attach the streamers to shock cord; attach the shock cord to the nose cone (or bulkhead in my case).
 Finishing:
The recommended paint job on this rocket is pretty easy: paint the nose cone red and everything else white. The
Atomizer comes with a very nice decal that fades from red to yellow, so I painted the lower section Sunshine Yellow to
match the decal. The nose cone and payload bay I painted Apple Red. Of course I used white primer underneath the finish
coat. All my paints are Rustoleum Painters Touch.
The waterslide decals on this kit are very nice. The graphics are clean and sharp and the decal material is plenty strong. I had no difficulty applying them. One thing to be aware of: the decal is printed on a clear background with no white base underneath it. This requires the builder to paint the model with a light-colored background like white or yellow.
The gradient wrap near the front and the Atomizer logo on the side do a nice job of setting this kit apart from many other simple 4FNC rockets.
Construction Rating: 4 out of 5
Flight:
The motors recommended for this kit are the C11-7 (1000' projected altitude) and the D12-7 (1700'). According to
RockSim, the optimal delay for a C11 is 5.6 seconds, so I would recommend using the C11-5 instead of the C11-7.
This minimum-diameter rocket does not have an engine hook. Masking tape is used to retain the motor during ejection. Other than that, launch preparation is typical of other streamer rockets. I used a few squares of wadding to protect the streamers.
My intention for the flight testing was to walk up the power curve, starting with a C11 and ending with an Apogee Medalist E6-8. An E9 with a projected altitude of 2250 feet and an E6 with a altitude of 3450 feet would have both set new personal altitude records for me.
For the maiden flight I used a C11-5. The Atomizer zipped quickly off the pad, straight up despite the gusty winds. The streamers deployed cleanly right at apogee. It descended quickly but safely to a landing in soft mud about 30 feet from road. Beautiful flight!
 For the second flight a few minutes later, I skipped the D12 and
went for the E9-8. Again the Atomizer zipped quickly off the pad to about 50 feet, then went unstable. It completed 4
tight loops before burnout, then tumbled to the ground. Because of the reinforced fins and fillets, the rocket suffered
no damage even though the streamers didn't deploy until long after it hit the ground.
For the second flight a few minutes later, I skipped the D12 and
went for the E9-8. Again the Atomizer zipped quickly off the pad to about 50 feet, then went unstable. It completed 4
tight loops before burnout, then tumbled to the ground. Because of the reinforced fins and fillets, the rocket suffered
no damage even though the streamers didn't deploy until long after it hit the ground.
To be safe, I loaded the rocket with a fresh C11 and measured the balance point. Then I replaced the C11 with an E9 and added payload weight (small potatoes that I picked up from the recently-harvested field) until the balance point matched the C11.
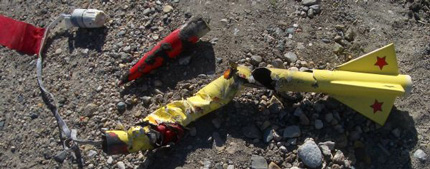
This third flight, with an E9-8, was quite spectacular. The rocket zoomed quickly to about 60 feet, then did one-and-a-half loops. It then flew arrow-straight into the ground, penetrating right up to the fins. The nose cone and body tube were destroyed. About all that was salvageable from the wreckage was the fin can and the streamers.
 Hmmmm... what went wrong? According to RockSim, I should have had
1.49 calibers of static stability margin, so it SHOULD have been stable. Obviously it wasn't. Maybe that heavy E9
engine moved the CG too far back?
Hmmmm... what went wrong? According to RockSim, I should have had
1.49 calibers of static stability margin, so it SHOULD have been stable. Obviously it wasn't. Maybe that heavy E9
engine moved the CG too far back?
I am somewhat at a loss to explain the two unstable flights, especially the final one. Granted, my fin reinforcement added a little weight in the rear, and I did slide the fins 1/2 inch forward, but these have very minor effects on the stability margin. Using the heavier E9 engine also degraded the stability margin, but RockSim says it should have been stable, even with an F21W engine.
The only thing I can think of is that a wind gust caused the CP to move forward, leading to wind-induced instability. This phenomenon is described well in this article by Bob Dahlquist.
Flight Rating: 3 out of 5
Summary:
The Atomizer is a high-performance rocket with attractive styling.
PROS:
- High performance
- Good looks, especially the decals
- Good customer support
Overall Rating: 4 out of 5
Other:
After I shared my unfortunate launch results on The Rocketry Forum, Solomon from Mercury Engineering contacted me and
offered to replace the kit. I declined his kind offer since it was not their fault. Still, it was a classy gesture on
Solomon's part. In an ironic twist to the story, I received a fresh Atomized during The Rocketry Forum's Secret Santa
gift exchange. I certainly hope to have better luck with this one.
Other Reviews
- Mercury Engineering Atomizer By Chan Stevens (October 19, 2007)
Brief: This is a basic 4 fin minimum diameter 24mm rocket designed for impressive altitude performance. Construction: After ordering online, my kit shipped same day and arrived 2 days later priority mail (very reasonable shipping to boot!) and carefully packed. Parts are all very good quality with a very professional header card and sealed bag. Balsa nose cone ...
 |
 |
Flights
|
|