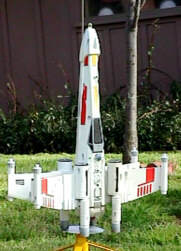
North Coast Rocketry Star Wars X-Wing Fighter
North Coast Rocketry - Star Wars X-Wing Fighter {Kit} (NCR 3540)
Contributed by Thomas Beach
| Length: | 20.00 inches |
| Manufacturer: | North Coast Rocketry  |
| Style: | Futuristic/Exotic |
![[NAR]](images/archive/images/link_nartitle.gif)
The following excerpt is from "Sport Rocketry". The intention is to allow guests to get a basic feeling about a kit. We strongly suggest that you get a copy of the referenced Sport Rocketry and read the entire article. Inside you will find many helpful hints in construction as well as other useful information. For more information, use the two links above.
(Sport Rocketry - Sep/Oct 1997 - page 10 - by Thomas Beach)
"The North Coast X-Wing is a much stronger, heavier model designed for flights on F and G motors."
"There is a discrepancy in the wing layout diagram involving the shape for the wing joiner pieces, but the instruction steps were clear enough to follow."
"I encountered problems with the overall assembly of the vacuformed body parts and the internal parts."
"I also found the internal parts simply would not fit together inside the vacuformed fuselage until I cut off 3/8" from the rear of the spruce spar."
"Once the parts went together, I was very pleased with the fit of the vacuformed parts. This is usually the most difficult part of assembling any vacuformed model . . ."
"Once the main structure is complete, the final steps go very quickly . . ."
"I'm not a big fan of peel-and-stick decals, but the ones supplied with the X-Wing were actually very good . . ."
"The boost was stable and looked great . . ."
The entire article gives the impression is that this model is expensive and should only be considered for an experienced modeler.
GUEST's OPINION:
"2/00 - Construction: I found it to be somewhat challenging to do the main vac formed body, where careful cutting,sanding and filling is required. Fortunately, most of the rest of the rocket is not difficult to put together, but there are lots and lots of pieces to assemble. Having some skills in building plastic model kits helps here, as there is more of this type of assembly than most other rocket kits. The best part of the construction? X-wings are supposed to be well used and dirty, so smudges, smears, 'oopses' and streaks add character. When I was all done, my spankin' new X-wing looked wrong somehow, so I had to borrow some weathering tips from railroad hobbyists to get a more 'realistic' appearance. The best effect is to sand the graphite tip of a pencil to get a fine powder, and then smear this on in creative ways with your fingertip. A coat of dullcote then seals this on. I applied the decals afterward, and did not seal over them with anything. They are very durable, and any nicks would only add to the model's 'realism'. (As if X-wings are real!)
"FLIGHT: Success? OUCH! Try try again...
"Recovery system---Watch out!!! I learned first hand that you better be careful with the recovery system if you build it as is. This model is rear ejection, and you need to pack the large nylon chute, and a big, fat, long shock cord around the engine mount, and then slide this into the rear of the rocket. It takes a whole lot-O-stuffin' to get it in there!!! And you need every last inch of that shock cord, which had also better be treated really, really carefully...
"As assembled according to the instructions, the chute attaches to the motor mount, which is then attached via the shock cord to the rest of the rocket. This means that if the shock cord breaks, the motor mount comes gently to earth via the chute, while the rest of the rocket does a spectacular death plunge.
"Sooo.....on my first flight with an F62, it had a spectacular lift off. Perfect boost, straight up, perhaps 250 feet (not much for an F engine, but this thing is heavy and draggy), then nice coast phase, picture perfect apogee, and nice ejection. Uh oh. When an F62 ejects, it EJECTS. The problem is that the rear ejection motor mount shoots out like a CANNON, which kept on going as if the shock cord was not even there. Snap!! and the aforementioned spectacular death plunge occurred. It didn't really auger in very deep as the ground was cold and hard. The main vac formed body helped break the fall by completely disintegrating. The rest of the components scattered into a really interesting pile of X-wing detritus. Oh the humanity...
"Resolution and Recovery:
As I carted home a brown bag full of X-wing parts, I pondered what went wrong. Did I nick the shock cord, creating a weak spot? Can't say, but it is apparent now that the rear mount configuration butts the engine right up against a solid bulkhead. This bulkhead is what the engine pushes on during boost, and what creates such cannon-like velocities upon ejection. There is no volume for the ejection charge to dissipate into; it is like a piston in a cylinder. I can't imagine what using a G engine would be like!
"When I got home and inspected the wreckage, I was surprised to see (which I did not notice at the launch/disaster site due to my being in a state of trauma) that even though the rocket was in many pieces, each of the pieces was intact!!! Wow. I slowly and methodically fitted each together, and realized that this bird would live again!!! Except for the vac formed main body, which was reduced to tiny plastic shavings, I had another chance.
"Calling the fine folks at Estes got me a new set of vac formed body halves, and a new decal sheet. It is now finished, and looks the same as before, with a few new details added, like piping and wiring details to the engines. And now for the recovery system. I decided that the engine mount could be sacrificed, so the chute now attaches to the rocket directly via it's own shock cord. A slip knot holds the engine mount shock cord and the parachute shock cord together to prevent tangling, but if the engine mount decides to take off again, it will go all by itself, and leave the parachute attached to the rocket. I have yet to fly it again, as I weigh the risk against the need to know if I got it right this time." (J.K.)
 |
 |