Pemberton Technologies Space Ark Jr
Pemberton Technologies - Space Ark Jr {Kit}
Contributed by Geof Givens
| Construction Rating: | starstarstarstar_borderstar_border |
| Flight Rating: | starstarstarstarstar_border |
| Overall Rating: | starstarstarstar_borderstar_border |
| Manufacturer: | Pemberton Technologies  |
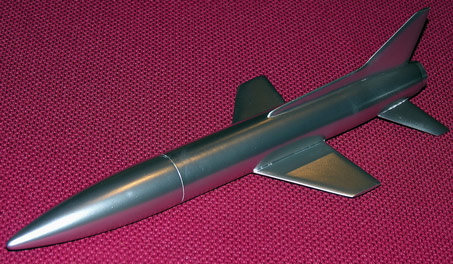 Brief:
The Space Ark Jr. is a downscale of Pemberton Technology's midpower rocket. Layne Pemberton offers a lot of really
cool retro-futuristic designs. He's also a nice guy whose instruction booklets are well known for their humorous
off-beat writing style.
Construction:
The package arrived with all necessary parts in good condition, except that the balsa nose cone had a couple small
dings. After reading a back-story about the Ruskie commies, Martians, and gung-ho American heroes, it was time to start
the build.
First came insertion of lead ballast in the nose cone, and some general sanding and filling. The fins are cut from stock balsa using paper fin patterns. I had some difficulty because the instructions referred to various fins with names like "wing" and "horizontal stabilizer", but the patterns/figures had no labels identifying which was which. By process of elimination, I eventually figured it out.
To attach the fins, alignment lines must be drawn on the tailcone. This was a very tricky process. The installation was made more difficult by the approach of through-the-tail-cone fin installation. It would have been much easier and surely sufficiently strong to surface mount the wings with an appropriate shape cut along the root edges. Also, the fin tabs weren't slanted, which was also a bit confusing.
The extra-long Kevlar® shock cord was glued to the outside surface of the motor mount tube, and this assembly was pushed/glued in the tail cone. Because the cord lay against the exterior of the motor tube, I found it impossible to insert the tube into the tail cone. I had to cut a trough inside the tail cone to make room for the cord. It was still a snug fit.
The rest of the assembly, including the remaining fins, was straightforward with one exception. I was confused about how far back along the airframe to mount the wings. I guesstimated it from the picture and adjusted slightly further back for safety. I skipped the fin-tip pods because these sorts of things tend to snap off so easily.
Finishing:
Finishing was mostly straighforward. I fill and sand before assembly, so all that remained was touchup and then
painting. With this retro-futuristic design, metallic paint is a great way to go, so I chose silver. The only tricky
part is getting the spray into the crevices above the crossbar.
Construction Rating: 3 out of 5
Flight:
My problems occurred during the flight, which was unstable. I was a bit rushed so I quickly looked at the recommended
motors (B6-2 through E18) and chose a B6-4 because it was what I had. Rather than wrap the 18mm motor in duct tape (as
recommended) for friction fitting (the only option), I used a spend 24mm casing as a motor adapter. This works well and
should be lighter than a large quantity of duct tape.
I failed to notice two instruction points about flying. The instructions clearly said to string test the rocket before flying. Also, in the middle of construction step three, away from the sections on flight prep, launch, and recommended motors is a sentence that says that a 48in rod is required for B motors.
Clearly it is my fault for not following the instructions, but I have a couple comments. First, he string test recommendation is sensible, but I think it is reasonable to believe that any commercially marketed model kit would have the CG/CP relationship sufficiently above minimum safety margins that modest variations in construction techniques by various builders should not cause problems for recommended motors. Why flirt so close the edge? Perhaps I placed the wings too far forward.
Second, I would suggest that the comment about 48in rods be moved to the recommended motor section; it is easy to overlook in the construction section. Actually, I would omit B motors from the recommended list altogether since most LPR Estes motor fliers might not have a 48in rod on hand and might not understand the importance of the extra rod length. I understand it, but I didn't notice the advice.
Anyway, the rocket became unstable after leaving the rod, doing the typical "bumblebee" flight pattern. Upon crashing, the aft portion of the rudder broke. Repair is possible.
Flight Rating: 4 out of 5
Summary:
Because of my experience, it is unfair to judge flight performance for this rocket. I have rated it on my expected
performance, knowing about PemTech's other kits. Quality of parts was fine, construction was mostly straighforward with
a few difficulties, style was fantastic, and I expect that flight should be good.
Overall Rating: 3 out of 5
Other Reviews
- Pemberton Technologies Space Ark Jr By Todd Mullin (January 26, 2008)
Brief: The Space Ark Jr. is a half-scale low power version of Pemberton Technologies' (Pem-Tech) mid power Space Ark. It is a single stage, parachute recovery model of the rocket seen in the sci-fi classic "When Worlds Collide". I got my Space Ark Jr. as a matched signed/numbered edition (#8) at the time Pem-Tech released their new low power line of products with their ...
 |
 |
Flights
|
|
G.H.G. (September 9, 2008)
M.A. (September 12, 2008)
|
|
P.T. (September 8, 2008)