| Construction Rating: | starstarstarstarstar |
| Flight Rating: | starstarstarstarstar |
| Overall Rating: | starstarstarstarstar |
| Diameter: | 1.33 inches |
| Length: | 30.50 inches |
| Manufacturer: | FlisKits  |
| Skill Level: | 4 |
| Style: | Futuristic/Exotic |
Brief:
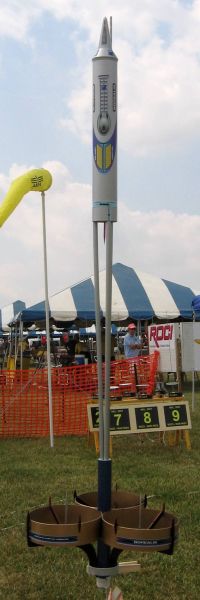
Another absolutely wild futuristic design by the mad scientist/evil genius Jim Flis, featuring primarily ring fin stability and ducted ejection plus a nose cone sure to draw a strong like/hate opinion...
Construction:
While you might be a little scared off by the $28.95 retail price on this, when you open up the kit and start to look over the amount and quality of parts, you'll find it's really a decent value, especially factoring in the eye appeal of the finished kit. The parts list includes:
- 3 BT-101 ring fins
- BT-55 upper body tube
- BT-60 lower body ring/support
- 2 BT-20 lower body tubes, one of which serves as motor mount
- BT-5 body tube, serves as central support to BT-101
- BT-2 transition body tubes (3)
- Balsa nose cone
- Laser cut fiber fins, jigs
- 16" plastic chute kit
- Kevlar/elastic shock cord
- Decorative toothpicks
- Peel and stick vinyl decals
The instructions are very good, clearly illustrated, and span 35 basic steps over 6 pages. It's rated a skill level 3.5 on a 5 scale, though that strikes me as slightly high. While it certainly looks like a complex build, I found it much easier than expected, and the design and fit on this is outstanding. I'd expect 5-8 hours of construction time plus some potentially time consuming finishing.
There are a couple of "gotchas" and tips I'll get out up front on this. Early releases of the kit had an incorrect laser cut fiber fin sheet. I think this has generally been handled via replacements being made available almost immediately after the kit's release at NARCON in March 2007, but if you pick one up from a retailer, you might want to email the folks at FlisKits to confirm you have a good set of fins. I got a hold of an early one (#55) at NARCON, and the corrected fins made it to my home practically before I made it back.
The other warning is to really think through how you want to paint this before you go too deep in the construction. If you want to use sharply contrasting colors, you'll find it easier to paint parts before bonding (masking off bond lines). This thing would be a real menace to try to mask once built, forcing you to hand paint many details.
Construction begins with the funky motor mount. You start off with a standard 2.75 inch BT-20 tube, but the forward end is a 20/5 centering ring with a BT-5 stuck to the end of it. On the other end of the BT-5 is another centering ring holding another BT-20. This gives you a pair of BT-20s connected with 1.125" of exposed BT-5. That gap is critical, as the instruction note that the BT-101s go there and can be used to test the fit/alignment.
Next, you get to work on the BT-101 rings. Because the tubes are only 1.125" tall, they are pretty pliable and don't retain their circular shape very well. This makes marking them tricky. Each tube gets a set of fiber fin braces tacked to it at 12, 3 and 9 o'clock position with one of the braces trailing down below the tube at the 6 o'clock position. This trailing end eventually attaches to the lower BT-20 for support.
The transition from the lower BT-20 to the upper BT-55 is accomplished via a trio of BT-2 tubes. The alignment of these is somewhat challenging. At the forward end, they are spaced via two laser-cut/drilled fiber centering disks spaced about an inch apart, which also serves as the Kevlar® shock cord anchor point. At the aft end, there's another pair of centering disks with tighter spacing basically forcing the tubes together. The aft disks slide into the upper BT-20, and the forward disks slide into the BT-55. To make sure you get everything perfectly aligned, there's even a little jig made from various laser cut fiber pieces and a template printed on the back of the header card. You'll want to make sure you get good solid glue joints around the disks, as they take a lot of ejection gas force.
With the basic frame of the BT-20s, trio of BT-2s, and upper BT-55 in place, you can now bond the BT-101 rings on place. As previously noted, these slip perfectly in the 1.125" gap between the BT-20s, resting flush against the BT-5. The trailing fiber rib/fin/supports are bonded to the lower BT-20, and a little BT-60 ring slides over them to secure them in place. If you've got everything right, you'll wind up with BT-101s touching each other on tangents and touching the BT-5 on a tangent as well. Again, it sounds and looks complex but is remarkably easy and hard to goof with the instructions and supporting jigs/alignment techniques.
At this point, construction is basically done save for some decorative touches (toothpicks stuck in various nooks and crannies) and attaching the launch lugs (one piece flush to the BT-60, another to the BT-20 with a standoff). I cheated a little bit by trimming down the launch lug to match the width of the BT-60, avoiding an ugly hanging tube.
Finishing:
OK, if you really want a beautiful finish on this, be prepared for some serious work/effort. If you want to fly it within a day or two of construction, you can certainly whip through the finish and hand paint a few pieces, and it will look fine.
First off, I wound up filling tube spirals before construction, knowing there was no way I'd be able to sand this with any force once built. Note that this includes the BT-2s and the insides of the BT-101s, which I forgot to do, and the BT-60 ring, which have some downright nasty grooves in them.
I wound up painting my Borealis in modules. The lower BT-20s (masked off the BT-5 for a naked bonding surface) got primer followed by three coats of Rustoleum blue metallic. The BT-2 trio got the same treatment but with silver metallic, as did the upper BT-55 and nose cone. The BT-101 rings got gold metallic before bonding the fiber fins. The fiber fins got gloss black, and I followed up by hand painting the edges a bright red. The lower BT-60 got silver metallic, again before bonding. I hand painted the assorted toothpick details red before bonding and tacked in place using a tiny dot of CA to avoid paint runs.
I've got to toss in a comment or two about the decals on this. In general, FlisKits's kits rarely use decals and when they do they're either excellent quality waterslides (ex. U.S.S. Grissom) or the peel and sticks that so many of us absolutely hate (ex. Cheetah, Flea). Recognizing that many a FlisKits's kit would be greatly improved with decorative decals, Jim's been doing a lot of R & D in this area. The resulting process was introduced shortly before NARCON 2007 in the form of range box stickers printed on vinyl stock. The quality of the artwork and reproduction is superb, the decals are fairly thin/flexible, and therefore are easy to work with. The adhesive is also top quality (once cured out, you'll never get 'em off).
I'm generally anti-stickers, but think these vinyl decals are a great addition to a sport design (too thick for scale). Even better--these are also pre-cut, so you don't need to waste time trimming to the edge lines with scissors. I just wish I'd paid attention to that little note in the instructions, as I wound up cutting mine first and then wondering why little wispy edges were peeling off...
Construction Rating: 5 out of 5
Flight:
For the maiden flight, I hooked up with Jim Flis at the National Sport Launch 2007 in Muncie, Indiana. Holding the Borealis in my hands, it felt incredibly fragile, so I figured what better place to destroy it than in front of the designer, where I might score a free replacement. Jim commented that he'd flown a number of prototypes without problem, but mine would be the first he'd ever seen of someone else flying one.
I went aggressive for the first flight, choosing a C6-3. I figured with the big rings and long body, it would be high drag, but it tore off the pad and climbed at a fast clip. Apogee was nose up, though very slowly climbing at that point. With all the doodads and trimmings on this, like the Night Whisperer, you definitely want an early deployment rather than a nose-down deployment or you will break off trimmings, so stick with the B6-2 or C6-3.
Recovery:
The 16" chute brought it safely back to earth. Despite a number of unfortunate flights and damage on just about everything that hit the dry/hard ground that weekend, the Borealis suffered no damage whatsoever and wound up spending the rest of the weekend on display at the FlisKits booth. It was a wonderful flight, and I look forward to another shot at flying it.
Flight Rating: 5 out of 5
Summary:
This is a great rocket with nothing but pros--cool design, not too tough to build, flies beautifully, and really nice decals.
Overall Rating: 5 out of 5
Other Reviews
- FlisKits Borealis By Ted Jones (March 2, 2009)
The Borealis is not only a unique looking rocket, it also provides a unique construction challenge. A quick look at the rocket suggests fragility, but don't be fooled. If properly assembled (the instructions provided are excellent), this is in fact an extremely durable kit. Appearances are also deceiving in terms of flight characteristics. This rocket gets off the pad quickly, flies great, and ...
 |
 |
Flights
|
|