Always Ready Rocketry Predator Jr.
Always Ready Rocketry - Predator Jr {Kit}
Contributed by Ken Tsai
| Construction Rating: | starstarstarstarstar_border |
| Flight Rating: | starstarstarstarstar_border |
| Overall Rating: | starstarstarstarstar_border |
| Published: | 2010-04-16 |
| Manufacturer: | Always Ready Rocketry  |
Brief:
I often fly underpowered. I like low and slow for the most part, and enjoy watching the entire
show rather than seeing a rocket disappear into the sky and waiting impatiently attempting to re-acquire it.
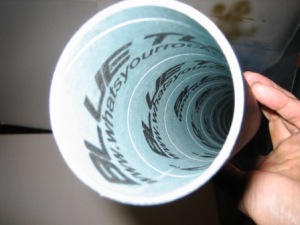
Sometimes, though, it's fun to see a rocket just disappear in an instant. Of course, building rockets that can survive high g-force abuse requires more strength. Without going to full composites, Blue Tube offers that strength in a very convenient package. I'd been looking at Blue Tube for a while, and when they released the 2.0 version, I thought it was time to give it a try.
I really didn't want to do minimum diameter - too many motor retention issues. I've gotten the friction fit wrong too often and have lost too many cases. With dual deploy, I may try it again since there won't be the motor eject event shooting the case out the rear, but that's for the future.
Enter the Always Ready Rocketry Predator Jr.
At roughly the same time, Aerotech released the larger 38/1320 case. A few e-mails back and forth between Randall (owner of ARR, and the manufacturer for Blue Tube) and myself led to an updated Predator Jr capable of flying the longer case, and the kit was on the way in early January 2010.
The Predator Jr. is a single stage, high performance, near minimum diameter rocket. How do you make a 3FNC rocket
even simpler? How about using a one-piece fin can? This rocket uses the ACME single piece molded reinforced resin fin
can. There's a weight penalty to using it, but the advantages are easier alignment (none), and no bevelling (already
air-foiled). Besides, at over 3 lbs, this is high power, and weight really isn't that much of an issue with these
motors. If you're looking for altitude, you actually have to ADD weight to this rocket to get maximum height from the
largest motors you can fit. Speed demons are a different story, though.
Construction:
Component list:
- 1 36" 54 mm airframe tube (booster)
- 1 24" 54 mm airframe tube (payload)
- 1 26" 38 mm motor tube
- 1 38 mm ACME fin can
- 1 54 mm Pinnacle nose cone
- 6 phenolic centering rings
- 1 wire anchor
- 1 38 mm electronics bay kit
- 2 long lengths of 1/2" tubular nylon.
- 2 rail buttons
- assorted nuts/bolts/washers.
Aside from the 6 centering rings, it's a pretty typical assortment of parts and pieces.
Instructions? There aren't any. The motor tube was pre-marked with pencil lines for the various parts, and the booster tube was pre-slotted for the fin can.
Really, for how simple this kit is, instructions aren't really necessary. Build it in the typical order of a standard 3FNC rocket, and it should be pretty straightforward.
 I
started with the motor mount. As I noted above, 6 centering rings was an unusual approach... In fact, it's 3 pairs of
concentric rings. The inner ring is snug against the outside of the motor tube. The outer ring is essentially 54mm
coupler, and slides nicely inside the airframe tube. There's a really small gap between the two, but when slathered
with epoxy, it's not an issue.
I
started with the motor mount. As I noted above, 6 centering rings was an unusual approach... In fact, it's 3 pairs of
concentric rings. The inner ring is snug against the outside of the motor tube. The outer ring is essentially 54mm
coupler, and slides nicely inside the airframe tube. There's a really small gap between the two, but when slathered
with epoxy, it's not an issue.
 I
started by cutting a channel in the smaller rings for the shock cord anchor wire to pass through. Once I got the fit I
wanted, I slid the anchor wire over the motor tube, and the inner rings over the anchor wire using liberal amounts of
epoxy. Once that cured, I slathered the inner rings with epoxy and slid the outer rings over the inner rings forming
the full width centering rings. Just for grins, I added chopped fiberglass to some epoxy and made fillets for the top
and bottom of each ring. Those rings aren't going anywhere without ripping the motor tube to shreds.
I
started by cutting a channel in the smaller rings for the shock cord anchor wire to pass through. Once I got the fit I
wanted, I slid the anchor wire over the motor tube, and the inner rings over the anchor wire using liberal amounts of
epoxy. Once that cured, I slathered the inner rings with epoxy and slid the outer rings over the inner rings forming
the full width centering rings. Just for grins, I added chopped fiberglass to some epoxy and made fillets for the top
and bottom of each ring. Those rings aren't going anywhere without ripping the motor tube to shreds.
At the bottom of the motor tube, I tacked the fin can in place, leaving ~1/2" at the bottom to attach an Aeropack 38mm retainer. The retainer was attached using JB Weld per the Aeropack instructions.
Since the fin can was moved up, I extended the slots in the booster to accommodate the new position.
 A quick dry
fit showed the slots were too short, so I extended them a little more. Lather, rinse, repeat. Blue Tube is tough to
cut. Next time, I'm pulling out the router. Eventually, I got the slots to the right length.
A quick dry
fit showed the slots were too short, so I extended them a little more. Lather, rinse, repeat. Blue Tube is tough to
cut. Next time, I'm pulling out the router. Eventually, I got the slots to the right length.
Onward. Time to mount the motor tube in the airframe. How the $#@%$#@??? do you glue a 26" long motor tube? There's no way to get glue on the rings and hope it stays. By the time the mount is slid in place, you'll have epoxy smeared up and down the entire airframe tube, and Murphy's law says that exactly NONE of it will be where you want it to be.
 While pondering the motor tube conundrum, I figured I'd do the e-bay. The electronics bay assembled
quickly and easily. Instead of a stiffy tube running the entire length, a couple of rings epoxied to the inner walls
act as bulkhead stops. The plywood bulkheads rest against these while being sandwiched by 6-32 threaded rods, nuts and
washers. In the center of each bulkhead is a 1/4-20 eyebolt for attachment of various tether lines. A couple small
brass tubes are glued to the plywood sled, and the sled assembly slides into the bay riding on the threaded rods. A
1" ring of 54mm airframe is glued to the middle of the bay, completing the bay construction.
While pondering the motor tube conundrum, I figured I'd do the e-bay. The electronics bay assembled
quickly and easily. Instead of a stiffy tube running the entire length, a couple of rings epoxied to the inner walls
act as bulkhead stops. The plywood bulkheads rest against these while being sandwiched by 6-32 threaded rods, nuts and
washers. In the center of each bulkhead is a 1/4-20 eyebolt for attachment of various tether lines. A couple small
brass tubes are glued to the plywood sled, and the sled assembly slides into the bay riding on the threaded rods. A
1" ring of 54mm airframe is glued to the middle of the bay, completing the bay construction.
Back to the motor tube. Well, I give up. I went ahead and slathered the rings hoping that something would stay. On the airframe tube, I put a bunch of epoxy where the upper ring should be, and then slid the whole assembly in. The top of the upper ring ended up with a nice amount of epoxy pooling on top of the ring. Good enough. On the bottom side, I took a 1" piece of coupler and epoxied it to the airframe behind the fin can. Now the entire motor tube is sandwiched between the coupler in the back and the pool of epoxy in the front. That's about the best I could come up with, and it sure seems solid enough.
Finishing:
There's actually very little to do for surface prep with Blue Tube. A few coats of sanding
sealer like Minwax furniture sealer fills the spirals nicely. It also soaks into the Blue Tube forming a nice vapor
barrier against moisture. You still can't dunk it in a pool to clean it off, but it's nice extra protection against a
light rain.
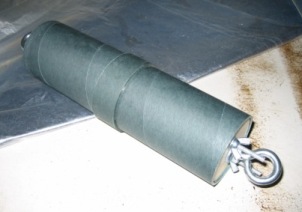
I painted the bottom purple, and the top white. I masked off a couple rings right around the e-bay so that it has a series of fading stripes from the white to the purple and vice versa.
If you've seen some of my other reviews, you may have caught that I tend to fly rockets naked. It's a superstition that goes way back with me. The more time I spend finishing the rocket prior to it's first flight, the greater the likelihood of something bad happening.
That said, the size, weight, and flight performance of the Predator Jr means that it probably won't fly at our local field, so it's a high power only rocket. That means at most 4-5 chances to fly it per year. Well, with so few opportunities, I went ahead and painted it.
When a superstition is based on empirical fact, is it really superstition? This is the most expensive rocket I've built to date. Why not make it look good? This is the most expensive rocket I've built to date? How stupid of me to ignore historical trends.
Construction Rating: 4 out of 5
Flight:
With this rocket there were a lot of "firsts" for me:
- My first 100% Blue Tube rocket
- My first "Dart"
- My first Dual Deploy flight
- My first L2 flight attempt (yes, attempt )
- My first motor CATO...
Pretty obvious what happened, yes?
3/27/2010 was my first opportunity to fly the Predator Jr, and also my first opportunity to make a L2 cert attempt. Serendipity, right? How could I not use my "strongest" rocket for a cert flight? Unfortunately, the largest 38mm J engine on site was a CTI J330 at ~760 Ns. This wouldn't be a neck snapping 8000' flight with a 1000+ Ns J motor, but it was still plenty big.
A quick shakedown flight with an H118 produced a picture perfect flight to 1181' with the altimeter deploying the drogue as planned at apogee and 750' for the main.
So on to the main event!
Yup, my first CATO. Roughly 1.5s into the flight, it looks like the nozzle/rear closure cracked and blew out the back end. In any other non-composite rocket, I'm 100% sure this would have been a total shred of at least the booster section; it was that violent.
The pressure ripped the Aeropack retainer and the bottom 1" of the motor tube right out leaving a jagged shear line. The ACME fin can that's supposed to be indestructible? I got small pieces on the rear chipped off. The Blue Tube motor mount and the fin can appear to have absorbed the brunt of the forces, for the rear of the 54mm airframe is in perfect shape.
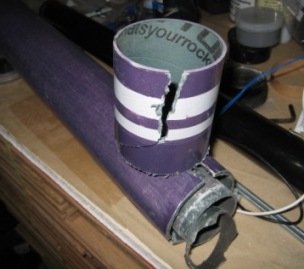 At
the front of the booster section, there is a ~3" zipper where the Kevlar®
shock cord and the wire anchor tore through. Again, only 3" zipper for the level of force that was displayed is
pretty amazing.
At
the front of the booster section, there is a ~3" zipper where the Kevlar®
shock cord and the wire anchor tore through. Again, only 3" zipper for the level of force that was displayed is
pretty amazing.
I've seen videos and pictures of CATOs at points in flight similar to mine, and there's usually very little left to recover. I'm loving the fact that this bird is going to fly again after relatively minimal repairs!
Blue Tube is TOUGH STUFF!
Recovery:
For drogue, I used an 18" Top Flight parachute. The main chute was a 36" chute from
Public Missiles with a spill hole. I think the drogue was a little big. For the shakedown flight at 1181 feet, it
didn't matter, but coming down from 6000+ will probably need a smaller chute.
The manufacturer says to just let it separate and tumble down, but I think I'll go with a 7x70 streamer, or perhaps a small 14" chute.
Flight Rating: 4 out of 5
Summary:
Overall, I really love this kit. It's a lot of fun, and represents a ton of new experiences for
me. Because of that, I'm sure the Predator will always have a special appeal to me. Just like the very first rocket I
ever flew.
Repairs are already under way, and I hope to have the Predator Jr ready to fly again for the May 2010 launch. I haven't decided if I'll make another L2 attempt with this rocket. While I'm sure that it can handle it, the fact is that the performance envelope of this rocket on a J motor is high enough that the error margins are notably smaller. It would be a lot less stressful trying to certify with a bigger 4" rocket that flies low and slow. And I get to watch the entire flight.
Overall Rating: 4 out of 5
 |
 |
Flights
|
|