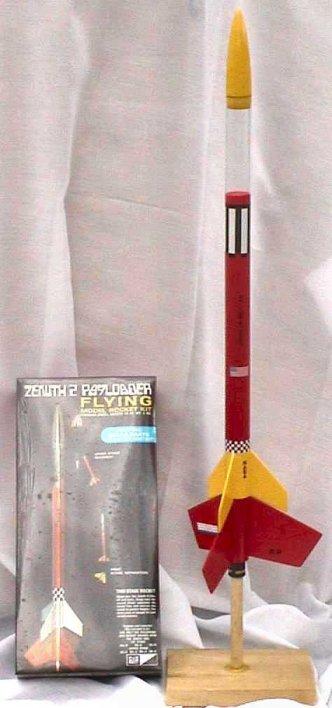
MPC Zenith 2 Payloader
MPC - Zenith 2 Payloader {Kit} (R-211) [1970-1978]
Contributed by Fred Nardei
| Diameter: | 0.98 inches |
| Length: | 15.00 inches |
| Manufacturer: | MPC |
| Style: | Payload |
Review copied, with permission, from Sky High Hobbies.
 Brief:
The Zenith 2 Payloader is a high flying 2 stage rocket with a clear plastic payload bay. It still lives on today as a slightly larger Zenith 2 Payloader rocket from QUEST Rockets. This was one of the molds that Quest bought from MPC when they went out of business.
It's a fairly straight forward design with 3 slightly larger fins on the first stage, and 3 smaller sharper fins on the 2nd stage boost rocket. The nose cone and coupler that joins the booster to the clear payload bay are both made of balsa.
The kit contains:
The Zenith 2 Payloader is one of the Mach 10 series of MPC rocket kits. It comes in a card board box and doesn't have vacuum formed detail parts that the plastic packaged MPC kits have. It does come with a block of permanent flame proof wadding and a good amount of water slide decals. It has some roll patterns and you can choose to deck it out as a NASA bird or an Air Force bird.
Construction:
Assembly began by gluing the booster joiner tube into the first stage tube. Once again correct measurements on these parts and the engine mounts is critical for getting all of the stages to fit together properly. The engine mounts were assembled and glued and set aside to dry. It's very important to follow the instructions to get the engine mount centering rings in their proper position so that the stages will seat together correctly. As they were drying both sets of fins were cut from their sheets. Each set of 3 were pinned and sanded to be identically sized. Then they were unpinned and formed by sanding compound angles into the leading and trailing edges. The booster and 1st stage tube were put together and the lines for the fins were measured and drawn on both stages together. When the fins were ready to be glued on I followed what I normally do to get multistage rockets to look and perform their best. Which is . When mounting the fins on this, or any other, multistage rocket, I've found that it is best to do it while all of the stages are fitted together. I start with the last stage and work my way up the rocket. When all of the fins are secured to the last stage I move to the next progressive stage making sure each fin is lined up with the fin behind it. This makes for a very neat and precise appearance. It also insures that the rocket will have very stable flights.
I painted the payload tube coupler before gluing it into the payload tube. Use plastic cement, not wood glue, to join the coupler to the plastic payload tube. The metal eye screw was then screwed and glued into the center of the bottom of the payload coupler. The nose cone is not glued on but it must have a nice snug fit. To get the best fit, Sand it or add scotch tape as you may need. You don't want it popping off at apogee and spewing your payload bay's contents out at 2000 feet AGL. I assembled the 10" six sided parachute using the latching swivel hook and it gets attached to the eye screw on the payload tube coupler. The shock cord is also tied to the eye screw and mounted to the booster tube by, again, threading the cord through 3 holes in a piece of card stock and gluing it into the booster tube far enough in so that it won't interfere with the chute or nose cone. I gave this high flying bird A Great yellow and red paint job in keeping with it's classic scheme.
Summary:
After having built many Quest produced Zenith 2 Payloader rocket kits, I really enjoyed getting my hands on the original. It’s a lot of fun working with the older style balsa parts like the nose cone and coupler. Most of these types of parts are plastic on modern kits. It takes a little bit of skill and a lot of care to get the fins lined up just right, but it is not too difficult to do. Once you do get them all lined up nicely, and get a smooth shiny paint job on it, you may agree with me that it’s one of the best looking rockets in the MPC line-up.
 |
 |
Flights
|
|
|
|
Bill Eichelberger (September 3, 2014)
The March 8, 2014 flight picture is awesome!