| Construction Rating: | starstarstar_borderstar_borderstar_border |
| Flight Rating: | starstarstarstarstar_border |
| Overall Rating: | starstarstarstar_borderstar_border |
| Manufacturer: | Model Minutes  |
My second "paper build" from one of the free rockets downloaded from Internet was the Model Minutes Tricarrow (See my "Free" Paper-Rocket Comparison Page). This one has two PDF's to downloaded and print. I printed it on 110lb Card Stock (Georgia Pacific brand purchased from WalMart). The instructions are not downloadable and are only on the web. They also do not appear to be finished as the "Balancing" and "Preparation for Takeoff" do not have any information. But, moving on . . .
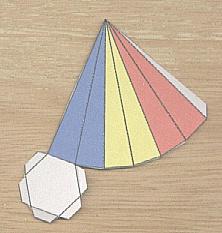
The rocket patterns were all contained on two pages, one was the body tube and nose cone and the other was the fins. On the first page there was a colored and non-color pattern for the body tube and nose cone.
You will need to provide a recovery system. The instructions show a parachute, but I went with a streamer. You will also need clay nose weight and a piece of 1/4" foam board. Interestingly, you will also need to provide a launch lug (I think they should have provided a template for one)
Model Minutes recommends using a transparent wood glue for assembly.

CONSTRUCTION:
A few highlights of the building process are below. There are a few unique characteristics about this rocket (when compared to other paper-only rockets) that include the hexagonal shape, the nose cone and the fins.
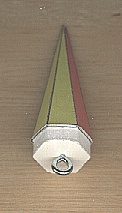 The nose cone is probably the hardest item to build. It is hexagonal in shape and has a cap that needs to be cut around carefully. The hexagonal shape makes it fairly easy to form a symmetrical cone. Once shaped and before gluing the cap over, the nose cone is filled with modeling clay. The instructions say 'oil based'. I used Plast-i-Clay Modeling Clay that I purchased from Ben-Franklins. This has to be done carefully so that the nose cone does not become deformed.
After the clay is in, the cap is glued in place. Then using a template, you are to cut out a nose cone shoulder from a 1/4" thick piece of foam board. This is then glued onto the cap. Lastly you add a eye-screw that is long enough to screw through the 1/4" foam board and into the clay.
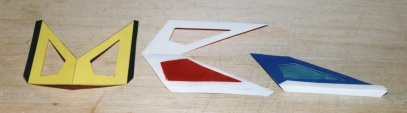
The fins can be finished two ways. The simple way is to cut out the pattern and glue them together. They are simply a doubling over of the paper and then where they attach to the body tube and folded outward. The second way is to cut out the fins and also to cut out the center section. Then a piece of transparent colored film is placed into the fin when it is doubled over. Model Minutes suggest letting the fins dry in a book to help keep them flat.
The body tube is also hexagonal and so a light scribe on the lines helps you achieve a symmetrical shape. The body tube has a glue tab that is used to make the seam. This makes the seam raised a bit.
The instructions tell you to make a thrust ring from paper (did not provide a pattern). They also tell you to make a launch lug from paper (did not provide a pattern) or to use a straw.
For the recovery system, I used 32 inches of 1/32" Kevlar® for my shock cord. It was attached using the 3-fold paper method (a pattern was provided) to the body tube. It was tied to the eye-screw.
I added a 24" x 3/4" Nomex® Streamer. I cut this from a roll of Nomex® that I had purchased from the now defunct Rogue Aerospace many years ago.
Overall, for CONSTRUCTION I would rate this rocket 2 ½ points. Even though it is a "free" rocket, the online instructions suffered from incompleteness and language translation. Now on the other hand, the pictures were great! You can see some of them throughout the review. In addition, I believe the hexagonal shape is a great way to start with "paper building" techniques.
FLIGHT/RECOVERY:
Model Minutes did not indicate an expected weight or recommended motors. My rocket weighed in a about 0.6 ounces.
My first flight was on an A8-3. The motor is friction fit into the motor mount until it hits the thrust ring. I added a couple of balls of wadding and rolled the streamer. Everything was ready.
The flight was impressive as I was surprised at how stable and straight it flew. I actually expected trouble because my doubled-over fins were not a perfectly flat as one would hope. But the large fins certainly makes the rocket stable. Ejection on the A8-3 was early since it was still clearly heading upward.
The second flight was on a B6-4. Again straight off the pad. Just when thrust stopped something happened. A fin tore from the rocket and it flipped and flopped in the tracking smoke until ejection and then fell to the ground. Interestingly the fin did not tear at the joint, rather, it tore from about 1/2" out from the body and down. Not what I would expect.
Thought of repair never entered my head, so I salvaged the recovery system and threw away the rocket.
For FLIGHT/RECOVERY, I would rate this rocket 4 points. I'm struggling with the rating on this because the Tricarrow flies very well. It is super stable and flies straight as an arrow. Of coarse the second flight broke apart. I'm giving it a 4 to recognize that failed flight, but wonder if it was because my fins were not so straight (see picture above - look close) and that put too much stress on them or what?
I give the rocket an OVERALL rating of 3 points. As a "free" rocket it provides a bit of unique fun having to build it from paper. The instructions are marginal, but again with the pictures it can be understood. The flights appear to be great . . . not mine, but I'm sure I'm the exception. The nose cone is excellent, with the foam board shoulder and eye-screw. All-in-all an average. Might try building this one again with the see-through fins.
Other Reviews
- Model Minutes Tricarrow By Daniel Kirk
This rocket is a free download in .PDF format. You just have to print on cardstock and build. (Some additional parts required.) This rocket prints on two pages. It has a hexagonal body tube and nose. Its 3 fins are cut from two layers of cardstock and glued together. Fins include attachment tabs that make it easier to glue them to the body tube. The directions recommend 110 lb cardstock. ...
 |
 |