Balsa Machining Service Astron Invader (Clone of the Month)
Balsa Machining Service - Astron Invader {Kit}
Contributed by Chan Stevens
| Construction Rating: | starstarstarstarstar_border |
| Flight Rating: | starstarstar_borderstar_borderstar_border |
| Overall Rating: | starstarstarstar_borderstar_border |
| Manufacturer: | Balsa Machining Service  |
Brief:
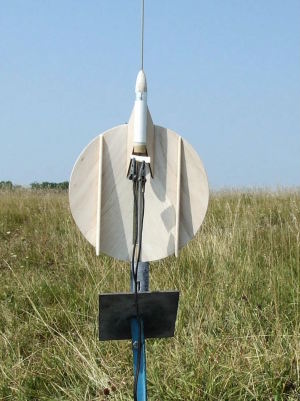
Best described as a flying pie plate, this is another in the BMS clone of the month program offerings. This particular kit is a clone of the K-19 Astron Invader, introduced in the 1966 Estes catalog, making the original only a year younger than this modeler.
Designed to be a spit-motor glider, it's a very finicky design but worth the effort for a decent glide.
Construction:
There is a bit of controversy over whether or not the parts are true reproductions or slightly modified (see construction notes), but my kit included:
- 18mm motor tube
- Balsa nose cone
- Laser cut 1/8" balsa fins, braces, etc.
- 3 3/16" balsa sheets
- Launch lug, nose weight
BMS's clone kits do not include directions. Instead, the modeler is pointed to online scanned instructions at places such as JimZ's archive site. This is a nice approach, as it saves everyone a small amount of money for printing, especially since most of the readers of this review can probably build this near a computer.
Construction starts by gluing together the balsa sheets. With the original, this appears to have required 4 sheets bonded together side by side, from which a large circle was cut. In my case, there were only 3 sheets, and it looked like the cutting was already done, as my three parts already formed a circle once bonded.
Next, I had to mark several lines on the circle using a pattern sheet, including the center line. Then, I cut the circle in half, flipped one side over, and rebonded at a dihedral using the supplied dihedral angle tool/stand. Very handy little piece... The reason behind flipping the one side is so that the grains of each piece wind up being bonded at an angle to each other, offering much better boost strength.
After allowing the wing to completely cure (think overnight), it was time to bond the various laser-cut balsa trim pieces. First came a pair of rudders, each of which were to be sanded for a very slight angle to better align with the dihedral wings. After that came the pair of motor tube braces, which are carefully aligned to lines drawn on the wings earlier. Finally there is a two-piece keel to go on the bottom. I have no idea why it was two-piece other than possibly offering a little extra strength against hard landings.
The nose cone is supposed to be glued into the BT-20, but you might want to wait until trimming first--including a test flight (with it taped on)--as it takes very subtle adjustment of nose weight and CG to get right. The original kit used a lead washer, although the BMS clone opts for clay to be crammed into a pre-drilled hole in the nose cone. Give some serious thought to ditching the clay for a few BBs or lead shot and epoxy, as even a slight pressure in packing the clay will cause the nose cone to split open.
CG is supposed to be 2-15/16" aft of the leading edge of the plate, however, mine tended to fly like a tank when hand tossing in that configuration.
Finishing:
Normally for a glider, you do not wan to add weight for stufflike filling grains and painting. The original kit recommended painting the underside black for easy tracking, and the top side orange to better spotting in the grass. I decided to go with much lighter dope, 50% thinned, just on the underside until I could get a few decent flights in.
Construction Rating: 4 out of 5
Flight:
This clearly wants short delays, so I figured 1/2A6-2, A8-3, or maybe even a B4-2 would do. After the fits I had trying to hand toss and trim it, I decided to go a very conservative first flight with the 1/2A6-2. In general, I think this is too wimpy a motor for it, and it should go with at least an A8.
The flight pitched up almost immediately off the rod, arcing over and heading right back to Earth. Continuing the pitch though, it completed the somersault and headed back up very briefly before finishing the thrust, spitting the motor, and trying to find a glide orientation in the meager 10 feet of accumulated altitude.
The flight was certainly not enough to tell me anything about the glide or trim, but was cause for investigation on the unstable path. Looking at it more closely, I noticed the motor tube was slightly angled, resulting in a nose-up slant, which amplifies the natural pitch up of a decent glider. This should be purely horizontal or even 1-2 degrees angled nose-down to counteract the pitch. I'll have to rework it a bit before flying again.
Recovery:
The first flight, while sloppy, was fairly harmless and everything survived fine.
Flight Rating: 2 out of 5
Summary:
This is certainly an unusual design, and I have to take the blame for the flight performance against my construction, not the kit or the parts. It's a finicky beast, but I think will be worth the extra effort to work out the kinks.
Overall Rating: 3 out of 5
Other Reviews
- Balsa Machining Service Astron Invader (Clone of the Month) By Dick Stafford (March 27, 2010)
Brief: I won this kit in EMRR's end-of-2009 Quarterly Rocket Give-Away, so I'll first give a hat tip to Nick. {TIP} This clone of the Estes K-19 Astron Invader is a odd-roc glider that has been described as a Flying Pie Plate . Its flight profile has been questionable, so Of Death belongs in the nickname too. So, that's what I'll call mine. After reading the reviews and given my ...
 |
 |
Flights
|
|