| Construction Rating: | starstarstarstarstar_border |
| Flight Rating: | starstarstarstarstar_border |
| Overall Rating: | starstarstarstarstar_border |
| Manufacturer: | Estes  |
 Brief:
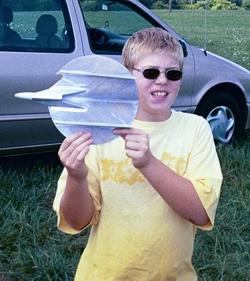
The Estes Astron Invader is one of the least seen, yet also one of the most interesting rockets produced by Estes in the early years of their existence. Available only from 1965 to 1967, the Invader may have had the distinction of being the first of the early kits to have it’s production run canceled. Despite this, and in some ways because of it, the Invader is one of the most uniquely challenging cloning projects from the early days of organized rocketry.
Construction:
- 1/8" balsa sheet
- 3/32" balsa sheet
- BNC-20B (available from Balsa Machining Services)
- BT-20J body tube (2.75")
- Nose weight
- Launch lug
One nice thing about cloning the Astron Invader is that it is a project that can be started, finished and flown over the course of a weekend. The limited number of parts and finish options combined with the excellence of the original plans (downloaded from JimZ’s site) make for a quick, relatively fool-proof build. I only deviated from the instructions in the installation of the nose weight. Estes no longer makes the old lead nose weights and I turned the house upside down trying to find a suitable replacement. Just as I was about to give up I noticed a magnet (the type used in place of pins to hold on name tags, lapel pins, etc.) hanging on the refrigerator. I glued it directly to the rear of the nose cone with thick CA and to my great surprise, it actually worked. The glide wasn’t perfect, but for a starting point it wasn’t bad.
Finishing:
This is where I made my mistake. I made three flights with my Invader, all of them entertaining. While the flight pattern wasn’t terribly smooth, it also wasn’t the disaster that I was privately sure it would be. From this initial success I got cocky. I thought the rocket would look good with a light coat of metallic silver paint before it made it’s QUARK debut that following Saturday. Then, since the silver rubbed off on everything, I followed with a light coat of semi-gloss. Surely the little bit of weight added by the paint couldn’t hurt, right? Hugely wrong. Read on.
Construction Rating: 4 out of 5
 Flight:
I awoke one blistering hot day this summer to find the house unexpectedly empty. With my son spending the day at an amusement park and my wife and daughter on an outlet shopping binge, I was free to do as I pleased. Despite the heat, I chose to head up to quasi-legendary B6-4 Field to launch a few of the projects that I had been working on. The unpainted Invader was first on this list. Armed with two packs of the newly re-introduced 1/2A6-2’s that I had bought especially for the occasion, I gave the Invader first flight honors. It didn’t disappoint. It did a surprisingly quick, tight loop off the pad, coasted upside down through the delay period, then returned to right side up after the surprisingly loud ejection charge. It settled into a steep, short, fluttering glide and came to a rest in the only green spot remaining on the field at that point in the summer. (The drainage ditch, thankfully dry.) For the second flight I added a small bit of clay to the nose and chose an A8-3, hoping for a little more height and maybe a better glide. I got more than I bargained for. The Invader left the pad far more quickly and immediately began doing a series of acrobatic loops, not unlike a sideways “figure 8,” before settling into a slightly slower, less steep glide. I added more clay for flight #3 and went back to the 1/2A6-2. Though still a low, tight loop, the glide was noticeably improved with the Invader gliding for close to 50 feet after the ejection. That settled it. I was ready to spring it on my fellow QUARK’ers.
But first, a classy silver paint job!
Needless to say, flight #4 pranged badly 15 feet from the pad, shattering both of the pylons that connected the motor tube to the body. Literally. When I tried to repair the Invader later, chunks of balsa came off of the shredded pylons as I attempted to sand them back into flyable shape. Clearly I had erred, and now I needed to try some somewhat hesitant repairs. I replaced the shattered pylons and sanded off as much of the offending paint as I could. This seemed to be surprisingly adequate and the Invader made several additional successful flights before destroying itself by power-pranging the one electric line at the Summit County Fairgrounds in NE Ohio on Labor Day weekend. With no adequate method to fix the damaged balsa without replacing most of one wing, I decided to retire my first Astron Invader to the balsa bone yard and try again at a later date.
Flight Rating: 4 out of 5
Summary:
As I said earlier, the Astron Invader is a great project if you are short on time before your next launch, but still want to show up at the pad with something new. You’ll undoubtedly get a lot of puzzled “What’s that?” due to the short shelf life of the original, but it is almost guaranteed to be the only one on the flight line. Depending on your building and trimming skills, you might also wind up with a lot of “What was that?” as you carry the remaining scraps of balsa to the resurrection pile.
PRO’s:
Seldom seen “classic?”
Overall sense of “What’s next?”
Quick build
Oddball looks
CON’s:
Trimming difficulty and overall sensitivity
Estes no longer sells nose weights
Overall Rating: 4 out of 5
Recommended Motors: 1/2A6-2, A8-3, B4-2, B4-4
 |
 |
Flights
|
|
|
|
Wallace Jones (August 1, 2011)
I initially launched my scratch built version from plans with a A8-3. It did a loop right off the launch rod, but did not have enough altitude to clear the ground. Skidded along ground until ejection charge fired. Tried again with a B6-4 and longer launch rod. Went straight off the launch rod a few feet than did a tight loop. Flew horizontal about ten feet off the ground under power for a couple of yards. Ejection charge spit the engine out and it went into a steep dive to the ground. I think a even more powerfull engine is required because I built this one exactly according to plan with proper balance point and weight. It is such a heavy model that a bigger engine may be necessary to give it some altitude. Model held together with no damage so I think it will take the stress of a bigger engine. Will update.