| Construction Rating: | starstarstarstarstar |
| Flight Rating: | starstarstarstarstar_border |
| Overall Rating: | starstarstarstarstar |
| Diameter: | 4.00 inches |
| Length: | 39.00 inches |
| Manufacturer: | Aerotech  |
| Skill Level: | 3 |
| Style: | Sport |
Brief:
This is a very sturdy 4 inch diameter, 39 inch tall advanced model rocket made by AeroTech. It is a stubby model
capable of handling anything from G to H power, sports piston ejection, and comes equipped with a 29mm motor mount.
Construction:
The component list for this rocket is:
- 1 4 inch diameter, 23 inch long pre-slotted cardboard body tube
- 4 pre-shaped plastic fins
- 1 12 inch long, cardboard motor tube
- 1 16 inch long plastic nose cone
- 1 piston cap
- 1 piston sleeve
- 1 motor hook
- 2 four-fin FIN-LOK rings
- 3 centering rings
- 1 bulkhead disk
- 1 spacer, HP motor (black tube)
- 1 spacer, Hobby motor (yellow tube)
- 1 ejection gas baffle
- 1 screw eye
- 1 18' long by 5/8" wide elastic shock cord
- 1 two ¼ inch launch lugs
- 1 42 inch diameter hexagonal nylon parachute
- 2 piston buckles
- 1 decal sheet
- 1 instructions
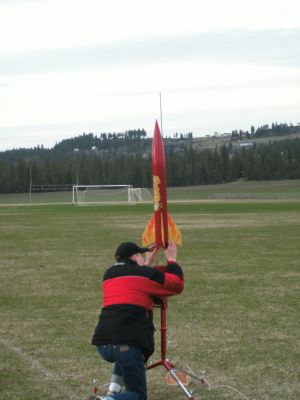
This rocket was an absolute dream to assemble. I have already built two AeroTech kits, so I could have built this without the instructions. However, I chose to use them because I am cautious about every rocket I build. I did modify the rocket a bit after it wounded itself a couple of times. Those modifications will be explained in the flight portion of this review. The instructions tell you to use CA glue for the construction, but I used 5 minute epoxy which worked great. The instructions were thorough and had some good accompanying illustrations. The construction started with the motor mount. The motor mount tube has a pre-drawn line down its length, allowing you to make precise measurements on the tube. The middle centering ring is slid onto the "back end" of the motor mount tube with the motor hook under it (unlike on Estes rockets, the tab on the motor hook that would normally go through the motor tube goes the "wrong" way so that it hooks behind the middle centering ring, making a very solid attachment of the hook). The front FIN-LOK ring is slid onto the tube so that the back edge of it is 4 inches from the "back end" of the tube. The rear FIN-LOK ring is then slid on until it's front edge is 1-15/16" from the back end. The FIN-LOK rings must be aligned, otherwise the fins will not fit. All these components are glued into place--and don't get glue in the FIN-LOKs! The ejection gas baffle cap is then glued into the opposite end of the tube, and the forward centering ring is glued on top of the baffle cap. The motor mount assembly is inserted into the slotted end of the body tube and the FIN-LOK rings are lined up with the slots. Glue is applied to the whole root edge of one fin, the fin is inserted into one of the slots, and it is snapped into the FIN-LOK rings. The same is done for the other three fins. The fins are filleted with glue and internal fillets are applied inside the fin-can. The rear centering ring is then slid into place and glued. On the forward centering ring, an airtight seal of glue is applied in order for the piston ejection system to work properly. Tie the shock cord to the screw eye, screw it through the bulkhead disk, and then screw it into the baffle cap on top of the motor mount. The piston cap is glued into the piston sleeve an eighth of an inch from one end of the sleeve. The piston is then fastened to the shock cord with two plastic buckles. You will probably notice that the piston is too large to fit into the body tube at this point. Since I have read the other reviews for this rocket, I was not surprised at this. I do not think that an "advanced model rocket" such as this should be able to be assembled in one's underwear, standing on one's head, and with one's hair ablaze (in other words, "should not be easily assembled"). A little sanding never hurt anybody. I would recommend priming and sanding the piston smooth after getting it the right size to remove the "fuzzies" and make it smoother. Lastly, the nose cone and parachute are then attached to the shock cord. My rocket weighed in at 38 ounces. That's it for construction!
Finishing:
Finishing couldn't have been simpler. Since the instructions just say, "paint this red, paint that yellow,"
and because New Holland is a company which sells farm equipment that is painted red and yellow, I decided to have a
little joke with the paint on this rocket. I primed and sanded the rocket several times but did not fill the spirals as
they are not deep. I then proceeded to paint the fins New Holland yellow, not protecting anything from the overspray. I
scuffed the yellow overspray on the rocket with 400 grit sandpaper, masked the fins, and painted the rest of the model
with New Holland red. I allowed the paint about a week to fully dry and de-gas before applying the self-adhesive
decals. I cut out the decals, dipped them in slightly soapy water, and applied them to the rocket. The finished result
was fabulous!
Construction Rating: 5 out of 5
Flight:
Now for the really good stuff--the flying! I now have five flights on the rocket, and it is scheduled for three more
at our next launch. The first flight was on a single use G79-4W. Instead of using a masking tape thrust ring (ugh!) as
outlined in the instructions, I used a piece of PVC pipe with an inside diameter just large enough to fit over the
motor's forward closure and long enough so that when it butts up against the baffle cap (used as a thrust ring) the
motor is retained by the motor hook. I also put a small amount of sheep wool wadding around the baffle cap to lengthen
the shock cord's life. Since its readily available, I use unwashed sheep wool for my recovery wadding. It is
flameproof, cheap (in my case its free), and easy to use. Unlike toilet paper or tissue which smolders when blown upon,
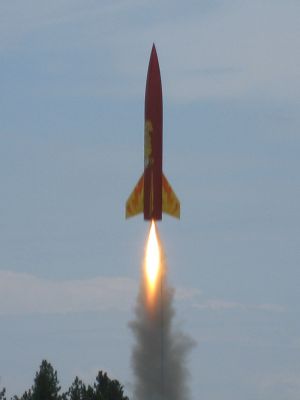
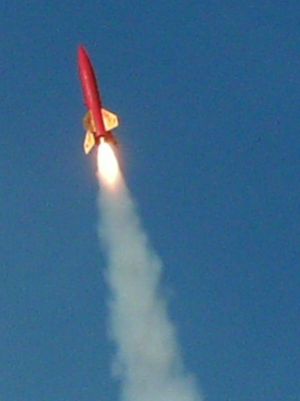
sheep wool is put out by the slightest breeze (if you can even get it to catch fire). The first flight was spectacular:
huge roar, long crackling white flame, tons of billowing smoke, and about 900ft AGL. The delay was right at apogee, the
chute inflated, and it touched down without a scratch about 300 feet away. AeroTech advertises this rocket as "a
short, fat rocket with slow lift-offs." On the G79W it went quite a bit faster than I would call "slow,"
but that's just my opinion.
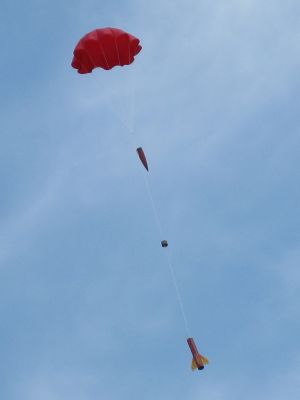
The second flight (on the same day) was on a G38-4FJ. It was not nearly as loud as the previous flight, but it was what I would call a slow liftoff. Ejection occurred just as the model turned nose down (about 550ft), the parachute opened, but it somehow got tangled around the piston, reefing the chute slightly. It landed with a bounce about 150 feet away. One fin fillet was cracked and the rear end of the body tube had a large crescent shaped ding in it. I used a piece of 4" tube coupler to reinforce the tail end of the rocket, put epoxy over the cracked fillet, and added about 3 ounces of nose weight (I was afraid that the tube coupler would hurt the rocket's stability). The rocket then weighed about 43 ounces.
The third flight was on another G79-4W with the same great flame, smoke, and roar as on the first flight. It was noticeably slower off the pad than before and the ejection was right on. The peak altitude was around 800ft. The 42" parachute was too small for the heavier weight of the rocket, and it recovered about 300 feet out with a cracked fillet (the same one that I repaired) and a kink in the tip of one fin. It was time for more mods.
I unscrewed the screw eye from the baffle cap and noticed that the bulkhead disk was slightly charred. So I cut out a piece of flat tin the same shape as the disk and epoxied the tin onto the disk to keep it from burning. I then epoxied the screw eye into the baffle cap. The shock cord is now attached via a quick link. I also scrapped the elastic cord and used a piece of 3/16" nylon rope instead. For those of you who don't like rope for use in rockets, just think about this. What is the rope tied to? In my rocket's case, its tied to a quick link which has a tensile strength of 220lb. What is the quick link attached to? A mild steel screw eye which has a tensile strength of under 100lb. This screw is in turn screwed into a piece of plastic (the baffle cap). Since this recovery system was designed to work in this rocket, a piece of tubular nylon capable of withstanding two tons of force is not needed.
The piston is now modified with a long nut, washer, and 2 eye bolts so that the shock cord is actually in two sections: one from rocket to piston, and the other from piston to nose cone. The eye bolts only need to be unscrewed to remove either section of the shock cord from the piston. I also made a 60 inch diameter parachute out of red ripstop nylon to be used instead of the kit's 42" one. Since this chute is so huge, I turned the piston around so that the piston cap faces the tail end of the rocket instead of the nose end. This gave me a lot more room, but it still wasn't enough to fit the parachute.
I cut off the bottom of the nose cone so the shoulder is now only 2 inches long. The nose cone had a pronounced wiggle after this. I then made a bulkhead plate with a U-bolt for shock cord attachment out of ½" plywood, inserted it as far as I could in the nose cone, and epoxied it firmly in place. The chute now fits easily. The bulkhead was also slightly out-of-round which eliminated the aforementioned pronounced wiggle of the nose cone.
I also made a cool way to retain your RMS casing. I cut out two strips of aluminum sheet 3/8 inches wide by about 2-¾ inches long. I marked a line on each one about ½ inch from one end and made a 90 degree bend at this line. I then drilled two 1/16 inch holes in the long ends of the resulting "L" shaped pieces (all of these measurements are approximate because the device is permanently installed in the rocket and I didn't write down the actual measurements). I procured two screws and in the short end of each piece drilled a hole slightly smaller than the diameter of the screws. With the same drill bit I then drilled two holes in the aft centering ring about ¼ inch away from the motor tube on each side is such a way that they did not interfere with the operation of the motor hook. I then inserted my "L" shaped brackets into the tail of the rocket short end down and screwed them into the rocket by hand. The result is two posts with holes in them sticking above the motor tube. In the flange on the aft closure of my RMS casing, I drilled two holes which line up with the holes in the brackets. If done correctly, this system allows the motor to be quickly and easily safety wired into the rocket, eliminating any chance of the casing ejecting.
Instead of the yellow, poor fitting cardboard spacer supplied with the kit for use with the RMS casing, I had my dad make an aluminum one on the lathe which fit perfectly. You will also notice that the instructions recommend wrapping masking tape around the junction between the motor tube and the aft end of the motor with masking tape to, "prevent any ejection gas from escaping around motor." This is a totally unnecessary step. If the ejection gas "wants out" it could just escape through the nozzle, but this is 4F black powder we are talking about. It pressurizes too rapidly to waste time going through tiny holes. If the piston doesn't move and the motor stays in, the ejection gas will over-pressurize the motor/body tube, and make an escape hatch through the motor/body tube. With all these modifications, the rocket weighed 49.6 ounces.
The first flight after these modifications was on a G64-4W. The sound, flame, and smoke from this reload were awesome! It went maybe 500ft. The rocket performed a slight lean with the wind, my parachute deployed at apogee, and the rocket floated down very slowly about 200 feet away without a scratch on it.
The next flight (on the same day) was on a single use G77-4R. I doubt that it made 500ft; it looked more like 400. The red flame was marvelous and the noise was thunderous! It again did its lean with the wind. It recovered closer this time about 150ft away.
I intend to fly it on a Cesaroni 3 grain G106 Skidmark at the next launch. That oughta be killer!
Recovery:
Recovery, as already discussed, was great on most of the flights, with only 2 issues. The oversized parachute will
hopefully eliminate any future landing injuries to the rocket.
Flight Rating: 4 out of 5
Summary:
The Sumo is a great rocket all around. I'm only 14 years old, and I was able to assemble it with ease. It's big, fat,
loud, and crowd pleasing. I highly recommend this rocket to anyone wanting to get into mid or high power.
Overall Rating: 5 out of 5
Other Reviews
- Aerotech Sumo By Taylor Jessee
Brief: This is a pretty simple rocket to build that is very neat and flies great. It is a single staged rocket, flies on mid and high power motors. Price is a little high but not too bad. Construction: The kit includes: 1 4" diameter cardboard body tube 4 fins 2 centering rings 1 motor tube 10' elastic shock cord 1 nose cone 42" parachute The ...
- Aerotech Sumo By Joe Cacciatore
Single-stage, single-engine rocket with piston ejection system and is suitable for Level 1 attempts. This Aerotech rocket has the standard Aerotech through the wall Fin-Lok™ system and components except the nose cone is a different material than the other Aerotech's. It is gray and presumably stronger. It has 4 fins about the size of the Astrobee D but reported thinner than the ...
 |
 |
Flights
|
|
G. (February 13, 2002)
B.B. (April 27, 2002)
T.L.J. (October 21, 2002)
R.C.B. (January 30, 2004)
|
|
N.L. (November 6, 2001)