| Construction Rating: | starstarstarstarstar |
| Flight Rating: | starstarstarstarstar_border |
| Overall Rating: | starstarstarstarstar_border |
| Manufacturer: | Thrustline Aerospace |
| Style: | Scale |
Brief:
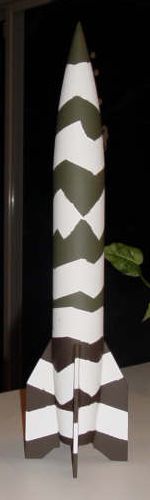
This is a 1/40 scale model of the German V-2 ballistic missile. This model has an 18mm motor mount for B and C size motors and uses an 18 inch mylar parachute for recovery.
Construction:
My beta test kit came in a plastic bag and included the following components:
- 1 balsa nose cone
- 1 balsa tail cone
- 1 ply centering ring
- 1 Kevlar and shock cord kit
- 1 motor mount tube
- 1 hardwood nose cone plug
- 1 nose cone eyelet
- 1 thrust ring
- 1 launch lug
- 1 packet of BB's for nose weight, 1.25oz
- 1 18 inch mylar chute kit
- 1 1/8 balsa sheet for fins
- 1 body tube
Upon opening the kit, I was very impressed with the quality of the components especially the nice balsa nose and tail cones. The instructions for this kit were in a very logical assembly order and included lots of text and color photos. The fin template and fin marking guide are included separate from the instructions. This is a skill level 2-3 project so some building experience would be recommended before attempting to build this kit due to some of the techniques used.
The construction begins with the motor mount by gluing the thrust ring into the motor mount tube. An expended 18mm motor casing is needed for this and the nozzle end of the motor should protrude approximately 1/4" from the motor mount tube. Next, two 1/16" holes are drilled into the centering ring for the Kevlar shock cord anchor and the anchor is threaded through the holes and tied together at the ends. You then apply some glue at the knot to keep it from slipping. Once the glue on the centering ring is dry, it is glued to the forward end of the motor mount tube in preparation to be installed into the tail cone. Before the motor mount can be installed, you will most likely have to drill a small hole in the tail cone to accommodate the Kevlar knot of the shock cord anchor. After this was done, I was able to install the motor mount into the cone with no problems.
The shock cord is now tied to the Kevlar anchor and the tail cone/motor mount assembly is glued into one end of the body tube. If you use wood glue like I did, you need to work quickly to make sure the glue does not grab at the wrong point.
I cut out the fin template and cut out all four fins. The balsa in my kit was ideal for fins, easy to cut but the finished fins were nice and rigid. An optional step to improve scale appearance was cutting out another template and cutting out actuator shrouds but I decided to pass on this step. I then stack sanded the fins to insure uniform size. I cut out the fin marking guide, marked all marking lines and then attached the fins one at a time with a few minutes drying time between each.
I glued the launch lug onto the body tube as instructions. Now is the time to assemble the nose cone. I put a small amount of glue in the nose cone, dumped in all of the BBs and added more glue. The instructions just mentioned to use a good quality glue for this step. I would have to recommend epoxy for this step. I used my regular Titebond II wood glue for this and it took a few glue applications as the glue shrunk and exposed some of the BB's. When I finally had enough, it took about 3-4 days to fully dry. I then drilled a starter hole in the nose cone plug, added some glue and screwed the eye bolt into place. To complete the cone assembly, I glued the plug into the base of the nose cone.
I now assembled the mylar parachute and set it aside until after finishing.
PROs: Great quality parts, instructions, quick building.
CONs: None that I can think of.
Finishing:
I sanded the entire model smooth in preparation for finishing then sprayed the model with Krylon gray primer and sanded between coats. I followed the primer with about three light coats of Krylon flat white enamel.
I then masked off the bottom of the model as I was trying a new camouflage paint scheme. I got the idea from the V-2/Blue Thunder demo from the propellant types page on the Aerotech website. I sprayed on two light coats of Krylon military olive drab. After the OD was completely dry, I masked off those areas and sprayed on two light coats of Krylon flat dark brown. The next day I sprayed on two light coats of Testor's flat clear to finish the model. I then attached the parachute and tied the shock cord to the nose cone at this time. No decals were included in this kit so basically you are on your own as far as finishing goes.
PROs: Easy to finish. Scale model, potential for several different schemes.
CONs: None
Construction Rating: 5 out of 5
Flight:
The recommended motors for this rocket are the B6-4 and C6-5. A8-3's are not recommended due to the model's weight. This rocket uses friction fit as there is no motor hook and wadding is required to protect the parachute. I prepped the rocket for flight by friction fitting a B6-4 in place, installing the ignitor, and inserting some dog barf wadding.
The rocket lifted off the pad nicely, arched ever so slightly, and reached apogee at maybe 250 feet before deploying the chute with no problems.
My second flight was on the C6-5. Nice liftoff and a little more arc this time due to wind but flew nicely to about 500 feet. It deployed the chute but one shroud line was stripped away from the chute. It still returned safely.
PROs: Flies great.
CONs: None that I can think of here.
Recovery:
This rocket uses an 18 inch parachute for recovery which seemed to bring the rocket in safely even though there was a lot of swaying and spinning noticed during descent.
On the second flight, the chute stripped a line but was still safely recovered.
The parachute was the only part of this rocket that I did not like. I thought the material was too stiff even though it seemed to unroll with no problems. I would recommend a nylon chute for this one instead.
PROs: Recovers nice on the 18 inch chute.
CONs: Chute material, stripped too easy.
Flight Rating: 4 out of 5
Summary:
I really liked this rocket. I found it easy to build, and for a V-2, it flew great. All the components were very high quality with the exception of the parachute.
Since this was a beta test kit, there may be some changes made to the production kits. John of Thrustline has really put together a nice kit here and I would recommend it highly.
Main PROs: High quality components, great instructions, quick building, nice flight performance.
Main CON: Parachute.
Overall Rating: 4 out of 5
 |
 |