| Manufacturer: | Fat Cat Rockets |

(Contributed - by Moira Jean Whitlock)
 Brief:
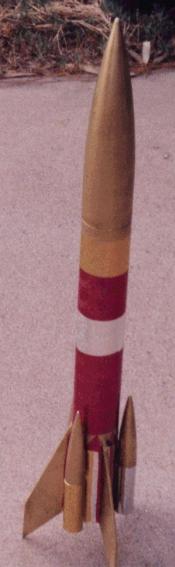
Single-staged, 3-finned rocket with 3 side pods that can also contain motors so
that flights can be with 1 or 4 motors. The rocket is not designed with a
payload section, so simultaneous ground starting of all motors or thermalite
air ignition of the outboards is suggested.
Construction:
There is one main body tube of kraft paper and 3 outboard kraft paper tubes for
the side pods. The main nose cone is hollow plastic, as are the 3 nose cones
meant for the side pods. The fins are 1/8 inch thick wood that appears to be
quality aircraft grade and not warped. They were pre-cut and all equal size.
There are 2 centering rings made of the same quality wood, and a 29mm motor
tube. The shock cord is of two materials, a steel cable and flat black elastic.
I made the loop in the wire (that goes through holes in the forward centering
ring and crimped) part large so that the cable would be too short to extend
above the top of the body tube because my experience with thin or metal cords
is that they can cut through body tubes readily if deployment is too fast. The
elastic part is tied to the loop. I also epoxied the crimp to be sure it would
hold. After 3 flights, it has held well. I epoxied the nose cones permanently
into the side pods. Thinking it over now, I wish that I had instead mounted
shock cords in the pods. This would facilitate motor removal and would allow
the use of in-production black powder motors with delays, and the pods could
put out streamers or tiny chutes for effect. Also, motors with delays wouldn't
have to be ejected in flight if the nose cones pop off. Many RSO's in dry
fields recommend against motor kicking.
I built this rocket two years ago, so I'm holding it as I write this. I remember clear, easy instructions with the only tough part being the cutting of the body tube to allow the fin tabs entry. The result is a sturdy, nifty looking rocket that has taken its share of punishment from non-certified motors and guinea pig tests when I started my clustering career.
Finishing:
I painted it gold with krylon spray paint and accented it with mylar book
covering material from Office Max. While this looks nice, I discovered that
since books don't fly, that this material isn't meant to take this sort of
punishment. Areas closest to the motor exhaust have scorched and shrunk away.
But it still looks okay.
Construction Rating: 4 out of 5
Flight:
The central motor is best to be an F or G type with a 7 second delay when the
rocket is flown with just that motor. With an adapter, I think a D or E can
work fine, because the rocket is not too heavy for it. An E15-7 or a D12-5
would be fine. When the outboards are filled, use D11-P's for them and a longer
delay in the center, like a G40 or 80 with a 10 second delay. If the fin can is
internally foamed, then I don't see why not to try a G125-10 as well. Since
these are very unlike motors, I recommend not trying to ground start them all,
but rather to cut thermalite wicks the same length (and thus burn time) and
retain one end in the 3 outboard motors with an Estes igniter plug and secure
the other end well into where the flame from the central motor would light it.
I find that with the "rapido" thermalite I have, 2 inch wicks burn
fast enough that during the last part of the central motor's burn time or right
during upward coasting, the fuse lets the outboards airstart.
Preparation is easy, with worm bed wadding enough to fill the diameter of the tube to 1/4 inch. I lightly taped the nose cone shoulder to tighten the fit a little so it wouldn't drag separate. This rocket has so far been a guinea pig in three flights. First, with a motor that is not certified, the US Rockets G45-8 Firestarter. It was a solo motor flight. This was the maiden voyage, and I feared the worst as flames shot out the aft end and I thought that the rocket would burst into flames. But it didn't. It finally took off on a straight dense trail of black smoke and tons of spitting orange sparks. Recovery went just fine, but small areas of the mylar accenting were burnt and curled.
Four (4) E15-7's was tried next. These motors came from Rocket Vision and had handy thrust rings. I applied an adapter and centering rings to align the 24mm E15 into the central mount. I lit all 4 simultaneously on the ground, and it flew VERY nicely. Really, an 8 or 9 delay in the center might have been even better.
The first airstart was tried next, with a central Aerotech G40-10W and three (3) Estes D11-P's lit with three (3) 2-inch thermalite rapido wicks dipped in Igniterman primer and pyrogen (just to be sure of ignition) and held into the D11's with the supplied igniter plugs. The rocket flew straight at first, but laterally slightly because it was windy outside. But all 3 outboards audibly lit right before the G40 burned out. It was neat. Recovery was just right.
Recovery:
The rocket is prepped again to show my friends at SSS my G40 and 3 outboard
D11-P's again. They like airstarts, so I plan to do it again. I haven't redone
the finish, because the wear on it gives character. The chute isn't at all
scorched and the shock cord isn't damaged. No real cons. The rocket is nicely
designed to take some punishment.
Flight Rating: 4 out of 5
Summary:
Fun, easy, good for the price. But I might add a small payload section to allow
the use of timers to light the outboards when thermalite can't be gotten. I'd
also recommend fiberglassing the side pods onto the airframe because I managed
to torque one off while removing spent motors. It was easy to re-epoxy, but
glassing would be stronger. I'd also not use metal shock cords unless they are
short enough not to zipper the body tube.
Overall Rating: 4 out of 5
 |
 |