| Construction Rating: | starstarstarstarstar |
| Flight Rating: | starstarstarstarstar |
| Overall Rating: | starstarstarstarstar |
| Manufacturer: | Hawks Hobby  |

Brief:
I received this as a prize from Hawks Hobby in the Dallas Area Rocket Society's 2007 Fall Classic Rocket Contest. Thank you! One word best describes this rocket: "Wow!"
It is one huge, fantastic rocket. It flies on 24mm motors and recovers by parachute. The rocket flies on AeroTech E or F motors. You could easily convert this to fly on 29mm motors, but remember the fins are surface mounted and some nose or payload weight may need to be added to re-balance the rocket at the same CG with the heavier motors. The rocket stands almost 68 inches tall and has a fin span of almost a foot!
Construction:
One thing I have come to expect from Hawks Hobby is their kits are always jam packed with a ton of high quality parts! This kit is no exception. Also, all of the small parts are contained in plastic bags, which I greatly appreciate. Marking guides are included to assure proper alignment of everything. The instructions are very straightforward and include lots of helpful illustrations.
The forward and aft sections of the rocket are ST-16, one at the rear, and three more at the front. Two heavy-duty 29mm tubes are joined to form the center section of the rocket. Kraft couplers are used to join the two 29mm tubes and two of the ST-16 tubes that comprise the forward payload section. The joined 29mm tubes extend to the rear of the aft ST-16 tube and are centered to hold the 24mm motor mount. The forward end of the tubes is centered into the rear of an ST-16 tube that is used to hold the recovery system. A solid balsa coupler is inserted into the rear of the payload section with a large eye screw provided for shock cord and parachute attachment. The motor mount kit includes a 3.75" engine hook. I modified the construction of the motor mount to allow installation of the engine hook using my standard method. Here's the link on EMRR's tip page for the general idea: ../../featured/tip_featured26.shtml
This method allows positive motor retention while not having to worry about the hook getting in the way of the delay element when using the AeroTech reload motors.
I filled the grain in the nose cone and fins and the seams in all of the tubes with Elmer's Fill 'n' Finish. The nose cone is very nice balsa. The main and "truss" fins are laser cut basswood. The centering rings are all laser-cut light-ply, and a Kevlar 3/8" elastic shock cord combo is included, along with two big 3/16" launch lugs, a hefty eye screw, and some really nice waterslide decals. The enlarged decals match the original perfectly and are exceptionally reproduced. The shock cord was super long as I modified the way it is installed. The instructions indicate to attach the Kevlar cord to the forward ring centering the 29mm tube in the rear of the forward section of ST-16 and then attaching the elastic cord to a loop at the end. I used my standard tri-fold shock cord attachment to allow inspection of the shock cord. I do love it though when the manufacturer puts Kevlar in the kit! The pre-assembled, 30" rip-stop nylon parachute that is included is an excellent plus, too, and exhibits the same level of quality as the rest of the kit: top notch!
I pre-sanded and prepped all of the parts before starting construction, my usual routine. That way I am sure to have sanded any attachment points and minimize any sanding in tight places that might otherwise be required in the final finishing steps. Just follow the instructions carefully and you'll find construction of the rocket is pretty straightforward. There are several measurements you need to get right for everything to align, but if you've installed couplers before there really isn't anything difficult about building the rocket except for having to angle cut the 1/8-inch wood dowels. Not that cutting the eleven dowels is difficult, but it just takes some time. You could cut them square and then sand them to the proper angle, but I measured the angles and then cut them to minimize the amount of sanding. I used yellow glue for all of the construction, except I smoothed in JB-Weld for the fillets on the three main fins since these are surface mounted, along the launch lugs and dowels that extend out the rear of the rocket for strength, and to anchor the eye screw in the balsa coupler. Using the "double-glue" joint method makes attaching the large fins a lot easier to manage. The double-glue joint attaches must faster so the fins are much less likely to fall over while drying. As is usual on any rocket I build, I installed a length of Kevlar (which was provided!) in a paper shock cord attachment (not provided) with a loop at the end to attach the elastic shock cord. To minimize abrasion from the Kevlar against the body tube, I soaked in CA around the top 1/2" of the body tube and tied a knot in the Kevlar to meet the lip of the body tube. As I noted earlier, the parachute is already assembled and it has small grommets holding the shroud lines. It's a very nice parachute!
Finishing:
As I noted earlier, all of the pre-finishing was done up front before anything was installed. Only a light coat of filler was used on the fins, as the basswood was very smooth after sanding with 400 grit sandpaper. I followed the paint scheme on the face card of the kit, which is pretty easy and looks great. I sprayed the entire model with a light coat of Kilz to seal off the glue and provide a solid base coat. Next, I lightly sanded the entire model with 240 grit sandpaper and then sprayed on a coat of primer. Next, sand and primer, and sand and primer again, sanding with 400 grit sandpaper. Using Krylon paint, I masked off the forward section and painted the rear white, and after that dried for 24 hours, I masked off the rear section and painted the front red. After drying for a couple of days I applied the decals. The decals went on very easily and laid down nicely, typical of my experience with their decals which is pretty cool considering the size of them. After the decals had a chance to dry for a couple of days, I put on a thick coat of Future Floor Finish to protect everything.
I did experience one problem unrelated to the kit when applying the Future. The red stripe behind the number 12 on one side of the fin stripped right off. As I noted earlier, I had waited a couple of days before applying the Future. When applying Future I normally very carefully apply a light coat over the decals and let that dry for about 24 hours to secure the decals before application on the entire rocket. I didn't do that this time. Bad move. I thought I would note this for folks using Future.
Construction Rating: 5 out of 5
Flight and Recovery:
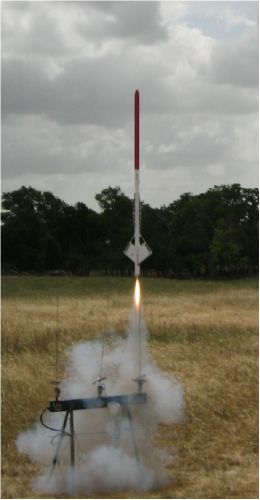
The first thing to note with this rocket is that it is 33 inches to the bottom of the upper launch lug. That means you need something longer than a 36-inch launch rod. I used a 4-foot rod. My first flight was on an AeroTech E15-4. The face card indicates to use the AeroTech E18-4 reload, but the winds were really light so I decided to use the single use motor. The up part was fantastic, straight, and true. Ejection was right at the top. Perfect! Uh-oh! See those trees in the background. Yep, that's where she drifted and landed in the top of the biggest tree. Luckily, a couple of buddies came to the rescue with a long pole and some agility recovering it from the tree with minimal damage. There was a stress in about three inches of a seam in the payload section but nothing that can't be fixed. Outside of that, the rocket was retrieved with hardly a scratch. Hopefully I will get it fixed up in time for the next contest!
Flight Rating: 5 out of 5
Summary:
The Super Solar Sailer is a great rocket. It is hugely impressive on the launch pad and beautiful in flight. Recovery on the large, red 30-inch rip-stop nylon chute is a big plus for a soft landing--assuming you don't land in a tree! As with all of the Hawks Hobby kits, when you consider the size and quantity of top quality parts that come in their kits, including the big nylon parachute, the pricing is excellent. I highly recommend this kit.
Overall Rating: 5 out of 5
 |
 |
Flights
|
|