Neubauer Rockets Gemini Titan (1/30th)
Neubauer Rockets - Gemini Titan (1/30th)
Contributed by Kurt Walchyshyn
| Construction Rating: | starstarstarstar_borderstar_border |
| Flight Rating: | starstarstarstarstar |
| Overall Rating: | starstarstarstarstar_border |
| Manufacturer: | Neubauer Rockets  |
Brief:
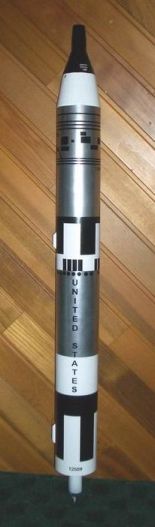
This is a historic, near-scale replica of the NASA Gemini-Titan space capsule
and man-rated booster. It is a cardboard and plywood 29mm MPR, single engine,
single booster with single parachute recovery design. It comes with removable
engine bells for display, and a slide-on-and-clamp fin set.
Construction:
The kit part list is small for the overall size of the finished rocket. This
translates into a very simple-to-build model. The motor mount system consists
of 2 laser-cut plywood centering rings around a 29mm ID cardboard engine tube.
The recovery system is anchored to the rocket motor retention assembly using
braided steel bicycle brake cabling (at least that what came to mind when I
looked at it) and looping it around the engine tube. The cable is pre-mounted
to one of the centering rings, so assembly is very simple.
Plywood fins are large and easy to mount, but I deviated here by making my own clear, rectangular Lexan polycarbonate fins instead. It added a bit more weight but its a cleaner look for this model.
The Gemini capsule is made from a single-pour of urethane into a mould, which makes it heavy but durable. The surface detailing is amateurish especially given the size and price of the model, but if its really a flyer you want to build as opposed to a looker, then it is "good enough". Paint and some added detailing will do wonders for this component.
Instructions were very easy to follow with simple assembly steps. Not much there in the way of difficulty. I didn't like the way the stock fin set mounted to the rocket--it uses the compression of a worm-ring clamp to hold everything together once the motor is inserted. Instead, I replaced the whole MMT assembly with an AeroTech 4" MMT system I got from A2Z Hobbies (its the 4" Fin Lok Kit that includes motor tube, Fin-Lok rings, motor hook, cooling mesh, ejection gas baffle, screw eye, thurst ring, thrust ring flange and centering rings). Those parts add about $25 to the overall price, but if you love bulding and flying historic scale/near-scale replicas like I do, then I believe this is the way to go. That said, the instructions come with a fin alignment template, good diagrams, good decal placement notes and paint scheme instructions.
Because of the weight of this rocket, I set it up for a rail launch. I think you'll save yourself some anxiety and get a better use-set of motors to play with.
I didn't build the decorative engine bell assemply, though it looks pretty easy to do and the parts fit together well - 'cause I could care less. My models don't go 'on display'. Rather they stay stored in protective carry boxes.
Finishing:
I didn't find the finishing of this rocket to be onerous. Quite the contrary.
The decals at first glance are a bit intimidating because the sheet is huge and
needs to be applied in one at most two applications.
The paint scheme involves two colours - gloss white and silver. I used a 'chrome' paint as opposed to standard aluminum as the former provides a more realistic colouring and finish.
The decals are very high quality self-stick vinyl and surprisingly easy to place. I recommend that if you feel a bit overwhelmed by the size of the sheet, you will be interested in cutting the decal sheet into two hoizontal sections and applying separately.
The urethane Gemini capsule MUST be washed with soap and water to get residue off it. Otherwise, you'll have issues painting it. Once scrubbed, matt the surface with a one of those green or grey emery finishing pads and attach any additional details you might want to the capsule. I recommend that in addition to using urethane glue (not epoxy) to attach additonal parts to the capsule, that you attach them mechanically as well if you can.
The kit, much to my chagrin, does not come with Gemini capsule decals(!?). So, off to the colour laser printer to make some up. I just made these out of paper and stuck them on the capsule - looks fine. They're accurate and tough.
If you are looking for a super (full0 scale kit of this historic rocket, this is not it. But, with some work and good crafting skills, it can be made into one fairly quickly because it offers a solid base on which to develop.
Construction Rating: 3 out of 5
Flight:
I used AeroTech G80-4T SU motors on all my flights. The rocket is launched from
my homemade rail launcher. All the flight were perfect with apogee between 150m
and 200m I would say.
The way you fly this bird is to slide motor into the MMT, then slide fin/MMT-sleeve assembly over the MMT end, and clamp the whole thing with a worm clamp. The instructions guide you through this well. My method was to slide my Lexan fin can/MMT sleeve assembly over the MMT with the AeroTech motor clip and then insert my motor. You have to cut a channel inside the MMT sleeve tube of the fin can assembly to accomodate the AeroTech motor clip properly. The fin can assembly I made has a backing plate with a fasterner thet attaches to the base centering ring of the rocket booster fuselage.
I use a Kevlar® parachute blanket and extra-long elastic and nylon strap harness. The rocket is very nose haevy as you would expect, so the long rail and additonal rear-end mass from the AeroTech MMT parts is very helpful.
Recovery:
This rocket is an excellent flyer and very durable for cardboard construction.
It is easy to prep and descent speed with the stock chute is satisfactory (on a
grass field). I had no damage to report and no unusual wear and tear. Because
of the over stability, aerodynamic bouyancy and weight characteristics of this
rocket, I suggest launching it only in ideal climate conditions from a soft
field.
Because of the materials used, make sure you stick with a long elastic strap as a shock cord - while robust, this is no PML Pterodactyl Jr.
Flight Rating: 5 out of 5
Summary:
The Pro's for this kit are:
1. Big and simple to build
2. Quality parts, decent materials and good fit
3. Tough when built using appropriate build techniques (Epoxy, JB-Weld, Cyanoacrylate, etc.)
4. Main roll pattern decals
5. Over-stable out-of-the-box due to heavy urethane capsule and big fins - no guessing about this!
6. Good display engine bells if you are interested
7. OK quality nylon parachute - but not ripstop
8. Easy to follow build instructions
9. Came with a nice SS barrel swivel for the chute
Cons are:
1. This kit seems to be hard to get (there seems to be a problem with 4" tube supply but I don't see why 4" AeroTech tubing can't be used)
2. Fin set mount system is goofy but I am sure works fine - you really need to consider replacing with AeroTech FinLok parts (except fin mount parts), and definitely use the plywood fins if you don't want to use clear plastic like I did, they're good.
3. The kit should come with both rail buttons and brass rod guides
4. Capsule needs some fundamental work with detailing for better scale appearance - there is ample opportunity to use one's crafting skills to build-out the scale of this model.
5. I think this model needs a stuffer tube
6. Parachute could be better quality rip-stop and better finish.
Overall Rating: 4 out of 5
 |
 |
Flights
|
|
|
|
J.R.A. (September 13, 2004)