Estes UP Aerospace SpaceLoft
Estes - UP Aerospace SpaceLoft {Kit} (1793)
Contributed by James Jason Wentworth
| Published: | 2011-09-15 |
| Diameter: | 0.54 inches |
| Length: | 12.50 inches |
| Manufacturer: | Estes  |
| Skill Level: | 1 |
| Style: | Sport |
 Brief
Brief
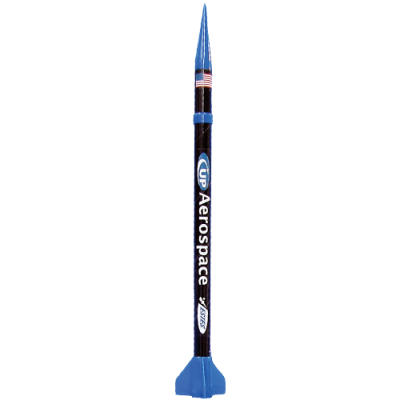
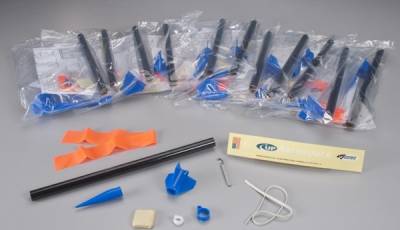
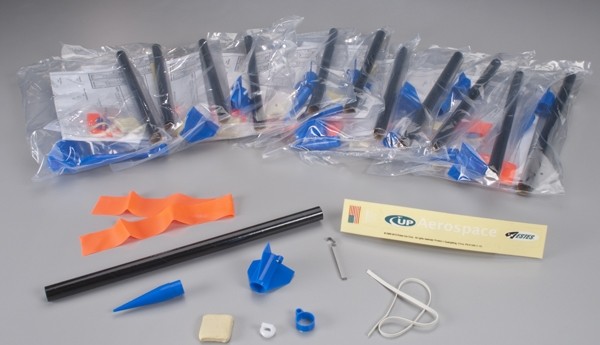
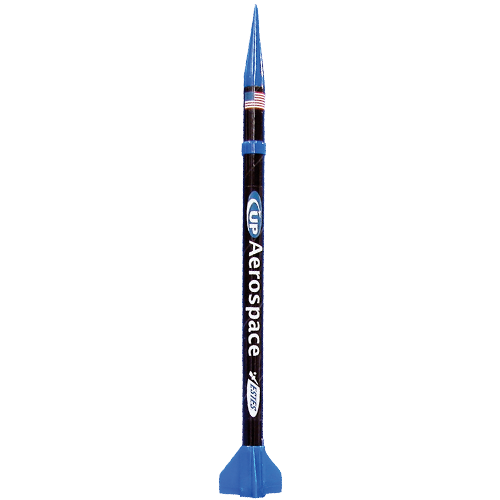
The Estes UP Aerospace SpaceLoft is a BT-5 size, 13 mm mini motor-powered flying scale model of the SpaceLoft suborbital launch vehicle that is built and flown by UP Aerospace, which is based in New Mexico. The model has a conical nose cone and three short-span clipped delta fins. This E2X (Skill Level 1, "No Painting Required") kit is sold only in 12-kit bulk packs. Each SpaceLoft bulk pack comes with an Estes Rocket Lab SpaceLoft Lesson Guide for classroom use, as well as a few extra kit parts such as shock cords and motor clips.
The model's specifications are as follows:
- Length: 12.5 in. (31.75 cm [317.5 mm])
- Diameter: 0.54 in. (13.8 mm)
- Weight: 0.47 oz. (13.2 g)
- Recommended Motors: 1/2A3-2T, 1/2A3-4T, A3-4T, A10-3T
- Maximum Altitude: 800 ft. (244 m)
Components
This streamer-recovery rocket has a black BT-5 body tube, a plastic fin unit with an integral rear launch lug, a plastic nose cone, and a plastic forward launch lug/shock cord anchor ring (all of which are molded in blue styrene plastic). The fins have scale, wedge cross-section leading edges and trailing edges molded into them. The model is equipped with a motor clip, and the kit's decals are the self-adhesive "peel-and-stick" type. Due to the small, scale-size fins on this rocket, a 1" (25 mm) square X 3/16" (5 mm) thick slice of plasticene modeling clay is included for use as ballast inside the nose cone. The shock cord is Estes' now-standard 1/8" (3 mm) wide white rubber band, which is 12.5" (317.5 mm) long in this kit.
Construction
The model is constructed using tube-type plastic cement such as Testors Cement for Plastic Models. The only unusual tool that is called for in the kit instructions is a white pencil for marking the body tube (because the rocket has a black body tube), but--as I found--an ordinary black fine-tipped marker pen works fine as long as the model is built in a well-lighted room.
The kit instructions proceed in a logical order, beginning with cutting the 1" square slice of clay into four 1/2" (13 mm) squares--three of these are rolled into thin "snakes" that are packed into the nose cone before the nose cone base is glued into the nose cone. Next, the body tube is marked for the proper placement of the 1/8" (3 mm) wide slits in the tube (one for the motor clip and one for the shock cord).
Following this, the motor clip is installed and the fin unit is glued over it, on the rear end of the body tube. Because the fin unit and the forward launch lug/shock cord anchor ring fit quite loosely over the body tube (this is the case for all of the SpaceLoft kits in my 12-kit bulk pack), I applied strips of Avery self-adhesive label paper to the body tube where the fin unit and the forward ring would be located. Both strips are 1.7" (43 mm) long. The fin unit strip is 1.25" (32 mm) in width, while the strip under the forward ring is 0.25" (6 mm) wide. The rear (fin unit) strip of label paper is flush with the rear edge of the body tube, and the forward strip is located so that its forward edge is 8.75” (222 mm) from the rear end of the body tube (which is 1-9/16” [39.7 mm] back from the front end of the body tube). I also added a BT-5 thrust ring.
Finishing
The model is completed in the same way the Estes Gnome kit is (threading the shock cord through its slit in the body tube, gluing the forward anchor ring onto the tube to anchor the shock cord, tying the forward end of the shock cord to the nose cone, taping the 1-1/8" (28.6 mm) wide X 12.5" (317.5 mm) long streamer to the shock cord, and applying the self-adhesive decals.
Due to the too-short length of the provided rubber shock cord, I used 9" (230 mm) of Kevlar cord with a 12" (305 mm) length of 1/16" (1.6 mm) diameter round sewing elastic cord tied to the upper end of the Kevlar.
The decals were very disappointing. Even though I wiped the body tube clean with household tissue to remove any skin oil from handling, and then carefully avoided touching the decals' adhesive sides while applying them (rubbing them down firmly), they became mostly un-bonded and curled up at their edges after only two weeks (and this was before I ever flew the model)! I applied cellophane tape along their edges (and directly over the smaller decals) to hold them down, and this has kept them in place on the rocket.
Flight
The rocket was flown three times--twice on 1/2A3-4T motors and then a third time on a 1/2A3-2T. Preparation was easy, although (as with all BT-5 size models) a pen came in handy for packing the wadding (I used three half-size squares torn from a full-size square of Quest Aerospace wadding, which is 11/16" [17.5 mm] wider on a side than squares of Estes wadding).
The surface winds were gusting at about 5 mph (8 km/h). The rocket's stability was quite positive in all three flights, with a few small "kinks" appearing in the smoke trails as the rocket corrected itself in response to varying winds aloft. Flight #1 (launched into the wind) and Flight #2 (launched with the wind) both ejected very close to apogee (approximately 350 ft. [107 m] and 400 ft. [122 m], respectively), and the rocket landed with no damage both times. Flight #3 (on a 1/2A3-2T) was also launched with the wind, but ejected only about 200 ft. (61 m) up, with the rocket still moving at a good clip. The rocket suffered a large dent in the forward edge of its body tube due to nose cone snap-back (even with the extra-long shock cord). For this reason, I do not recommend the 1/2A3-2T for the Estes UP Aerospace SpaceLoft.
Recovery
The 1-1/8" (28.6 mm) wide X 12.5" (317.5 mm) long fluorescent orange plastic streamer provides a sufficiently rapid descent to minimize wind drift, yet a slow enough touchdown velocity (on grass or soft soil) to avoid damage to the rocket. The streamer attachment method given in the kit's instructions (taping it to the shock cord with masking tape) works well enough, but a better method (which I used) is to fold a strip of clear plastic packing tape around one edge of the streamer, punch a small hole through that end of the streamer, and then pass the shock cord through the hole.
I have nothing against Estes' white rubber band shock cords, but they must be provided in sufficiently-long lengths to prevent nose cone snap-back (especially with heavier, ballasted nose cones such as those in the SpaceLoft kits). I have been told by a source at Estes that their new-production run kits have longer shock cords.
Summary
In summary, the Estes UP Aerospace SpaceLoft is (provisionally) a quite good model rocket kit. Its plastic fin unit and plastic forward launch lug/shock cord anchor ring fit too loosely on the body tube (unlike the fin unit and the forward ring in the Estes Gnome kit), but with the addition of strips of self-adhesive label paper to the body tube, the fin unit and the forward ring fit very nicely. (I have been told by a source at Estes that the SpaceLoft's fin unit and forward ring fit issue will be addressed.)
The decal adhesion problem with the SpaceLoft appears to be systemic, as an Estes Gnome that I built not long after building the SpaceLoft also exhibited the decal de-bonding problem (I have informed Estes about this problem, and they are looking into it). Cellophane tape holds the decals in place.
With these provisions, I would still recommend the Estes UP Aerospace SpaceLoft kit bulk packs to teachers and youth group leaders as educational model rocket kits. Estes is aware of the current issues with the kit and is in the process of addressing them.
Sponsored Ads

")


 |
 |