| Construction Rating: | starstarstarstarstar |
| Flight Rating: | starstarstarstarstar_border |
| Overall Rating: | starstarstarstarstar_border |
| Diameter: | 0.38 inches |
| Length: | 7.92 inches |
| Manufacturer: | FlisKits  |
| Skill Level: | 1 |
| Style: | Sport |
 Brief:
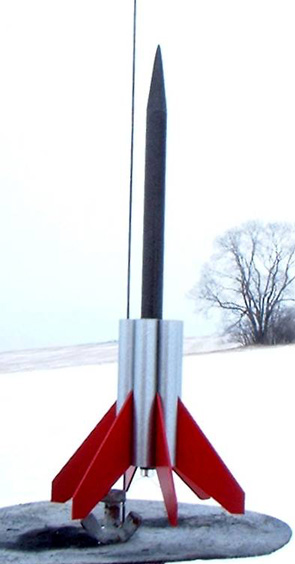
Fliskits continues to drive the rebirth of Micromax rocketry with this kit. 6 external tubes serve both stability and as anchor points for fins. This is a very simple build, and can probably be done in a half hour. It also flies very nicely on those tiny 1/8A motors.
Construction:
Once you get past the concept that you're dealing with really small parts, you'll appreciate that you're getting very good quality model rocket components:
- balsa nose cone
- kraft paper tubes
- laser cut basswood fins
- Kevlar shock cord
- centering rings
- Mylar streamer.
Of course, with most rockets you would not be able to fit all this into a roughly 2x4 ziplock baggie. This is accurately listed as a skill level 1 kit. Unless you want to spend an hour or two filling tube spirals and sealing grains, you can have this ready for paint within about 30 minutes. Everything fits very nicely. The instructions are top-notch and loaded with plenty of good illustrations.
The motor mount is a basic tube, interior centering ring/block, and a pair of external centering rings. The instructions call for using a spent motor casing to slide the interior block into place. If you are new to MMX's and haven't got a spent motor case, you could make do with a 3/16" launch lug.
One neat aspect of this, as with most Fliskits micro-to-the-max kits, is the Kevlar shock cord. The "cord" is pretty a wispy thread, anchored to the motor mount but does the trick.
The external tubes are assembled using a classic technique for alignment, bond two at a time to each other and lay the pairs on a flat surface to dry. This keeps them perfectly aligned. Once you've done this with three pairs, you can then attach the pairs to the main body tube (with a bead of glue tacking the pairs to each other as well). The paint scheme is one thing to consider. If you want to paint the external tubes a contrasting color, you'd better either paint them before bonding, or paint them a darker color than the main body as you'd have to paint the tubes last (they're pretty tough to mask if you paint the body tube last).
With the tubes in place, you then bond the 6 fins. Each fits nicely in the seam between a pair of external tubes. The final effect is where the rocket derives its name. This thing looks like a nasty mudwasp!
Finishing:
While I'd have loved to paint this in a wasp-like black and yellow scheme, I decided to play around with some various Rustoleum® Metallic finishes I had laying around. I had decided to paint the tubes and fins separately before bonding them. The main body and nose got a black metallic finish. I painted the external tubes silver and the fins a cherry red metallic.
Since paint is a lousy bonding surface, I had to make very thin scratch lines for bonding, and applied a very thin bead of CA using a toothpick applicator. Traditional wood glues would be fine for normal construction, but in working with pre-painted surfaces I prefer the higher performance of CA.
Construction Rating: 5 out of 5
Flight:
There's only one motor for this rocket, the Quest Micromax. So unless you give into the temptation of those 6 external tubes and cluster the bejeebus out of this, a single MMX-1 is the motor.
After carefully slipping in trace amounts of dog barf and wadding, I rolled up the streamer and loaded the Mudwasp for flight. The instructions provide some decent tips on how to break open the plastic MMX igniter designed to slip into the plastic UFO launcher complex, so that you can fly the MTTM (micro to the max) kits off a standard pad/launcher setup. I generally prefer to simply "roll my own" using 32 gauge nichrome wire and have never had a problem with this method.
The motor lit right away. Given the hefty weight and drag on this puppy, the liftoff was slow enough that I could track it across the entire flight profile. For a MMX, that's extremely rare. It was especially easy in this case, as the apogee was at most 40-50 feet, not high enough to loose. I caught a slight spin, suggesting that my fins might be a tad out of alignment.
Recovery:
The streamer is clearly just for effect, way too small to appreciably slow down this 0.33 ounce kit. In my case, the streamer also got stuck and did not come all the way out. Just popping the nose cone was not enough to make this tumble. So after arcing over, it came down in a nice ballistic path. Fortunately, the recent thaw had softened the ice and ground and instead of a fatal prang, I simply plugged into about 6 inches of snow. No damage whatsoever.
Overall, this is clearly not going to fly too far/high and the 50-foot flight is kind of fun to watch. Almost makes me want to make a micro Mars Lander to see if it can peak at under 10 feet.
Flight Rating: 4 out of 5
Summary:
Overall I was very satisfied with this rocket, especially the build phase. Great quality parts, assembles with very little effort and another unique design.
The only downside I'd offer is the wimpy flight, which is obviously held up by the weight and Cd. If I were to do another one, I'd probably pay much more careful attention during construction to all my component weights, go thinner on the paint, etc., hoping to keep it at or under 0.25 ounces.
Overall Rating: 4 out of 5
Other Reviews
- FlisKits Mudwasp By Jon Chrisman (January 26, 2008)
One of the newest additions to the Micro-to-the-Maxx lineup from Fliskits is the Mud Wasp. A unique six tube and fin design rocket. The parts consisted of: NCB-3AM Nose Cone CA-M Cord Anchor Launch Lug Engine Block 2 Centering Rings Motor Tube Body Tube 6 Short Body Tubes Streamer 6 Laser Cut Fins Kevlar Cord The instructions for the Mud Wasp are ...
 |
 |
Flights
|
|