Estes Fat Boy to Upscale Star Snoop
Modification - Fat Boy to Upscale Star Snoop {Modification}
Contributed by Bill Eichelberger
| Manufacturer: | Modification |
| Style: | Sport, Upscale |
 Brief:
The Gooneybird series was a collection of six cartoonish rockets produced by
Estes back in the mid-70's, presumably after someone spiked the water cooler.
Judging by the instructions, the series was aimed at either fairly young
rocketeers, or those suffering from acid flashbacks. While looking through
JimZ's plan archive I noticed an unnatural similarity between the dimensions of
the Gooneybirds and the current Estes Fat Boy. As it turned out, it was little
more than a simple 1.59X upscale of the fins.
Modifications:
- 1.59X fin upscale. This can be easily done on any commercial copier.
- Kevlar® shock cord knotted and mounted behind the motor mount.
Construction:
You will need:
- One Estes Fat Boy kit - currently available at most hobby stores.
- 3/32" basswood fin stock.
- 2' section of Kevlar® line.
The Estes Fat Boy comes packaged in the typical Estes hanging bag. All parts were present, however the die cut fins had separated from the balsa sheet. This was of no consequence as they were the only part scrapped. (Not counting the stock shock cord, which should always be scrapped.)
Since the Star Snoop fin pattern was not a through the wall fin, I did have to use one of the stock Fat Boy fins to figure out where to place the Star Snoop fin in relation to the TTW tab on the Fat Boy fin. It also bears mentioning that in building the stock Fat Boy, the tab must be trimmed in order to fit the fin into the slots cut into the body tube. I cut a 1/8" piece out of the bottom of the tab, which not only makes the tab slide more easily into the slot, but also allows the fin to align itself with the bottom of the body tube.
Elmer's Wood Glue was used in all phases of construction.
Since I used basswood for the fins, it was only necessary to use two coats of thinned Elmer's Fill 'n' Finish as sanding sealer. When the fins were sanded smooth, the body was sprayed with a coat of white Krylon primer, sanded, re-sprayed and re-sanded. I then sprayed the entire body with several coats of Krylon gloss black. The body was virtually finished at this point.
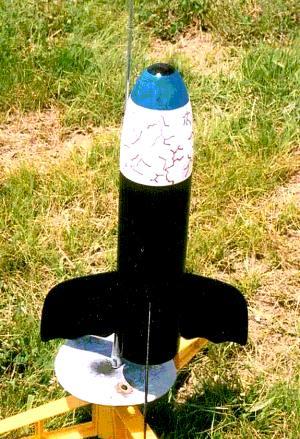
As it turned out, masking off and painting the nose cone was the most difficult of the build process. After filling the seam in the nose cone with body putty and sanding it smooth, I primed the cone with two coats of white Krylon primer. After sanding out the second coat, I sprayed the tip of the cone with Krylon gloss black, psinting just enough of the tip so that, when masked, it would take on the appearance of an eyeball. I allowed the paint a week to dry, then masked off the area by lightly gluing a scrap piece of BT-50 over the very tip of the cone. When this had dried in place I sprayed the middle section of the cone with Testor's Royal Blue, which I also allowed a longer than normal amount of time to dry. I then masked off the area that was supposed to remain blue with the cap from the Testor's can and painted the remainder of the cone with Krylon gloss white. When the white paint was dry, I drew in the red lines that gave the rocket it's pre-Visine look. To my surprise, it turned out looking pretty good. (Probably because of my previous experiences waking up with the red-eye look on a daily basis between the ages of 18 and 30.)
It's hard to find fault with kits like the Fat Boy. Nothing fancy, but Estes really got this one right. The combination of well thought out instructions and materials produces a very durable rocket with little effort, making this a great rocket for kids or beginners.
Flight:
I flew the first incarnation of the Star Snoop three times before it was
tragically eaten by a large tree.
The first flight was on a B6-4. This was a mistake. I like low-level flights, but this one barely cracked the 50' mark. The ejection charge fired a mere 20' from the ground, barely allowing time for the parachute to break the rockets fall.
For the second flight I flew it on a C6-3 and was rewarded with a flight that was more like the typical Fat Boy flights that I had grown accustomed to. The three second ejection charge was a little short, so I packed in a C6-5 for the third flight.
The [third] flight itself was great. It arced back over our heads at lift-off, but we had already had several flights do this over the course of the day, and all had lived to fly again, so this was of little initial concern. This flight would be different. As soon as the parachute filled, the winds shifted and the rocket began drifting toward the trees. At one point it looked as though it had cleared the trees and was drifting toward the wide open soccer field, but a rogue wind shift again took it back out over the trees. Had the wind continued carrying it, it would have landed in a field behind a fence and been easily recoverable. This wasn't the case though. Just as the rocket was over the tallest of the trees, the wind stopped and the rocket dropped like a stone. We tried to figure out a way to rescue it, but all of our efforts proved futile. It just sat there, hopelessly tangled in the thinnest of the branches at the 40' level, winking at me and beckoning me to try my hand at climbing up and attempting a rescue. I wasn't biting and instead went out and bought another Fat Boy for a second Star Snoop.
I used the 18" parachute that came with the Fat Boy, but as far as the rest of the kit's recovery system, I scrapped it for one that I've had a lot more success with of late. I attached a two foot long section of heavier elastic cord to the previously mentioned Kevlar® cord. A combination of fireproof shredded newspaper insulation and an aluminum cupcake holder help to shield the parachute and shock cord from burning. So far it seems to be working. The once yellow Kevlar® is now black with ejection detritus, while the elastic cord and parachute show no signs of burning.
Nice slow lift-off and great small field altitude. It's worth considering cutting a spillhole in the parachute, especially if you've built it with the basswood fins, because the Fat Boy is prone to drifting on the 18" chute. The spillhole will allow the rocket to drop faster, but the basswood fins should be strong enough to withstand the hard landing.
Summary:
If you're in the mood to build something different while staying on familiar
ground, this is a pretty foolproof project. In the end you wind up with a
rocket that is guaranteed it's share of stares and comments, especially from
kids. There are six different rockets in the Gooneybirds series, but not all of
them match up as well to to Fat Boy's fin placements, or whose decals are as
easy to reproduce as the Star Snoop, whose decals looked like they were drawn
by a semi-talented five year old. It helps to have a good place to start for a
project like this and the Fat Boy fits the bill perfectly.
 |
 |
Flights
|
|