| Construction Rating: | starstarstarstarstar_border |
| Flight Rating: | starstarstarstarstar_border |
| Overall Rating: | starstarstarstarstar_border |
| Diameter: | 3.75 inches |
| Manufacturer: | FlisKits  |
| Skill Level: | 2 |
| Style: | Odd-Roc |
 Brief:
This is a 2nd Opinion review of the Fliskits Decaffeinator, a foam cup rocket with a 24mm motor mount. I made a couple of minor modifications to the design.
Construction:
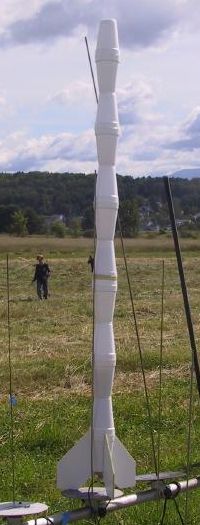
This kit is pretty basic. At its core is the lengthy 24mm motor mount configured for rear ejection from a BT-70 body tube. Around that mount are a collection of foam core fins and Styrofoam cups. The assembled rocket stands over 6 feet tall but weighs just a few ounces.
This rocket is a very quick build. The motor mount is built traditionally using yellow glue. The rest of the rocket consists of variation on foam and is assembled using a hot glue gun.
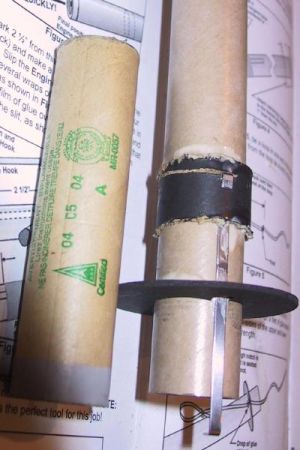
One change I made was to set the motor mount thrust ring to allow for the longer Estes E9 engines. This meant that the provided engine clip would be too short. I modified the clip to bring the upper end of the hook out of the motor mount tube and bent it back over an additional ring I placed outside the MMT.
I chose to use the through the wall fin mount technique rather than the easier and less strong surface mount. Templates for both styles of fins are provided. One thing I noted was that I needed to extend my TTW slots up into the second cup in the stack on the motor mount. This wasn't obvious from the instructions but would be necessary if you don't want the fin roots hanging below the body tube.
 I did run into a little trouble getting the hot glue to coat the cups lips quickly enough so that the beginning of the ring was still melted while the end of the ring was still being laid down. I found that ignoring the glue gun trigger and pressing my thumb directly on the end of the unmelted glue stick jutting out of the rear of the gun, resulted in a quicker glue flow and more working time to position the cups.
I also used an old trick in a new way. Hot glue can be resoftened using heat from a standard hair dryer. I used a hair dryer to resoften some of the glue joints and reposition the cup edges for better alignment. I do not recommend using a heat gun for this procedure as the Styrofoam cups themselves would likely melt.
Another tip is for stiffening the edges of the fins. If you don't have a very sharp razor knife when you cut out the fins (as I didn't), you will likely gets snags and holes in the foam core between the posterboard layers. To fill those voids and toughen up the fin edges, I used a coating of Gorilla Glue. This glue foams up slightly as it hardens so that it expands to fill the uneven foam core edges.
When doing the final assembly of the cups, I chose to use a mid-body seam to make transporting the rocket easier. Suggestions for how to do this are included on the back page of the instructions. An extra cup is needed, but those aren't hard to come by.
Finishing:
No finishing is required for this rocket if you like white Styrofoam. It reminds me of the classic NASA and gleaming Sci-Fi ships of years gone by so I left it as is.
Construction Rating: 4 out of 5
Flight:
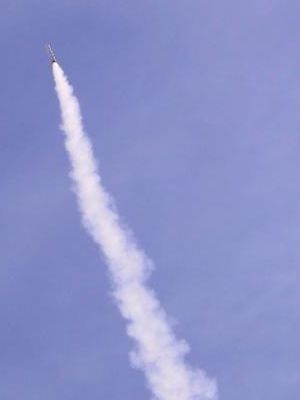
My first flight for the Decaffeinator was on a D12-3. I needed to use a spacer to bring my total engine length up to that of an Estes E9. Prepping this rocket is very simple. The rear ejection motor mount is partially inserted into the rocket. The parachute and shock cord are then tucked in around the motor mount. The motor mount is then fully seated into the rear of the rocket. Take note that the parachute and cord should not be wrapped around the MMT. They should be loosely tucked between the two centering rings. Because I incorporated a mid-body seam in my rocket, I needed to use a ring of masking tape to attach the top of the rocket to the bottom half.
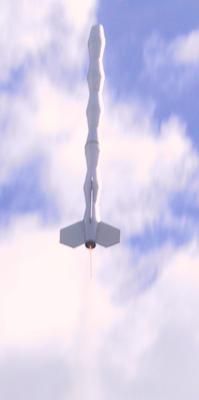
There were a few scattered chuckles when this pile of coffee cups went out to the pad. The crowd (and I) were pleasantly surprised by just how nicely this rocket flies. It had a very straight boost on the D12.
Recovery:
Everything stayed together right up until the ejection charge. At that point, one of the glue joints on the upper cups failed and the rocket came down in two pieces. Due to the light construction, the "nose" fell at the same rate as the rest of the rocket under chute. The tethered motor mount and lower airframe were right next to the upper section in the field. A little hot glue and this rocket will be ready to fly again. At this point I think I'd rather have the glue joints failing then having the cups breaking, so I don't think I'll be strengthening the joints much. Perhaps a little more glue, but no extra tape seems warranted.
Flight Rating: 4 out of 5
Summary:
Most people are dubious as to how a stack of hot glued coffee cups is going to perform. They don't stay doubting long when they see how a D powered foam rocket can give a good show. Then again, it might be a good idea to get a portable hot glue gun to add to your field box. Those cups might need a little TLC on a regular basis.
Overall Rating: 4 out of 5
Other Reviews
- FlisKits Decaffeinator By John Lee (May 9, 2009)
Brief: I opened this package to try and build it quite some time ago but stopped when reading the instructions. Most of the construction is done with a hot glue gun and I didn't have one. When my brother in law asked about it sitting on my desk, I told him I didn't have such a tool. A few weeks later, one magically appeared. Thanks Toby! This kit is made from Styrofoam coffee ...
- FlisKits Decaffeinator By Joe Policy
The face card of this most unusual offering from FlisKits proclaims it is "nearly 6 feet tall and weighs only 6 ounces". This rocket is built out of Styrofoam coffee cups! The kit includes: 1 Nose Block 1 BT-50 Body Tube 1 BT-70 Body Tube 1 Launch Lug 2 Centering Rings 1 Engine Hook 1 Engine Block 1 16" Parachute Shroud Line Tape Disks 36" Shock Cord ...
 |
 |
Flights
|
|