| Diameter: | 0.98 inches |
| Length: | 11.75 inches |
| Manufacturer: | Custom Rockets  |
| Skill Level: | 1 |
| Style: | Sport |
Brief:
I purchased a Custom Venture as an afterthought one night while on an engine buying trip. I figured that it was a kit that I could build in an evening for the launch the next day and decided to see if it would be possible to actually get it looking decent and flyable before the launch. Once I got home and opened it, I decided that the low price and almost disposable nature of the rocket would allow me a certain amount of freedom as far as modifying it. It was this train of thought (or should I say train wreck of thought?) that led me to the decision to change the rocket from 18mm to 24mm power.
Modifications:
Modifying the Venture for 24mm flights is as easy as turning one of the 2050 centering rings that are included in the kit into an engine block. This needs to be securely glued in place by using an expended 24mm casing to push it into place but no other steps are needed as long as you plan to friction fit the engines. The BT-50 body tube allows plenty of room for extra shock cord, which in this kit is a swap you should consider making even before you open the package.
Construction:
The parts list:
- BT-50 main body tube
- 2050 centering ring for engine block
- PNC-50 nose cone
- 3/32" balsa fin stock
- launch lug
- 24" Kevlar® shock cord
- 36" length of 1/8" sewing elastic shock cord
- Custom 12" parachute kit
- small snap swivel
- clay for nose weight
Finishing:
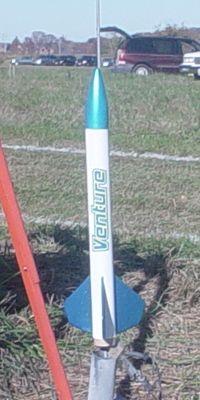
Construction and finishing also couldn't have been a whole lot simpler. After giving the body tube a good going over with thinned Elmer's Fill 'n' Finish and the requisite sanding to kill off the tube spiral, I tied a 24" length of Kevlar® onto the centering ring and glued it into place as an engine block. Once this had dried sufficiently I shaped the edges of the three fins, tacked them in place using gel CA, and anchored them with some heavy duty Elmer's Wood Glue fillets. After giving the fillets some time to dry, I filled and finished the fins and then sprayed the nose cone and the fin can with the remains of a can of bright blue metallic paint. When this had dried sufficiently, I masked off the fins and nose cone and sprayed the rest of the rocket gloss white. The bright blue metallic paint matched the venture decal almost exactly and the end result was an impressive looking little rocket. After applying the decal, the rocket was done except for the addition of some clay nose weight and the recovery equipment, which was a 36" length of 1/8" sewing elastic attached to the Kevlar® that I had installed with the engine block. The parachute was the Custom chute that had been included with the kit.
Flight:
Launch day was everything a day at the pads should be every time: sunny and warm with only a few puffy clouds obscuring a bright blue sky. For the first flight I chose and friction-fitted a C11-5, deciding to err on the conservative side of the measure. I had noticed that the nose cone didn't fit with an authoritative snugness, but it seemed tight enough to me. (It didn't wiggle it's way out when I shook the rocket rapidly from side to side.) If I had read almost any of the articles ever written on Custom rockets of this size (my own on the Tristar included), I would have recognized this as the potential disaster waiting to happen that it was. Unfortunately I chose to go on with the launch and nothing went right from the start. The rocket had barely cleared the rod when the nose cone came loose and started dangling down the side of the body tube. It then started to tumble end over end while still under power. This probably should have been its death sentence but it fortuitously pulled the chute loose during the tumble and was floating gently toward the ground when the ejection charge fired, signalling an end to its maiden flight. This performance received an equal measure of laughter and cynical applause when the rocket touched down.
For the second flight, I wrapped the nose cone with masking tape until the fit was snug in the body tube. Loaded with another friction-fit C11-7, the Venture leapt from the pad for a quick, high, arrow straight flight. The seven second ejection charge turned out to be a good pick as the charge fired just after the rocket tipped over and I was able to watch the whole flight from beginning to end as it landed several hundred feet downfield. Taking a bead on the spot where it looked to have landed, I set out with plans of a short recovery walk, all the while plotting it's next flight on a D12-7 but I never saw the rocket again. I had the spot in sight the whole time, but there was an apparent black hole on the VOA soccer field that I hadn't counted on. I looked for twenty minutes or more then grew disgusted and gave up. I hope whoever wound up with it enjoyed it in whatever dimension they call home.
Summary:
PROs: Bargain basement price, relative good looks, ease of construction.
CONs: Fit of nose cone, length of supplied shock cord.
Other Reviews
- Custom Rockets Venture By Ken Johnson
An entry level 3FNC rocket that tries hard to beat the Estes Alpha. Like the other Custom rocket kits I have built, the nose cone was excessively loose and had a lot of casting flash. And like the others, the parting line had a number of dimples and flaws that detract from the rocket if not remedied. Otherwise, the quality of components are quite good. For your money, you get real balsa fins, ...
 |
 |
Flights
|
|