Custom Rockets Stealth Interceptor
Custom Rockets - Stealth Interceptor {Kit} (10014)
Contributed by Nick Esselman
| Diameter: | 1.33 inches |
| Length: | 17.51 inches |
| Manufacturer: | Custom Rockets  |
| Skill Level: | 3 |
| Style: | Futuristic/Exotic |
![[Picture]](/images/archive/images/ratings/rating_cus_stealth_interceptor.gif) (09/17/01) The Custom Stealth Interceptor™ was the third of three kits
that I built as part of a rocket "ship" series which also included
the Estes Night Wing™ and the Rogue Interdictor™. I have always liked
the looks of the Stealth Interceptor™ and have had this one in my "to
be built" box for a little over 4 years. Since then Custom as discontinued
this rocket. Too bad, it is always nice to have some "futuristic"
models out there.
(09/17/01) The Custom Stealth Interceptor™ was the third of three kits
that I built as part of a rocket "ship" series which also included
the Estes Night Wing™ and the Rogue Interdictor™. I have always liked
the looks of the Stealth Interceptor™ and have had this one in my "to
be built" box for a little over 4 years. Since then Custom as discontinued
this rocket. Too bad, it is always nice to have some "futuristic"
models out there.
See
my 18mm Futuristic Rocket Comparison Page
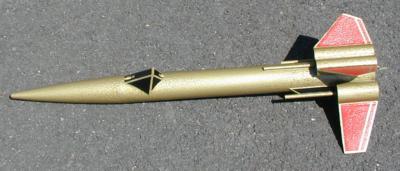
The Stealth Interceptor™ comes with a 12" BT-55
(1.325" diameter) body tube, two (2) 2.75" BT-20 (0.75"
diameter) tubes and two (2) 1.85" BT-50 (1" diameter) tubes that are
used as "decorative tubes". There is also a piece of cardstock that
the Canopy is cut out of. There is an 18mm motor mount with motor retention,
one (1) 3/32" pre-marked balsa sheet for the mounts and wings, and three
(3) launch lugs for the Laser Canons and the actual launch lug. The recovery
system includes an 18" silver mylar
 parachute, shroud lines and tape disks, and
piece of elastic shock cord. The nose cone is hollow plastic with a screw hole
to fit in a small eye-screw. Lastly, there is also a decal sheet for finishing
the rocket.
parachute, shroud lines and tape disks, and
piece of elastic shock cord. The nose cone is hollow plastic with a screw hole
to fit in a small eye-screw. Lastly, there is also a decal sheet for finishing
the rocket.
CONSTRUCTION:
The instructions are 6 pages with diagrams for each of the 30 steps. In addition, there is a Fin Alignment guide which also has the 3-fold paper cut-out drawn on it. The instructions are more than adequate for most builders, however, there are a couple of "gotchas" that should be taken into consideration.
Some of the interesting points about building the Stealth Interceptor™ included having to cut your own fins verses the die-cut of the Estes' Night Wing™. However, the fins are pre-marked on the balsa verses having to trace templates like the Rogue Interdictor™. The Fin Alignment Template is used to gain proper fin alignment on the Stealth Interceptor™, whereas, the Night Wing™ used small alignment guides and the Interdictor™ relied on lines and gluing fins on perpendicular to the tube. Also the Stealth Interceptor™ requires you to build a canopy, while the Night Wing™ is molded into the nose cone and the Interdictor™ uses a decal to depict the cockpit.
If you ever get a chance to get one of these rockets, you may want to consider the following suggestions. I think this helps in the build and gives a better looking model.
First, don't install the motor mount until AFTER all the tubes and fins are glued onto the body tube. Why? With the motor mount installed the motor retainer clip prevents you from setting the rocket down flat on the alignment template. And due the the heavy reliance on the template this is not good.
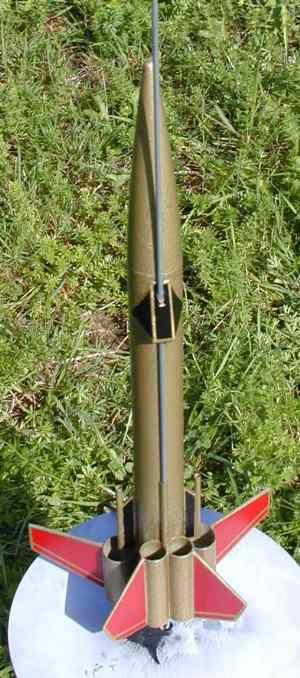 Second, I
decided to put the actual launch lug on the TOP of the rockets body right after
where the two upper "decorative" tubes attach. This way the launch
rod goes through the gap between the tubes and into the launch lug. This was a
great idea that looked good until I got ready to mount the canopy which would
have blocked the launch rod. I solved this by getting another longer piece of
tubing (1/8" launch lug) and cut it to fit the length of the canopy. Then
I cut slots in the canopy to allow it to still rest flush to the body tube, but
allowing the launch lug to fit through the center. Once mounted and dry, I cut
the launch lug to conform to the slopes of the canopy. I'm okay with it! (You
can see this pictured to the left).
Second, I
decided to put the actual launch lug on the TOP of the rockets body right after
where the two upper "decorative" tubes attach. This way the launch
rod goes through the gap between the tubes and into the launch lug. This was a
great idea that looked good until I got ready to mount the canopy which would
have blocked the launch rod. I solved this by getting another longer piece of
tubing (1/8" launch lug) and cut it to fit the length of the canopy. Then
I cut slots in the canopy to allow it to still rest flush to the body tube, but
allowing the launch lug to fit through the center. Once mounted and dry, I cut
the launch lug to conform to the slopes of the canopy. I'm okay with it! (You
can see this pictured to the left).
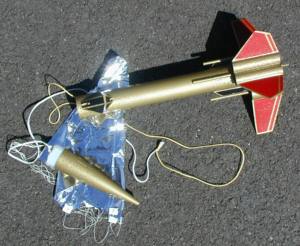
Lastly, Custom suffers from from "short shock cord" syndrome, too (like another company we all know and love . . . yes, we love them). So, I added a 24" piece of Kevlar® and then attached the supplied elastic shock cord to it. I am a big fan of using elastic on this size of rocket but also don't like the kick-back dents, so hence the Kevlar®. I usually try to make the total length of the shock cord 3x the length of the rocket and the Kevlar® at least twice as long as the elastic. I attached the Kevlar® to the inside of the body tube with the 3-fold paper method.
For finishing Custom has a step for filling and sanding the fins, for painting the rocket gold and for applying the water-transfer decals. I stuck to my theme of using Rustoleum's "Hammered Look" Gold paint to match the other two space ships. First, though, I used a very thick layer of Plasti-Kote primer, sanded and hit it again. Then I used Rustoleum "Hammered Look" Gold paint. This kit came with a nice set of decals. There are fin strips for both sides of the four fins, an excellent fitting canopy decal and then two laser canon stand-off decals. They are water-transfer decals and I had great success with them. Indeed a sharp looking rocket. Other detailing could be done by painting the inside of the tubes either flat black or red and painting the laser canons.
Overall, for CONSTRUCTION I would rate this kit 4 points. The instructions and quality of materials were fine. I would have liked to see the motor mount installed after the fin installation to allow better utilization of the template. Also, there was a very deep molding groove in the nose cone. I actually didn't fill it and made it part of the design by ensuring that it faced the top of the rocket. A kind-of air intake of sorts.
FLIGHT/RECOVERY:
 Custom
recommended using a B4-2, B4-4, B6-2, B6-4, B8-5, C5-3, and the C6-5. I must
disagree with a couple of their recommendations unless you want an early
deployment. The B4-2, B6-2 and C5-3 are going to stress your recovery system,
so don't press it. How do I know? My rocket finished weighing in at 2.5 ounces
and was perfect on B4-4's. Custom indicated a finish weight of 1.6 ounces. So
any where in between is definitely too light for those Bx-2's and C5-3. I'm
actually concerned about the C6-5 and may opt for a C6-7 instead.
Custom
recommended using a B4-2, B4-4, B6-2, B6-4, B8-5, C5-3, and the C6-5. I must
disagree with a couple of their recommendations unless you want an early
deployment. The B4-2, B6-2 and C5-3 are going to stress your recovery system,
so don't press it. How do I know? My rocket finished weighing in at 2.5 ounces
and was perfect on B4-4's. Custom indicated a finish weight of 1.6 ounces. So
any where in between is definitely too light for those Bx-2's and C5-3. I'm
actually concerned about the C6-5 and may opt for a C6-7 instead.
Flight preparation is easy and the wider 1.3" body tube gives you plenty of room to work with wadding and the parachute. I added a piece of Pratt Heat Shield. I used the mylar parachute and after three flights have had no issues.
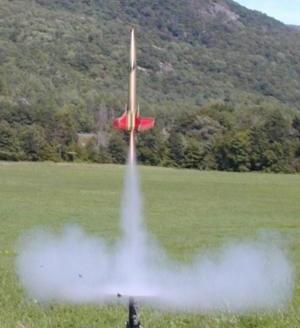

I'm not going to describe each flight because all were on B6-4's and all were perfect. This rocket is exciting off the pad and recovery was great with the flashy silver mylar parachute. The B4-4 is great for small fields and a perfect match for this rocket. I'm thoroughly impressed.
For FLIGHT/RECOVERY, I would rate this kit 4 ½ points. This is where I have to take off ½ point for the recovery system's short elastic but I don't want to detract on how wonderful this rocket flew and how impressive it looked flying. The mylar 'chute was sized and functioned flawlessly. I would not trust the short delay motors that are (were) recommended either.
Overall, I am disappointed that Custom has discontinued this rocket. Sad, very sad. It is an impressive futuristic design that flies great. Custom kits, in general, suffer from the short elastic and so would have this one if I didn't adjust for that right away. If you can find one, get it and if nothing else mail it to me as a gift! I give the kit an OVERALL rating of 4 ½ points.
 |
 |
Flights
|
|