| Construction Rating: | starstarstarstarstar |
| Flight Rating: | starstarstarstarstar_border |
| Overall Rating: | starstarstarstarstar_border |
| Diameter: | 1.17 inches |
| Manufacturer: | Semroc  |
| Skill Level: | 1 |
| Style: | Clone, Sport |
Brief:
When you buy a Semroc "retro-repro", you're buying a little piece of rocketry nostalgia. According to the
introduction included in the instructions, the OSO was originally introduced by FSI in 1967 and listed for $4. The
updated Semroc version uses laser-cut balsa fins instead of plywood, an engine hook, and also includes a neat little
baffle system that eliminates the need for recovery wadding. It's gone up in price a bit from the $4 original price,
but at $17.50 in 2007 dollars, it's still a very good bargain. Sure, it's a 3FNC, but stylish fin shape, payload bay,
baffle, and sharp accent decals make this a sweet looking rocket.
Construction:
Parts for this one are typical Semroc--excellent quality and true original tube sizes rather than the more popular
BT-5/20/50/60 series:
- Balsa nose cone
- Payload tube (series 11 size)
- Balsa bulkhead
- Body tube (series 11)
- Laser-cut fins
- 18mm motor mount kit/hook
- Baffle kit
- Elastic shock cord (just elastic--no Kevlar®)
- 12" plastic chute
- Waterslide decals
The instructions are very good with plenty of quality illustrations. This is accurately rated a skill level 1 kit as you can get by with a single color paint scheme. I probably had about 2 hours into the construction of this plus surface prep and paint so it's definitely a quick and easy project.
The motor mount is straightforward consisting of an 18mm tube, a coupler block, metal hook, and a pair of centering rings. The motor tube was even pre-slotted, a nice touch.
The fins being laser cut are also a breeze. Given the unusual shape though, you will want to be careful to identify the leading, trailing, and root edges before sanding them. There is a clear illustration aiding this, but I point it out because that's one of the most complicated aspects of the whole build.
Fins are surface mounted. I used CA to tack them in place then two very thin yellow glue fillets.
I think I've seen at least 3 different baffle styles now in Semroc kits and found this one to be among the easiest. It consists of two BT-5 body tubes and two centering rings with off-center holes. You first glue the tubes together but offset by 1/2" lengthwise. Once the glue has set, you then tack a centering ring onto one tube, but need to carefully align it so that the "fat" side covers the other tube. Repeat the process for the other centering ring, but this one also holds down the end of the shock cord. Once this is glued in the body tube, the effect is that the gas goes up one BT-5, shoots out the end into the gap between the tube and the centering ring, bounces back down the gap between the tubes, hits the backside of the aft centering ring, then goes back up the second tube. Got it? Don't sweat it--just follow the instructions and it will work like a charm, will last at least as many flights as you'll fly and recover, and eliminates the need for wadding.
The payload section is a simple nose cone, 8" body tube and balsa bulkhead. You can glue the nose cone on if you want, but I friction fit it so that I can use it for altimeter readings and as a functional payload bay.
There are a couple of 1/8" lugs to glue on, a plastic chute to deal with (very nice, high-tack tape rings, by the way), and that's it for construction.
Finishing:
I'm pretty finicky when it comes to finish so I wound up spending a good 6 hours or so filling tube spirals and balsa
grain. The tubes only had light spirals to begin with, but at 30" long, there's a lot to cover.
You can get creative if you like, but I went with a simple all white body and fins and red nose. That saved masking and a day or two of cure time. With the red accent decals, it turned out very nicely. I could also see something like a light glittery silver metallic though and might try another one in that scheme.
The waterslide decals are fairly rugged and easy to work with, although they do tend to bite pretty quickly so you'll need to be careful where you start to slide them on.
Construction Rating: 5 out of 5
Flight:
For the maiden voyage, I went with a B6-4. Since it had a payload bay, I went ahead and loaded it with a Perfectflite
altimeter just for kicks. It is supposedly capable of 400 feet on a B6-4, but it also supposedly weighs 1.5 ounces
versus my relatively heavy 2.3 ounces (prepped, without motor or altimeter).
Despite the baffle system, I still slipped in about half an inch of dog barf, just so I could chip away at the bale.
The flight was straight as an arrow in fairly brisk winds. The delay was perfect, and the altimeter reading was 235 feet. Something tells me the listed weights and altitudes are straight out of a simulation program...
Recovery:
The baffle and dog barf did the job, as the chute deployed perfectly without any melting. The 12" chute is just
about right, but had this found pavement, I would surely have sustained a little damage. I'll probably swap out for a
15" chute on calm days and stick with the 12" on windy days.
Flight Rating: 4 out of 5
Summary:
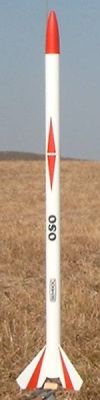
I like the styling of this one with the arrow-feather type fins and the nice decals.
The only con I'd offer is a minor one: I would prefer a single piece body but that would make packing/shipping a pain.
Overall Rating: 4 out of 5
Other Reviews
- Semroc Oso By Ron Wirth (October 8, 2007)
Brief: The OSO is another superb Retro-Repro kit from Semroc. This rocket is based on the original Oso kit by Flight Systems, Inc but with several improvements. While the rocket appears not much more that a 3FNC kit, it does contain a payload section and an ejection baffle. At a finished length of just over 30”, the rocket is a nice additional to anyone's fleet. I ordered the ...
 |
 |
Flights
|
|