Roachwerks Custom Turnings Little Joe II (1:38.5)
Roachwerks Custom Turnings - Little Joe II (1:38.5)
Contributed by Chan Stevens
| Construction Rating: | starstarstarstarstar_border |
| Flight Rating: | starstarstarstarstar |
| Overall Rating: | starstarstarstarstar_border |
| Manufacturer: | Roachwerks Custom Turnings  |
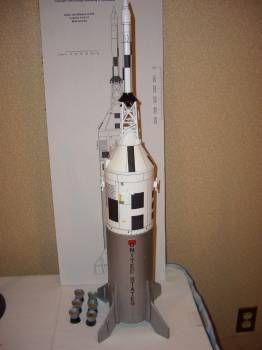
Brief:
Based on the George Gassaway/Tom Beach drawings originally published in
Sport Rocketry, this highly detailed scaled kit is a great project for
the craftsman. It's also a versatile flyer, handling from 1 to 7 motors. This
review is a combination of construction notes plus some notes from my
experience flying this as my giant sport scale entry for NARAM47.
Since Roachwerks typically only makes kits in limited runs and this one has been sold out for more than a year, you'll just have to drool over the review or try to find one up for auction sometime. In fact, most kits are sold out prior to release based solely on Gordon Agnello's (aka Sandman) reputation on The Rocketry Forum.
Construction:
My kit arrived in a rugged cardboard box complete with a picture of the kit on
the outside. This was a nice feature considering I typically allow my more
ambitious projects to "age" for a few months in my build queue, and
the label makes it easy to pick out of the pile when the inspiration hits. In
this case, the deadline pressure for NARAM provided the motivation about a year
after my purchase. I would like to note that despite the fact I'd waited a year
and that the kit was completely sold out, Gordon was outstanding in replying to
numerous emails along the way, even sending out replacement parts, and offering
terrific support. I think Gordon was almost as anxious about seeing his kit
going to NARAM as I was in building and flying it.
Highlights of the extensive parts list include:
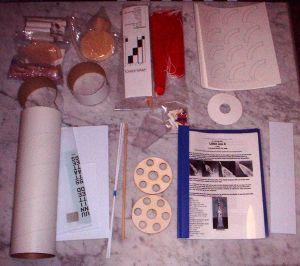
- BT-101 body tube
- balsa fins (rough cut, must be hand trimmed)
- resin cast actuators and fin fairings
- balsa nose cone
- basswood escape motor flare
- basswood tower base/capsule tip
- pine capsule base
- 24mm E-size motor mount with clip and block
- 6 18mm motor mounts with blocks but no clips
- corrugated wraps
- pre-printed wraps for the upper body, transition/capsule shroud, and tower body
- waterslide decals
- 2 nylon chutes (24" and 16")
- Assorted wood dowels, styrene, etc. for details
The 16-page instruction manual, which is in a vinyl cover/binder, contained numerous color photos and was clearly written from the perspective of an experienced builder. There were good tips and warnings along the way. In addition to the 16 pages of instructions, there were also several pages of detailed drawings, as well as a full-sized poster of the drawing that the model was based on. That was a nice touch and I wound up mounting mine on foamboard to submit with my scale documentation. That should have helped me score well on the similarity of outline portion...
Construction starts with marking the BT-101 tube. There's a detailed drawing wrap for this, although mine was a bit undersized. I highly recommend making at least 2-3 spare copies of this as you'll want to cut it up and mark on it throughout the project as you make assorted details.
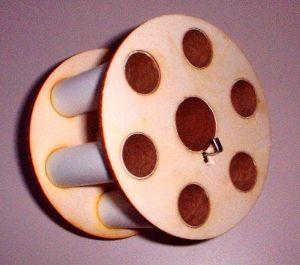 The motor
mount assembly is a bit complex given that there are 7 motor tubes involved and
alignment is important. I was a bit disappointed that only the 24mm tube had a
clip, forcing tape retention on the 18mm tubes which are mounted flush to the
aft centering ring. For those of you not familiar with competition rocketry,
even something "acceptable" on the sport range like spitting a motor
can result in a DQ, so having 6 opportunities to DQ is a bit risky.
The motor
mount assembly is a bit complex given that there are 7 motor tubes involved and
alignment is important. I was a bit disappointed that only the 24mm tube had a
clip, forcing tape retention on the 18mm tubes which are mounted flush to the
aft centering ring. For those of you not familiar with competition rocketry,
even something "acceptable" on the sport range like spitting a motor
can result in a DQ, so having 6 opportunities to DQ is a bit risky.
The heft of a 7 cluster motor mount is an impressive thing, and after a brief period to admire the work, it gets bonded into the BT-101.
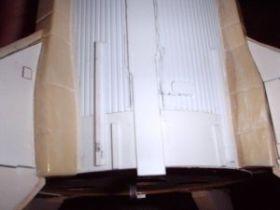
The next beef I had with the kit came when I started to lay out the corrugated wraps. The circumference of the tube is about 13" and there is a conduit running the vertical length of the wrap, so a 13" long wrap would be perfect, leaving no exposed seams to deal with. The wraps included in the kit, however, were shorter, resulting in two seams, one of which was exposed. It's probably a case of using common, cheap sized wraps. The wraps are attached using Weldwood Contact Cement, which was new to me, and involved a bit of a learning curve. It's sort of like mixing the texture of rubber cement with the instant bite of thin CA. It took me a few practice bonds to get the hang of applying it in the right thickness and I wound up with some smudges to clean up.
After applying the wraps, there are a number of optional details that can be added. These are generally cut from various styrene pieces.
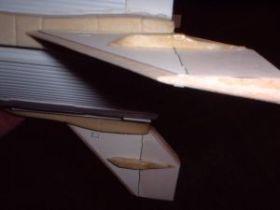
To attach the fins, you'll need to cut away small sections of the corrugations. Although it doesn't require a perfect fit since the seams are covered by fairings. There are some cardstock pattern details that go on the fins, too, to represent the upper hinged section, hydraulic covers, and inspection covers, There are resin cast actuators as well. This covers up a lot of the balsa grain, making the filling easier, but I coated the cardstock with thin CA and sanded it smooth. There is also a balsa wedge leading edge piece to bond to the fin. I'm not sure why this was done this way, as it might have looked better to carefully sand the bevel in the balsa rather than deal with a seam/joint.

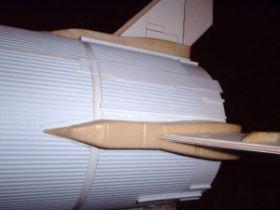
The instructions offer no advice for placement of the 1/4" launch lugs. Considering NAR competition penalizes for launch lugs (unless the original rocket shows them, any deviation from the outline is a ding), I decided to use a wrap around pop lug approach.
With the lower body finished, it's a good idea to paint now, because the paper wrap on the upper body isn't exactly something you want to mask off. I went with a light coat of gray primer to expose any flaws in my workmanship, touched everything up, then went with two coats of white primer, followed by 4 coats of a silver automotive paint.
After the lower body is painted, the upper body wrap can be attached. Mine just barely fit. Note: use white glue on paper wraps, as it won't discolor or shrink. The instructions suggest rubber cement but I think that might be a bit too thick for the wrap to fit.
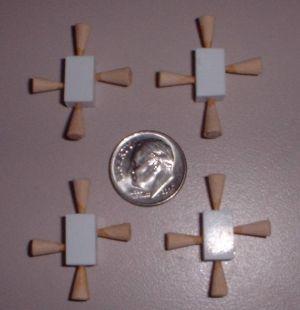 The next
step is constructing the RCM nozzles, which is a big pain. There are four of
them and they consist of a styrene block and four nozzles. You "turn"
the nozzles from dowel stock using a pencil sharpener. I found the wood points
very difficult to bond to the styrene and after talking it over post-flight
with Gordon, he suggests using balsa for the base instead.
The next
step is constructing the RCM nozzles, which is a big pain. There are four of
them and they consist of a styrene block and four nozzles. You "turn"
the nozzles from dowel stock using a pencil sharpener. I found the wood points
very difficult to bond to the styrene and after talking it over post-flight
with Gordon, he suggests using balsa for the base instead.
There are a few other optional doodads on the upper body wrap, including silver tape for some covers and a couple of antennae.
Once you've mastered the RCM nozzle pain, you're ready for the even bigger pain of building the tower by hand. There are 44 dowel pieces needed for this plus styrene stock for the base sections. The dowel pieces are cut using a template, and it's very challenging to get everything shaped and aligned properly then bonded well enough to handle the stress of flight. (It is worth mentioning that a chute is attached to the tower base for recovery.) Even more fun is negotiating a plastic ring/washer through the tower pieces to sit in the center. If you were any good at the board game "Operation" as a kid, you can handle this, but I had a tendency to keep killing the patient.
The capsule assembly is relatively simple, consisting of a cone top, a cardstock shroud, and a pine base. My shroud was too small and after a couple of emails to Gordon, I found a set of replacement wraps at 100%, 102 and 104% scale waiting in my mailbox. Gordon really went above and beyond the call to help make sure I had what I needed to pull off a beautiful build. In my case, the 102% wrap fit just right. Note: the capsule top/cone and base should be painted white before bonding or you're stuck trying to mask a paper shroud.
After dealing with the pain of the RCM nozzles and the tower, it was a relief to see that I didn't have to hand whittle the escape motor nozzles, which were already provided fully turned. These were attached to the motor flare and the completed assembly was painted black.
The tower tube is a breeze. Slip the tube over the shoulder on the motor flare using white glue to hold it in place, then glue a nose cone (after painting it white) on the other end, followed by applying a wrap.
The last bit of construction is the display nozzles, which each consist of two shrouds bonded small end to small end around a TC-20 coupler tube. This way the tube can be inserted into the 18mm motor tubes. Again, it is better to pre-paint the parts here rather than mask off a complex layout later.
I also went above and beyond the instructions and made a custom umbilical cover out of cardstock, attaching it to the capsule wrap.
Prior to flight, you will definitely want to add nose weight. In my case, concerned about the 7-motor cluster weight, I added enough epoxy and BBs to bring the total model weight up to 24 ounces without motors. My CG is at about the U point on the United States decals.
Finishing:
Due to the pre-printed wraps, the complex masking and painting is virtually
eliminated. There are a couple of waterslide decals to apply and that's about
it.
Still, I decided to apply a few layers of Krylon clear coat, so I masked off the upper body and applied 5 light coats. The result is a shiny finish and durable paint protection.
Construction Rating: 4 out of 5
Flight:
A bit of background first on the NARAM event and scoring: Only 4 trophies (and
extra/bonus points) are awarded for each event. For example, there was no
difference in points last year between my immaculate Apogee Saturn V (over 300
hours spent on that one) and the Estes E2X Mercury Redstone cobbled together in
an hour or two. I learned last year that the difference between 10th and top 4
is often in making up "mission points", which are awarded for complex
flights such as staging or clusters, using electronics, etc. I had come out of
the static judging in 4th place and was counting on flying a very aggressive
7-motor cluster to protect or improve my spot. On flight day though, I realized
that if I secured flight points by finishing anywhere below 4th with a
qualified flight, I stood a fairly decent chance of placing in the top 3 or 4
overall for the national meet. Risking a DQ or only lighting a portion of the 7
motors could be disastrous to my meet score, so I scrambled trying to figure
out how to reconfigure the model for a single motor flight (as only a portion
of the NAR certified motors are also certified for contest use). My rocket
originally weighed 36 ounces to keep the CG far enough forward to compensate
for the weight of the 7 motors on the aft end. I spent a couple hours chipping
frantically away at the epoxy/BB block and eventually got the weight down to a
more nimble 24 ounces, which I thought I hoped I could propel with an E30-4.
At the pad, my nerves were completely shot. I'd only gotten about 6 hours sleep the whole week, the pop lug felt tight, there was a constant rain of plastic death throughout the day (as plastic model conversion entries are notorious for crashes and a high DQ rate), and of course, flying in front of a crowd of 100-200 people didn't help. Gordon was there at the pad with me and offered up a special igniter which he assured me would be much better than the included Copperhead.
The RSO called it down, but nothing happened. Continuity was still good, but now I'm down 5 points for a misfire (another difference between the relaxed sport flying world and the must-be-perfect competition world). I double checked the leads, waved the paddle again, and 5, 4, 3, 2, 1, nothing. Feeling bad karma, I then changed pads and igniters, giving Gordon back his "never had a problem before" igniter and switching to a self-made pyrogen dipped igniter. All kidding aside, I am fairly sure the leads at the pad were bad, not Gordon's igniter.
With a new pad and new igniter, it went 5, 4, 3, 2, 1, smoke and fire with a slow, gentle flight up to about 100 feet, where the fading power from the E30 yielded to the extra nose weight I'd left in for potential clustering. It went horizontal then started arcing down during the delay burn. Thankfully, the delay really went at 4 (I hardly ever get an accurate delay from AeroTech motors), full deployment, and both chutes brought everything down in good shape. I had recorded a qualified flight and secured at least 4th place for the event.
With the qualified flight under my belt, I later elected to fly a second flight. In scale events, each contestant is allowed two flights, with the higher of the two counting on the scoring. I looked over the other contestant's scores and figured that a 5-motor cluster would get me enough points to move up to second place (but first place was out of reach). I then prepped a D12-3, three C6-3s, and a C6-5 (just in case the -3s didn't quite get the chutes out, I hoped the 5 would give it one last push). I was very nervous about the tape/friction fit and practically had to hammer the motors in to makes sure I wouldn't spit even one. I approached the pad armed with clip whips and prepped for the flight at the very end of the day.
No misfires this time as the motors lit right away and the LJ-II jumped off the rod with a much quicker climb than the E30. The extra motor weight was enough to keep it climbing vertically after burnout, so it was just arcing over when the -3s popped the chutes. Perfect score for the flight, lots of mission points for lighting and retaining the 5 motors, and I wound up placing second in the event, which was just enough to put me in first overall for the national meet.
Recovery:
Due to the added weight, I substituted out the 16" chute for the tower and
went with a 30" Spherachute. Still, flight #1 drifted right back to the
pad and was damaged slightly from actually hitting the pad.
Flight #2 was flawless, with nary a scratch.
Flight Rating: 5 out of 5
Summary:
This is a magnificent rocket with lots of details and is very versatile with up
to 7 motor capability. Pros are the attention to detail, quality of parts and
design, and accuracy of the reproduction.
Cons would be the short wraps as well as a couple of minor deviations from true scale on color and some minor details.
I highly recommend lurking in TRF and watching for a Sandman/Roachwerks kit announcement, then pouncing on it. Just don't pounce ahead of me and bump me out of getting one!
Overall Rating: 4 out of 5
Other:
I would strongly recommend removable nose weight, so you can adjust the CG for
the motor configuration. There's no need to carry 7 motor nose eight if you're
flying on a single D12.
I would also consider upping the central motor from 24mm to 29mm, not so much for the brute force factor as for the additional single motor options you'd have. There's plenty of room for it, and it opens up a lot more choices.
 |
 |
Flights
|
|
|
|
G.R.A. (August 20, 2005)