| Manufacturer: | Vaughn Brothers |
 Brief:
Shorter body, Carbon Fibre/Kevlar re-enforced airframe, piston ejection system,
extra centering ring, all thread reinforcement round central electronics bay.
Replaced recovery shock cord with tubular nylon and replaced motor mount with
PML phenolic motor mount tube.
Modifications:
This would have been an easy kit to build from stock as it came with easy to
read instructions and contained easy to build parts. Having said that, I
promptly put the instructions in a drawer and begin my kit-bash in earnest. As
always I measured the components and entered the data into RockSim. I also had
an extra body tube which was slightly shorter and by mistake used this tube
instead of the original tube (hence my rocket is slightly shorter than the
kit). Using RockSim I wanted to design something which was a little different
than the usual single deployment ‘blobbo’ rockets. With this in mind
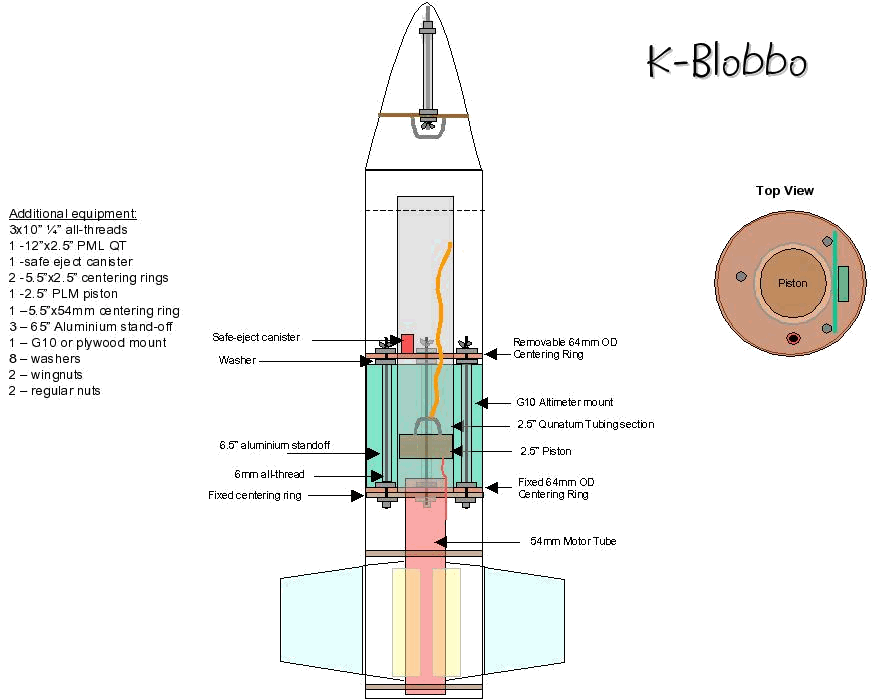
I decided to have a central piston which would span the length of the rocket
and create a void which I could use for an electronics bay. To achieve this I
needed extra centering rings to fit the motor mount and the piston tube (a
piece of 2.5" PML QT). A forward centering ring would be removable and
allow for the placement of electronics in the void created by the piston. The
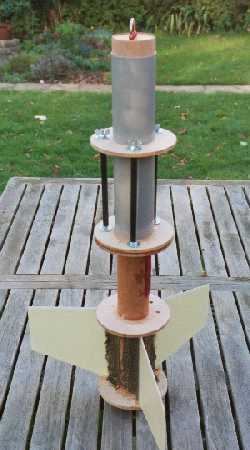
forward centering ring is held in place by the all thread rods which have
carbon fiber sleaves with washers to create shelf for the centering ring to sit
on (see picture 2). I drilled a very small hole in the base of the piston tube
which allowed for some air to pass down below the electronics bay and keep a
vacuum from forming inside the piston.
The fins were mounted in the usual way with extra strips of carbon fiber and Kevlar® as re-enforcement.
The airframe was vacuum bagged using my trusty foodsaver and some carbon fiber/Kevlar® weaved cloth. A further sanding veil of fibreglass was applied once the first layer was 1/2 cured. The result was an airframe which is rock solid. The body tube was slotted all the way down so I could mount the entire motor and piston assembly in one step. Once mounted onto the airframe external fillets were created with resin and silica filler. After this had all dried the rocket was almost done.
After measuring the center of gravity against the CP in RockSim I decided how much weight to add. In the end I used 1.5lbs of lead along with the weight of the hardware and forward bulkhead plus enough resin to seal it all side the nose cone. This left about 3/4 of the nose cone as extra room for the parachute and shock cord (i.e. I didn't have to stuff all of this into the piston tube).
I was now ready to finish it.
Construction:
- 1 body tube made from thick kraft paper
- 3 fins of G10 fibreglass
- 2 plywood centering rings for a 54mm motor mount
- 1 10" 54mm motor mount
- 1 heavy elastic shock cord
- 1 plastic nose cone
 1 nylon parachute
 - 2 quick links
- 1 launch lug
- Instructions...
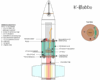
- Schematic (Click Here)
Construction (PROS):
The extra room a 5.5" airframe gives makes this an easy kit to build from
stock. For my sins the modifications I made took a while as they were somewhat
involved. From stock the kit is complete so no complaints there. Since this is
a mod I ignored all instructions and replaced parts as needed.
Construction (CONS):
The body tube did not come slotted which isn’t a real big problem but does
make for extra work.
Finishing (PROS):
In keeping with the idea of trying something different with this rocket I
decided to use a ‘Monocoat’ finish. This was my first attempt at
using a Monocoat iron-on finish. After some testing with the iron and some
samples I decided upon a sky blue airframe with a black and white check trim (a
Z-car effect). I had Scott Binder print up some new decals (as I planning to
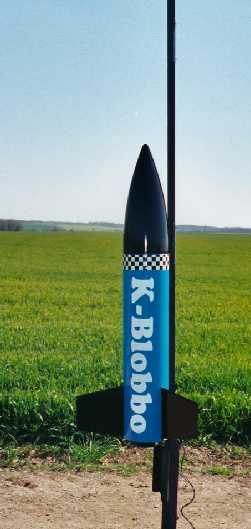
ultimately launch this on a K550). Its new name was to be K-Blobbo. As you can
see in the picture the results were not too bad (see picture 1).
Finishing (CONS):
As the Monocoat isn’t supposed to be applied over a prepared surface this
meant that I could not use a filler primer (UV Smooth Prime) to create a nice even
surface for the Monocoat to cover. Hence there are surface ripples from the
composite covering showing. I may have a go at finishing the composite layer
then trying to apply the Monocoat again.
Flight:
This kit is suppose to be the King of Blobbos and recommends I and J motors. I
had a couple of J’s left so first off was a long burning J185 Blue Thunder
which lifted off the pad very nicely and burned and burned. The parachute
deployed on time but the surface drag from the rocket was such that the delay I
choose was wrong and too long. However, the solid build of the airframe meant
that even a late and high speed deployment was no problem. The rocket came down
fairly close and all was well. A video of the launch detected a slight wobble
which to me meant that I was just too close to the center of pressure so more
nose weight was going to be needed.
After another 1/2lb of nose weight I launched it on a J275 White Lightening. This time there was no wobble and I put in an RDAS in the electronics bay to ensure deployment at apogee. All went to plan and the rocket landed safely nearby. The altitude reached as 1000 feet lower than Rocksim predicted (lots of drag).
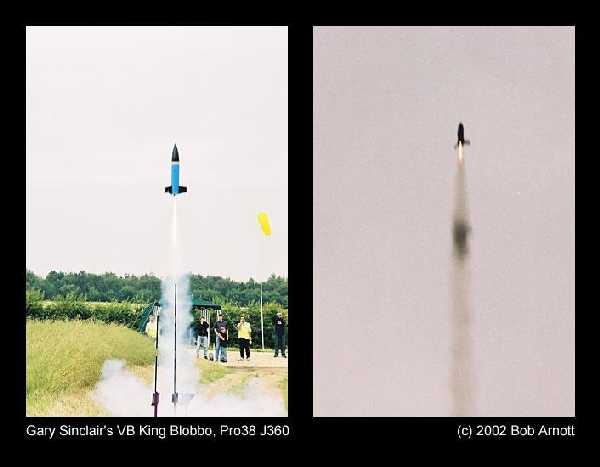
A third launch was performed using a Cessaroni Pro38 6 grain (international version) J360 (800ns). 3. 2. 1. launch and up it went to 2500 feet with the RDAS ensuring deployment at apogee. Analysis of the data indicated that a 10 second motor ejection delay is ideal for this rocket.
I have since launched this a fourth time on a J360 Pro38 with only motor ejection and it flew as planned with the 10 second delay providing the correct delay for an apogee deployment.
Summary:
A nice rocket with the internal piston making for easy prep. The electronics
bay ’round the piston is really handy and allows for a greater range of
motors.
Other:
As always build it like an M and you won’t need to build it again when it
crashes.
 |
 |