| Construction Rating: | starstarstarstar_borderstar_border |
| Flight Rating: | starstarstarstarstar_border |
| Overall Rating: | starstarstarstarstar_border |
| Manufacturer: | The Launch Pad  |

Brief:
Single stage scale model of a British/French anti-radar missile.
Construction:
The kit includes:
- 2.6" diameter body tube
- Short 2" diameter body tube used to form tail cone
- Engine mount tube
- Fiber engine mount rings
- 2 sheets of balsa
- 2 balsa strips to simulate the missile's conduit
- Parabolic nosecone
- Mylar parachute
The instructions are minimal but sufficient. All Launch Pad kits assume the purchaser has experience in building rockets. Launch pad does not give you the template for marking fin positions on the body tube. You will need to make one yourself. This kit requires significant shaping of balsa to form the conduits. This kit also requires you to form a paper cone which is glued to the top of the plastic nosecone to give it the proper shape. It takes a lot of effort to get the paper and plastic to blend seamlessly. Mine was damaged after the first flight and removed because of this.
This rocket has 8 fins that are mounted fairly far forward on the body tube. As a result, a significant amount of weight must be added to the nosecone. This is supplied in the form of a ball of clay. The instructions tell you to seal this in place with lots of glue. I used an expanding foam instead.
The most difficult part of construction is making the conduits. You must sand the back side of the conduits to a concave shape so that they will mate to the body tube. Both ends of the conduits are sanded to a particular shape. Finally, shallow holes are drilled in the conduits an inch apart down the their entire length. After drilling a few holes, I didn't like the look so I filled them back in. The rocket looks pretty darn good without the conduits altogether.
If you like to build, you will like this kit. I would say this kit builds like a level 3 rocket.
Finishing:
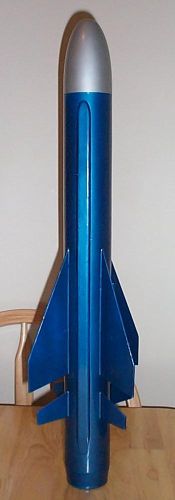
I went with a scale look and painted the rocket light ivory. On its first
flight, the nosecone broke free from the rocket and fell to the ground damaging
the paper extension. I removed this and gave the model a non-scale paint job.
The body is now metallic blue and the nosecone is silver. It looks pretty sharp
this way.
Construction Rating: 3 out of 5
Flight:
This rocket flies really nice on a D12-3. It's a little squirrelly, but not too
bad. Certainly not dangerous. This rocket has been in my collection for some
time now and has had its share of hard knocks. So far I've always been able to
repair it. Most recently, an extremely late ejection charge stripped the chute,
causing the shock cord to rip about half an inch into the body tube. The damage
has been patched and she is ready to fly again.
Recovery:
I'm not a big fan of the mylar chutes. After a few flights they become horribly
crinkled. Any nicks can cause the thing to rip in half. I replaced mine with an
Estes chute.
The plans tell you to tie a string from the nosecone to the shock cord, but I found that the string would snap from the force of ejection and the weight of the nosecone. Better to tie the shock cord directly to the nosecone.
Flight Rating: 4 out of 5
Summary:
Despite not giving it perfect scores, I really like this rocket. It was fun to
build and is great looking.
I'm not crazy about the paper nosecone extensions, the mylar chute, or the lack of decals.
You have to give credit to The Launch Pad for coming out with some unusual and interesting designs.
Overall Rating: 4 out of 5
 |
 |