| Construction Rating: | starstarstarstarstar_border |
| Flight Rating: | starstarstarstarstar |
| Overall Rating: | starstarstarstarstar |
| Diameter: | 0.28 inches |
| Length: | 9.82 inches |
| Manufacturer: | FlisKits  |
| Style: | Helicopter, Contest, MicroMaxx |
Brief:
There's something seriously wrong with Jim Flis, and thankfully the rest of us in the hobby can enjoy the fruits of
his eccentricity. FlisKits continues to expand the Micro To The Max line and also continues to dabble in NAR
competition designs. Rather than monkey with relatively simple events, Jim started with one of the most challenging
events held today, and with the Nanite has tamed the Rocket Glider event for the MMX crowd. Now, with the Tiddlywink,
the world has a relatively easy to build 1/8A helicopter model that performs fairly well and this model will surely be
the most common rocket at NARAM this year.
Construction:
As with the Nanite, Jim had to abandon the MTTM standard of using a tiny baggie and instructions/header card all
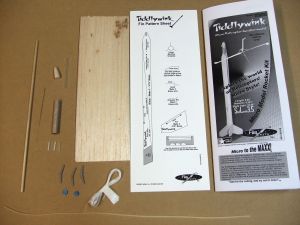
fitting on a single 8.5" x 11" sheet of paper. This is packed like a "real" kit in a heat-sealed
bag with plenty of good quality components including:
- Balsa nose cone
- BT-2.5 motor tube
- Balsa fin/blade stock (1/16")
- 1/8" wood dowel
- Sig rubber
- Assorted launch lugs
- Swivel/pin hinges
- Wire, thread, assorted do-dads
As someone with about 500 builds under his belt, including maybe 25-30 helicopter models, let me assure you that the instructions for this are a must read and should be very closely followed. It's not that it's a complex build, but that it incorporates some unusual techniques and design features and you'll need to thoroughly read the instructions to catch this.
Despite the fact that I had a few performance-enhancing tweaks I wanted to make along the way, I built this one completely stock and will review it as such. I'll save the tweaks after dialing in this one for a few flights first.
Weight is a killer to helicopter performance, especially when sliding all the way down to Micromaxx level and so I'll also note a few key weights along the way. Overall, my model weighs in at a very respectable 4.3 grams empty. It could easily be built a bit under 4 grams with a few minor tweaks.
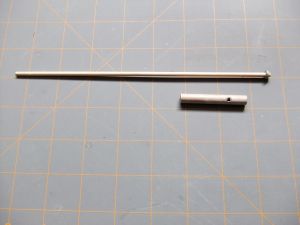
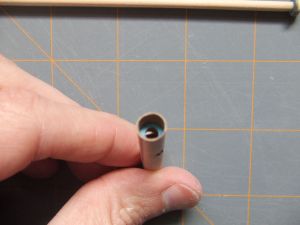
Construction starts with the motor tube, a fairly tiny section of BT-2.5. You glue a centering ring into the forward end which will serve as the stop for the piston assembly. Key construction tip not covered in the instructions: make sure you clean up and burrs on the ID, even try to sand it lightly if you can. Make sure you get a good fillet on the forward seam. Next, drill a couple 1/8" vent holes just aft of the centering ring. Drilling is easy, but cleaning up the fraying inside of the tube is a little pain. Remember, this is piston-activated, so the inside of this tube has to be very smooth. I taped a scrap of sandpaper to the outside of a scrap of 1/8" dowel (from a later step) and sanded the inside smooth. I also soaked a little thin CA on the holes so they would not fray. At 0.4 grams, the motor tube represented almost 10% of my total weight, but if you want it to last very long as a piston, there's not much that can reasonably be done to shave weight here.
The main shaft of the model is a 1/8" wood dowel cut down to 8" long, which gets a centering ring attached at the end which enables it to slide inside the BT-2.5 to work as a piston. This single piece wound up being over 25% of my total weight at 1.2 grams (after cutting). Hardcore competition folks know there are a number of alternatives that could shave about a third of this weight, although that clearly gets beyond the target market for this kit.
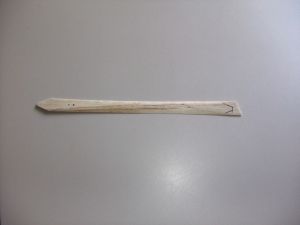
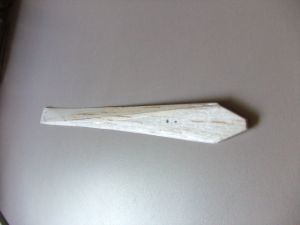
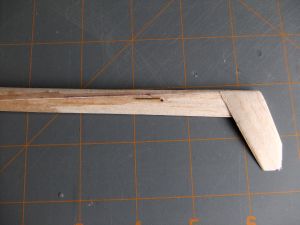
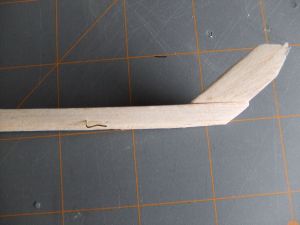
Next come the blades, hand cut from 1/16" balsa sheet, along with fins from same. The 9" x 3" balsa sheet supplied with my kit weighed in at 2.2 grams. Not bad, but not exactly contest balsa. The blades, before sanding, worked out to about 1.0 grams for the set, and the fins added another 0.3 grams. The blades get a pretty common airfoil and camber: flat bottom, rounded leading edge, and tapered trailing edge. However, the instructions call for actually splitting the blade in two and re-gluing using a cardstock angle for the camber. I prefer to lightly score the blade, then flex/snap open the cut line to flex open a camber. I then filled the exposed crack with medium CA. The CA wound up weighing more than the balsa I'd sanded off in airfoiling, so my finished blades (with fins) wound up weighing in at 1.5 grams for the set, up from the 1.3 grams I started at.
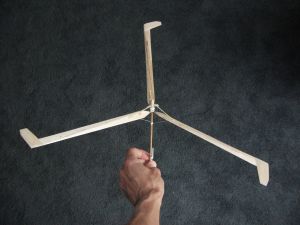
I have to note the fins on this, which are very unusual. Most copter designs use fins attached to some sort of body tube at the base, and flat/cambered blades that snap into place at deployment. Flis saves some mass and tries to turn everything into adding performance and has the fins incorporated into the blade design as little flaps/extensions. Using this approach, the fins aren't quite facing in the usual 120-degree orientation, but they are balanced and work, plus when deployed wind up helping the blades a bit rather than acting as drag when the model tries to spin. It's a very clever approach that is probably going to influence copter design in the future. Since their primary purpose is blade extensions, the airfoil sanded into them will seem whacked--rounded leading and trailing edges with a tapered airfoil from root edge to tip edge. It makes sense once you mount them...
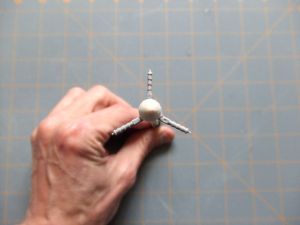
With the blades and fins done, construction will pick up pace. Blades get tiny sections of launch lug on the forward underside that serve as receptacles for the hinge pins. The dowel is inserted into the motor tube (at which point you need to confirm the smooth flow of the piston assembly, most likely discovering a need to sand down the dowel a good bit).
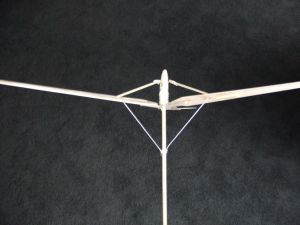
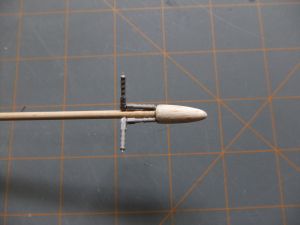
The hinges are another cool feature of the kit. I've typically used either trimmed down Klett hinges or music wire, which either means weight or finicky performance. Jim's found a nice little plastic hinge that looks like it was removed from the shoulder of a tiny little Transformer toy or robot. They're actually Robart hinge points, available from Sig, and you might want to pick up a few of these as spare parts down the road or in my case, for scratch builds. I love the performance and weight. One end of the pins is glued to the top of the dowel (after the dowel is glued into the nose cone) and the other end is glued into the launch lug on the underside of a blade. I found that sanding the side that goes on the dowel a bit flat will help improve the surface area for easier bonding. I also had trouble with the other end being too loose in the lugs for a good fit, and so I had to insert a tiny sliver of napkin into one end of the lug then the pin in the other so that the CA would grab on the napkin and quickly lock the hinge pin into position.
The mounted blades then get some detailing to manage the launch and deployment action. To hold them in place during boost, each blade gets a tiny arm attached that's formed from brass wire. This arm locks in place in the exposed forward end of the motor tube/piston. When the piston is pushed forward at ejection, the arm slides out of the tube and releases the blade. The blade is deployed via a piece of Sig rubber, attached to a pin inserted into the nose cone, and through the blade. The dihedral of the blade deployment is controlled/limited by a piece of shroud line string anchored to the dowel shaft on one end and the underside of the blade.
Finishing:
For sport flying, you might want to paint this but in doing so would likely double the weight and potentially muck up
the lines and piston controlling blade deployment. A better approach as recommended in the instructions would be to
color the model with magic markers. I left mine naked for first flights but will eventually Sharpie it when I start to
fly on bigger fields with taller grass.
Construction Rating: 4 out of 5
Flight:
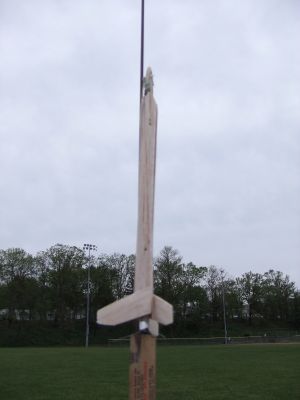
Chompin' at the bit to see how it would fly, I zipped down to my local ball field/park where I was able to set up on
a vacant soccer field at twilight. Flight prep is quite easy on this compared to typical copters with burn
strings--just hook up the elastic, fold down the blades, and slide them down to catch the hooks on the forward lip of
the motor tube.
I had loaded the only recommended motor for this, a Quest MMX-II, and used one of the very nice (albeit expensive at $0.50 apiece) Q2 igniters especially designed for Micromaxx (the version without pyrogen dip). These igniters eliminate the nuisance I've occasionally had with either breaking open/reworking the little plastic-based old style MMX igniters or cutting/folding up my own from bare nichrome wire.
Since I built stock, I also didn't want to juice my performance with a piston and flew using a standard MMX rod (with the kit's supplied launch lug). The boost was fairly straight, but there was a little wobble action towards the top. It wasn't that high though, maybe 75 feet or so at apogee.
Recovery:
MMX's are notoriously short delays, barely a second, which usually results in very early deployments unless you're
dealing with a heavy or high drag model. In this case, I could definitely have used another 0.5-1.0 second as it was
still coasting up when the blades came up.
Deployment was perfect. The blades snapped into position immediately and in less than a second it started spinning. Within two seconds, the blades were practically a blur. I was flying in dead air, virtually no wind, and my time was pretty close to 30 seconds.
Flight Rating: 5 out of 5
Summary:
This is an outstanding little rocket and another great MMX competition performer. There is no doubt whatsoever that
at NARAM, the 1/8A-HD record of 27 seconds for A division (children), 16 seconds for B division (teens), and 29 seconds
for team division will fall. I'd even wager that a slightly enhanced version of this kit will top the C division
(adult) record of 64 seconds.
Copters and/or Micromaxx might not be the most appealing niches in rocketry, but my two cents' says this is one of the best overall designs/products out there.
Overall Rating: 5 out of 5
Other Reviews
- FlisKits Tiddlywink By Glenn Roth (July 12, 2009)
Brief: MicroMaxx helicopter duration rocket. Construction: 1 small BT, 3 fins/helo blades, motor taped in BT, small nosecone glued on a shaft. BT is slid up on locking pins that are mounted on each blade. Instructions were straightforward and somewhat easy to follow if you read through them several times. CONs: way too delicate and hard to get hinges mounted correctly. I've ...
- FlisKits Tiddlywink By Ray King (April 11, 2009)
Brief: This is another innovative MicroMaxx rocket from FlisKits. It was developed by Jim Flis based on customer requests and in preparation for the upcoming NARAM contest. Based on my results it will likely be a very popular model at NARAM and any 1/8A HD competitions. Construction: The parts list: BT 2.5 Body Tube NCB 2.5TW Nose Cone 0.060" Fin Stock ...
 |
 |
Flights
|
|
|
|
J.F. (August 5, 2009)