| Construction Rating: | starstarstarstarstar_border |
| Flight Rating: | starstarstarstarstar |
| Overall Rating: | starstarstarstarstar_border |
| Manufacturer: | Saturn Press |
Brief:
I have been a fan of the Astrobee 1500 for years. My first cut at one was a
large scratch built bird for a NARAM many years ago. That bird was about
40" tall and flew on a composite engine. So when I saw an actual kit of
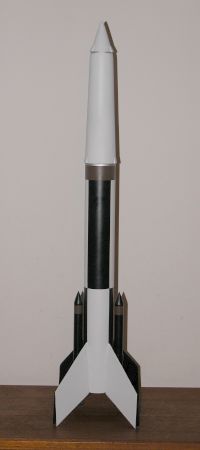
this vehicle I knew I had to have it. The kit is produced from a Peter Alway
design by Balsa Machining Service. The actual Astrobee is a conglomeration of
rocket motors that was internally developed by Aerojet to sell to NASA for high
altitude, ballistic trajectory sounding flights. It was the largest sounding
rocket that NASA has ever flown. I found this a very attractive scale model
that I needed to add to my collection. With mostly precut parts and excellent
components, this is a great scale model to add to any collection.
Construction:
My kit was ordered from Aerospace Specialty Products. When it arrived, I
immediately opened it to see what type of construction job I was going to be
performing. The parts were all high quality based on Peter's design and BMS's
materials. As is always true of BMS parts, they were excellent quality. The
large balsa nose cone that is actually the second stage shroud and nose cone
was a perfect turning. The fins were very thin basswood that was laser cut. The
attach fittings for the strap on boosters to the first stage were also laser
cut from basswood. There were also turned nose cones and balsa nozzle plugs for
the strap-on boosters. The tube "doublers" for the strap-ons were
laser precut from the paper tubing which made construction even easier. The
engine mount centering rings were laser cut from heavy fiber board. An elastic
shock cord and parachute were included for recovery. The instructions were good
although probably not perfect.
The kit includes:
- First stage body tube with laser cut slots for fins and strap-on boosters.
- Second stage/nose cone single piece balsa cone.
- Laser cut basswood fins.
- Laser cut fiber board centering rings.
- Strap-on booster balsa nose and tail cones.
- Strap-on booster tubes.
- Laser cut strap-on booster double tube.
- Engine mount tube.
- Mylar parachute and elastic shock cord.
- Launch lug.
The basic construction is typical of any smaller model rocket, however, the engine mount installation is a bit different. The upper centering ring is attached to the engine tube but the lower one is not glued on at this time. Once the front ring was glued and dried, the engine mount was glued into the rocket body at the front end only using the "loose" rear centering ring to center the tube. The rear ring was then removed to allow for internally gluing the through-the-wall fins into place from inside the tube.
The fins use built up construction to correctly simulate the actual vehicle. There are two side panels and three edge panels that make up the fin. The one thing that troubled me with this kit was the fins. Even though very thin basswood is used for the fin, the leading edge joint is going to have a flat edge twice the thickness of the basswood as built per the instructions. I knew the actual vehicle had sheet metal fins with a relatively sharp leading edge. I actually contacted Peter about this and was told there was no simple solution so he designed it this way. I wanted to have the sharp leading edge so once I had the fins completed, I took epoxy putty and built up a ¼" wide leading edge across the fin that tapered to a sharp tip. It means my model is slightly out of scale, but it looks much better.
The fins attached to the body through laser cut slots. It was a little difficult to get the fin tabs through these slots, but it makes for a nice strong joint with no need to fillet the fin at the tube to maintain a scale appearance. The filleting is done internally at the tube to tab joints. Once this internal filleting was complete, the rear engine mount ring was glued in place.
The strap-on boosters also required some extra work but the laser cut attach rings and tubing doublers made this a bit less tedious. The doubler tubes were glued to the strap-on tube and then the attach fittings are glued into place. There is a balsa nose cone and also a balsa tail insert. The tail insert is glued in place and a paper nozzle cut from a template is glued around the balsa tail fitting. The completed boosters should be set aside and painted before attaching to the main stage. After finishing and painting these boosters and the overall rocket, I epoxied the boosters to the main stage into the laser cut holes on the main stage. These laser cut holes make alignment and attachment a relative breeze. The shock cord is glued internally to the lower stage.
A launch lug was provided and glued at two locations on the lower stage. The large nose cone comes with a screw eye for attaching the shock cord and parachute.
Finishing:
The most time consuming job on this kit was to finish the large fins and nose
cones. The second stage/nose cone balsa turning is very large and requires some
effort to finish. I am still using model airplane balsa filler coat and sanding
sealer. I applied two coats of filler to the nose cones and fins followed by
three coats of sanding sealer. I sanded between each coat. The completed wood
parts were very smooth with a very nice finish. One thing I should note is that
I finished the fins prior to installing them into the main tube.
I painted the vehicle per the scale black and white pattern using Krylon paints. I also did not attach the strap-on boosters until I had painted the main stage and the boosters separately. The paint pattern was not that involved and I started with a gray primer followed by gloss white overall then I taped off the black patterns. There were also two silver bands at the top and bottom of the second stage to simulate the marmon clamps. Adhesive chrome mylar was included for simulating the clamps, but I masked and sprayed the clamps with silver paint instead.
Construction Rating: 4 out of 5
Flight:
I actually had this completed rocket on the shelf for some months before flying
it. The rocket is designed for D12s and I used a D12-5 for the first and only
flight. It was a bit windy in Bunnell, Florida, on the day I flew it. Prepping
is standard and I used flame proof wadding. The parachute was mylar and I had
installed an elastic shock cord. At ignition, it lifted straight off the pad in
a nearly vertical flight even with the breeze. That is due to the extreme
stability the large fins provide. The D12 probably lofted the Astrobee to about
800 feet. The chute came out at apogee and it drifted down wind which required
a bit of a walk to pick up. Upon retrieving the Astrobee, I noticed that
unfortunately at ejection the nose had recoiled into the first stage tube and
gouged a small chunk out of the balsa nose. Back at the workshop I filled it
with wood putty and sanded it back to shape before repainting the nose cone.
Recovery:
Recovery was nominal and easy using the included parachute.
Flight Rating: 5 out of 5
Summary:
This was a very nice kit, but I would only recommend it to a patient,
experienced modeler. The parts are extremely well made and all high quality. It
flies very well due to the large fins and makes an excellent addition to a
scale modelers' collection as well as a great display model.
Overall Rating: 4 out of 5
Other Reviews
- Peter Alway Astrobee 1500 By Chan Stevens (June 8, 2007)
Robert Koenn has already submitted an excellent review for this, so I'll just add a few stray second opinions. This is a great reproduction of the NASA/Aerojet research rocket and should appeal to both scale aficionados and NAR scale competitors. At $30, it is a real bargain in the scale world. The kit is produced by BMS based upon the work of scale guru Peter Alway. As Robert noted, the ...
 |
 |
Flights
|
|