| Manufacturer: | Estes  |
 Brief:
After a bit of prodding from my decal maker, Mr. Bill Eichelberger, I am submitting this review. Thanks Bill.
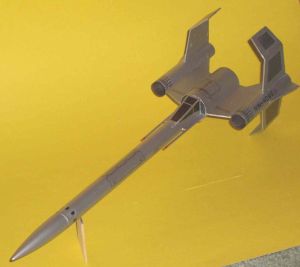
The Nebulon Warrior is a rather easy to duplicate kit with the aid of plans downloaded from JimZ's website. It is a space plane fighter type rocket.
Construction:
All of the tube sizes and component numbers are in the plans.
I just happened to have a PNC-20A in my stash, but I think they can still be found from some vendors. To build the rocket you will also need a 12" length of BT-20, two 4" lengths of BT-20, and a 2 3/4" length of BT-55. For centering rings I used heavy cardboard cut from a folder. I did not have a engine hook so I just used an engine block and friction fit the motors. The shock cord is 14" of Kevlar® and 14" of 1/8" elastic.
Construction is pretty straightforward and the instructions are easy to follow. PDF files are great for printing body tube marking guides as long as you set them to print at 100%. I had some 3/32" basswood left over from a project so I used it instead of balsa on the two large wings that couple the main BT to the wing pods. I like to tack the fins on rockets with CA and then fillet with white glue. This makes it easier to get more done in less time and then I'm not stuck holding parts waiting for white glue to set up.
Finishing:
I ran into one setback here. The decals in the original were on a blue back decal paper. This led to the model spending a lot of time sitting in primer before finish. I sealed the fins with white glue, sanded, sanded again, primed, and sanded one last time. The rocket then spent 6 months and all five of its flights to date in primer. Until one day decal maker Bill Eichelberger got bored and with the aid of a Windows paint program, he erased all of the blue with white and printed them for me.
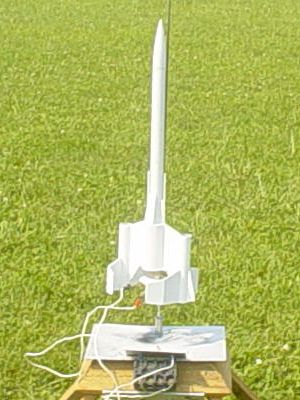
I cleaned up the rocket and gave it 2 coats of some Krylon Aluminum paint I had on the shelf and applied the decals. I then gave it a coat of Krylon clear.
Flight:
The plans call for the standard A through C motors. Mine has flown with pretty much all of these and flies great with all of them. I use dog barf for wadding and the chute is Estes 12" plastic. The chute is attached to the nose cone with a swivel. This rocket is very stable in flight and is not bothered by the wind. The only gotcha is the big fins like to tangle up the chute. So far I have been lucky that when it has tangled up it manages to untangle.
Recovery:
The standard 12" chute is perfect for this rocket. With five flights to its credit, there has been little wear and tear on this bird. Then again, it also has new paint. If I had gone with the recommended length of shock cord, I think I still would have a problem with the fins tangling. That is just the nature of the beast.
Summary:
This is a cool rocket to build and fly. Despite the problems with the shock cord and decals, it is a great clone to build with a minimum of cost in parts. I like it.
 |
 |
Flights
|
|