| Construction Rating: | starstarstarstarstar_border |
| Flight Rating: | starstarstarstarstar_border |
| Overall Rating: | starstarstarstarstar_border |
| Manufacturer: | Qmodeling  |
Brief:
This is probably going to be considered the flagship bird of Qmodeling's upscale/mega retro series. It's a 1.65
upscale of the Estes classic Andromeda. As noted in the other fine reviews, this is a magnificently engineered design
and a sheer pleasure to build and fly.
While I will cover some construction detail and pictures, I'd also highly recommend Bob Cox's construction thread on TRF for more information. Bob was one of the beta builders of this and really put an outstanding effort into building his model, which was proudly displayed at NARCON 2008.
Construction:
OK, let's hit the touchy subject of price right up front. At about $120, this is way beyond the price one would
normally expect to pay for a mid-power kit and that's going to put a fair number of people off. I was one. I've
normally picked up every Qmodeling release right away, but at this price it was beyond my budget and I waited about a
year before finally picking one up. That was in large part due to working out a deal having won a Vega or Viper kit in
an EMRR contest. For the money though, you get some pretty impressive stuff--not just a bag of parts, but some
amazingly helpful tools/fixtures and top of the line recovery system. While it will certainly rank up there at or near
the top of my most expensive model list, it will also rank up there on my most impressive model list as well.
The parts list is extensive; more than I want to elaborate on in this review. In addition to over 6 feet of good quality kraft tubing (slotted for TTW fins), you get laser cut balsa fins, a heavy wall foil lined 24mm motor tube, the famous QModeling interlocking motor mount assembly, numerous laser-cut fiberboard details, decorative rings and dowels, etc. Also included are multiple sheets of outstanding quality silk screened waterslide decals, Kevlar® shock cord, 9" x 9" Nomex® heat shield, and a 30" Top Flite nylon parachute.
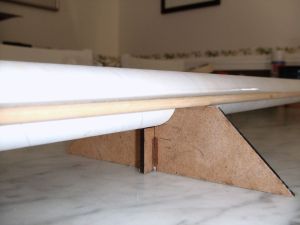
The real "bonus" materials though, are the 3 multi-purpose assembly fixtures.
My instruction manual was revision 3.0, which at time of writing is also the most current edition (QModeling makes all instruction manuals available online). Other than missing decal placement illustrations (there was no page 2 where these would go), my instructions were excellent and probably the finest in the hobby today. They have obviously been refined through several builds and Bob Cox's input is certainly noticeable with plenty of attention to detail and construction tips along the way.
According to the instructions, construction is broken out into 3 main sections totaling about 3.5 hours plus finishing. I had to laugh at that though, as I tended to be overly picky as I went and probably dropped closer to 30 total hours into this. However, I'd say 20-25 could be considered finishing related. Surprisingly, I'd rate this no higher than a 3 on the 5 point skill level scale, thanks to the terrific instructions and illustrations plus the assembly fixtures.
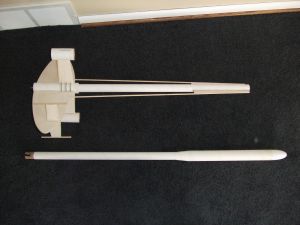
As noted in the other reviews, you really do need to thoroughly read the instructions before beginning construction in order to make an informed decision about how to manage the recovery mounting and separation. The three options presented are basically midpoint separation with chute in the lower BT-55, nose cone separation with chute in the upper BT-60, or two-piece twist-lock construction with nose cone separation so you can break it down for easier transport. There are a number of pros and cons with each approach. In my case, while I normally drive to launches in a small crossover SUV that can handle the 6-foot configuration, I am occasionally left with a relatively tiny compact car and chose the split twist-lock approach.
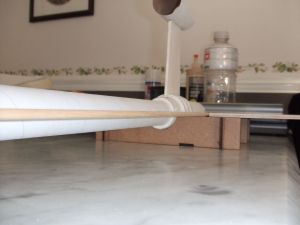
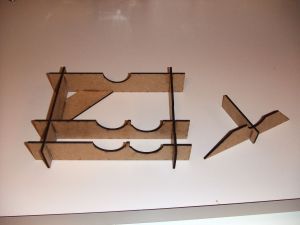
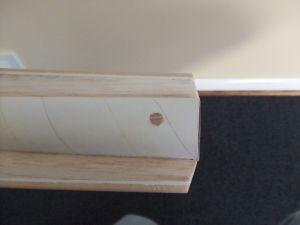
Construction begins with a couple of assembly fixtures. These are pretty straightforward, built by tacking together laser-cut parts that have interlocking slots with a little CA. While the illustrations are very good, a couple of pieces are very similar looking, and it's possible to get the middle and one end piece mixed up or even mount one of the pieces backwards so pay careful attention to the positioning as you go. I did in fact blow it and mixed up the middle and end piece and didn't catch it until much later when I couldn't properly fit parts in for a tricky alignment.
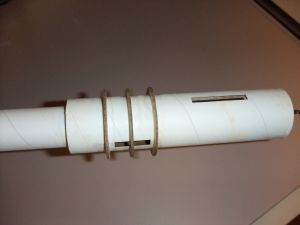
Next comes the motor mount, which can be a bit tricky if you're not used to the QModeling mounts. These ain't exactly your typical body tube/centering ring/hook assemblies... Even something as simple as a thrust ring becomes a bit more complex here--there's one thin ring mounted from the aft end, reinforced by a second ring mounted from the forward end (which will require a long Q-tip to apply the glue fillet). Worth noting is that the thrust ring position will be a bit off depending on your intended motors. If you're using the 24/40 RMS hardware, there will be a little too much room. If you're using an Estes E9 (not something I'd recommend) or the newer 24/60 RMS hardware (outstanding choice!), then the thrust ring is not far enough forward. It's really important in this case to begin with the end in mind.
With the thrust rings in place, a metal retaining hook is then popped in and held in place by a series of gear-like balsa rings. These rings in turn hold interlocking balsa plates that are slotted for TTW fins. A series of centering rings finish off the motor mount construction (and depending on your recovery placement choice, the Kevlar® shock cord might be mounted to the forward centering ring).
Once the motor mount is complete, it is then mounted inside the lower BT-55 section. As an example of the impressive attention to detail, each of the BT-55 tubes is marked with an X at the cut end, so that you can make sure that end goes inside the transition (upper) or inside the lower BT-60 tube (lower). The assembly is completed by sliding on a slotted BT-60 "reactor tube" and 3 centering rings (reactor rings).
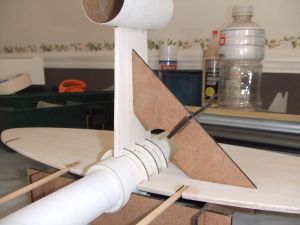
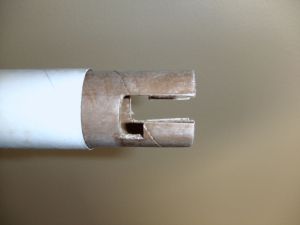
The fin work on this model is extensive, and includes some very complex positioning and alignment challenges that are greatly simplified by the fixtures. First, the two main fins need to be assembled from two pieces, presumably caused by balsa sheet restrictions, as I could think of no other reason to justify having to laser these as separate pieces. Next, you tack on 2 decorative trim plates onto outboard BT-60 pods using the fixture to hold the plates in place on the tube. Once the plates are in place, the same fixture is then used to align the fin to the BT-60 pod.
Next, the main fins are attached to the lower body tube/motor mount assembly. Again, using the fixtures makes this a breeze. One fixture holds the front end level, and another fixture locks the aft end in place as well as positioning the fins and keeping them true/straight. Once they're in place, you tack on the forward strakes and long trim dowels, which fit snugly into the pre-notched fins. The same fixture that kept the forward end of the body tube level on the previous step serves to keep the strakes aligned here. Once that's done, it's rotated and is then used to make sure the pair of fins that support the BT-60 pods are perpendicular to the main fins.
The last fin-related construction step is the antennae mast, which is a slotted fin that slips onto one of the main fins and has a couple dowels trimming the ends. Mine did require a little filling, although not as much as Drake's so it looks like this has improved a bit over time.
The fins and strakes get a few decorative details on them, each of which are carefully positioned using a template laser cut from stiff/fiber cardboard.
The upper body is much simpler. The upper BT-55 gets a pair of centering rings to fit into the BT-60 and a cardstock shroud on the aft end. The shroud even uses one of my favorite seam-minimizing techniques of a separate glue tab that goes inside, allowing the two ends to mate up in a perfect butt joint. And the glue tab is even just a hair shorter, preventing it from causing a small bump when the centering ring pushes against it (it rests against the centering ring, doesn't slip over it). The upper tube is topped off with a BT-60 main compartment and a basic Estes PNC-60 (Big Bertha style) nose cone.
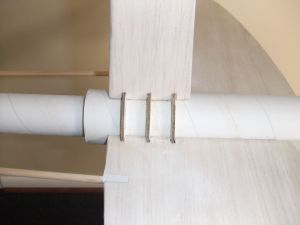
Now in my case, having chosen the twist-lock method, I had some more work in store for me. The twist-lock has a dowel pin inserted in the lower BT-55, so I had to drill a couple holes for this and reinforce the inside with thin CA. The upper BT-55 gets a coupler inserted, but before inserting it I had to cut away a pair of L-shaped slots that fit over the dowel pin. With such precisely engineered design throughout the rest of this, I foolishly figured the dimensions and template would result in a perfect fit. While the dimensions probably were perfect, when executed by a Dremel in my less than CNC-controlled hands, it took several passes to get just the right fit. I was paranoid about being too sloppy and having a glaring joint seam, so had a fit that was too tight to twist and lock, having to gradually expand the L of the slots until it fit.
As a nice touch, there are a couple of decorative disks/pads included to cover up the dowel pin holes if going with this option.
Finishing:
One of the things I love about the Andromeda is that you can achieve such a beautiful appearance with an incredibly
simple paint scheme. The thing is basically all black, with just a couple accent colors that can be done by hand.
I started out by filling grains with ample smearing of Elmer's Fill 'n' Finish (tube spirals were dealt with before construction). I then went with two coats of Plasti-Kote gray automotive primer, which goes on thick and sands off easily, helping to finish off the grain and spiral filling.
After the primer coats had been sanded down, I followed up with two coats of Rustoleum metallic black paint (the kind with an almost sparkle finish). This paint is an outstanding choice for this type of model and was also my preferred paint for the trade show demos I made of the FlisKits Night Whisperer and Alien 8.
With the black fully cured 24 hours later, I then painted the reactor rings gold using a hand brush, and the various decorative pads a flat black.
I can't say enough about the quality of the decals. When working with accent colors over black paint, especially white trim, it's frustrating to run into decals that lack the white base coat. These are fantastic, with no bleed or dulling of the color at all. The white and red really jump off the paint.
I also shamelessly copied one of Bob Cox's innovations with this, picking up some reflective tape for trimming the inside of the BT-60 pods as well as accent stripes on the plates on the outside of those pods. It was fairly quick and simple, and the bright red tape really pops in the daylight.
Construction Rating: 4 out of 5
Flight:
When AeroTech first announced the new 24/60 case and F35-5 motor at NARAM-50, I was all over it and picked up a case
from our local dealer right away. I had been looking over my fleet for the perfect candidate to fly these on, and while
I had a few that would work, my unbuilt Andromeda kit was just begging to jump to the workbench to test out this new
motor. I think this might be the first time I've ever decided to build a rocket for a motor rather than deciding to buy
a motor for a rocket.
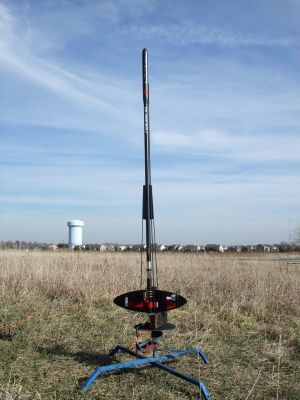
At 15 ounces with motor and flying in windy conditions (10-12 mph steady throughout the day), I really felt like I needed the full power of the F35 over the recommended F21/F24's. The liftoff was perfect with just a slight amount of initial weathercocking (more on that below), followed by a perfectly straight flight, not a trace of roll. The -5 delay was actually fairly accurate, something I rarely encounter with composite motors and deployed the chute just as the rocket was turning over.
Recovery:
It took a couple seconds for the chute to unfurl, as even in the larger BT-60 I had to pack it pretty tightly, but
when it did unfurl, it was plenty to bring the model down gently. Despite the hefty sized components, this is still a
pretty fragile model and there are plenty of exposed dowels and pods begging to break loose. In my case, the model came
down under decent speed in soft grass but was immediately dragged a good 50 yards in the stiff breeze, snagging in the
grass and weeds along the way. By the time I caught up to it, a mere 30 feet from a small lake, both of the pod fins
had broken loose, although I found them walking back and they can easily be repaired. I'll be using epoxy this time
though rather than the thin wood glue and CA I'd used the first time.
On the walk back, I also noticed that I'd broken loose the lower launch lug, which no doubt led to some rod whip and explained what I thought was slight weathercocking. This is designed for two lugs--one towards the midpoint, just forward of the CG, and the other near the aft end of the rocket against the reactor rings. I think the aft lug is going to undergo way too much stress unless you fly off a 12 foot rod or something. In my case, I flew off a 6 foot rod, but after climbing 3 feet the upper lug has cleared the rod and I'm essentially just hanging on by the lower lug. 3 feet of travel is not enough to achieve stable velocity even under the F35, so the rocket is going to pull away at that lug so far behind the CG. I think rail buttons would be strongly preferred here or at least a lug with a much stronger bond to the fin/ring joint.
Flight Rating: 4 out of 5
Summary:
This is an outstanding rocket and will be among my favorites overall. Beautiful design, exceptional quality
throughout, and construction made as simple as possible through solid engineering and great tooling.
The only cons I'd offer are the weak launch lug approach which really needs a longer rod and the price, although the price is probably appropriate given the size of the model, quality of components, and extras such as the tooling. Still, I hate to keep acquiring more Nomex® and nylon chutes with every QModelling kit I buy and would much rather have the option of going chuteless to bring the costs down.
At $120, I can't exactly say rush out and buy this one, but for Andromeda fans or anyone looking for that one special rocket, this would have to be a serious contender. It's a pleasure to build, and awesome to watch in flight, especially with the newer 24/60 case available to goose it up a bit in power.
Overall Rating: 4 out of 5
Other Reviews
- Qmodeling Andromeda By Drake "Doc" Damerau (July 5, 2008)
Brief: The Mrs. Andromeda is a 1.65:1 upscale of the classic Estes Andromeda, kit #1273. This kit was first introduced in 1975, and remained in production until 1982. Q-Modeling has taken the original design, upscaled it, and modernized its construction. Construction: Scale: 1.65:1 Height: 72.25" Weight: 14.0 oz (with recovery system) Fin Span: 19.68" ...
- Qmodeling Andromeda By Geof Givens (May 3, 2008)
Brief: The Qmodeling Retro Mega Series Andromeda is one of the most formidable mid-power kits available. This beautiful kit is a 1.65:1 upscale of the Estes Andromeda. QModeling's BT-60 version stands nearly 6 feet tall. The 24mm motor mount is designed for high-thrust APCP motors such as F24-4 or F21-6. Construction: There are over 80 parts and also more than 80 construction ...
 |
 |
Flights
|
|
|
|
T.S. (July 4, 2008)