Brief:
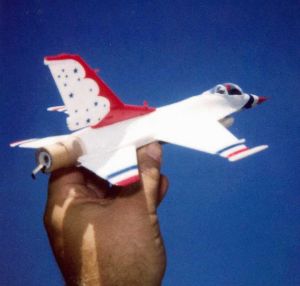
This is a plastic model conversion (PMC) I did of the Revell 1/48 scale F-16C for the "Advanced" NARTREK program. It was fast and easy to do. It is also a great first PMC to try because the kit comes already painted in USAF "Thunderbirds" colors. Because of this, it has less emotional investment in the event of "plastic death", as some call this part of our hobby. It flies extremely well on C6-3 power if (and only if) balanced properly and built straight. The Revell kit is rated for ages 10 and above and I think kids about that age could accomplish and fly this conversion with minimal adult supervision. However, in general, PMC is definitely not for beginners.
Construction:
There are 3 really essential components to successful PMC of model aircraft kits:
- You cannot add too much nose weight.
- Wings, stabs, motor tube, and launch lug must all be 0-0-0-0 degrees incidence to each other or you risk lawn-dart under power results.
- You must keep engine heat away from the low-temperature plastic or the 1st flight will be the last due to melting damage.
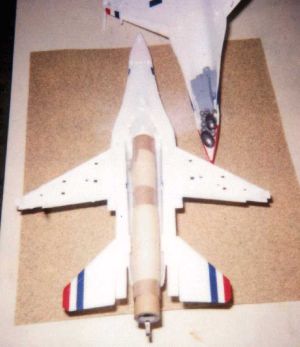
Many plastic model kits are not suited to PMC for the simple reason that the largest rocket motor that can be crammed inside will not lift it safely with all the added nose ballast needed for balance. The Revell 1/48 F16C is perfect for PMC to 18mm Estes power because a BT-20 motor tube slides neatly inside with only minimal surgery to the hull. Better yet, the natural resting place for the motor tube is magically zero-zero degrees thrust line to the flying surfaces with no fussing or shimming or custom cut, odd-shaped centering rings--it simply fits just like it was made for this. With the motor tube glued in place and the cockpit section sliced off to create a nose cone, this PMC is not very different from a typical Estes rocket kit, except for the 1.5 oz of fishing sinkers stuffed in the radome!
Construction details are as follows. Please read through before cutting or gluing anything.
- A 5 11/16" piece of Estes BT-20 tubing was cut and fitted with an Estes motor hook and motor stop in the usual fashion. Aft 3" of the motor tube assembly was wrapped in 2 layers of 3M masking tape as a radiant infrared barrier to protect the plastic.
- Only the following 3 modifications were made to the Revell kit internal structure to accommodate the motor tube and recovery system:
- The jet afterburner nozzle is omitted and its attachment section is completely cut off with a razor saw to enlarge aft opening for BT-20 tube.
- The vertical fin tab and internal receiver tabs are cut off with nail clippers so that the fin attachment is now glued flush with fuselage using 5-min epoxy.
- The one piece horizontal stab is divided and the central joiner section is discarded. This is best done with a razor saw after gluing it back in place to assure zero-zero alignment with wings and motor tube.
- The nose is sliced off with the razor saw aft of the canopy and exactly aft of the air intake bulkhead to allow for chute ejection. I assembled the upper and lower fuselage sections with tape and rubber bands prior to cutting. [NOTE: No glue was used!] I cut the upper half 1/2" further forward than the lower half to better prevent movement of the forward half in flight.
- An Estes NC-20 nose cone was cut in half just ahead of the reduced diameter aft end and inserted temporarily in the motor tube for fitting.
- The motor tube was fitted into the lower fuselage half, aligned along the central axis and wings, and tacked into place at both the receiver for the ventral fin unit and on the contact point of the cut nose cone with the intake bulkhead, which was taped in place for fitting. No centering rings are used.
 Pieces of scrap balsa were used to secure the motor tube to the inside fuselage. When the upper and lower halves are attached, bits of tissue and wet epoxy are stuffed into the open spaces to give a gas seal around the motor tube. The aft anchor of the shock cord (consisting of 12" Kevlar® thread and 12" of 3/8" wide elastic) is a knot in the Kevlar® end epoxied into the tissue-epoxy mixture. [NOTE: The shock cord is located outside of the motor tube, which will contain only the parachute.] The parachute (I used a 9" Top-Flite "lite" chute) is tied to the loop on the base of the cone base.
- Prior to closing up the fuselage, the cockpit, fins, and ventral intake ducting were glued into place per the kit instructions. The nose section, including canopy, pilot, seat, and cockpit assembly, were glued in place after first inserting 1.5 oz (42 gm) of lead fishing sinkers into the radome and under the seat unit. This is barely enough ballast, so don't skimp!
- The top and bottom fuselage halves were joined, adding epoxy to the loose collection of lead sinkers to bond them in place
- A 1.5" section of Estes 1/8" launch lug tubing was glued in place on the underside surface of the air intake ahead of the "nose cone" breakpoint and painted blue to match the pre-colored plastic. This is ugly, but it is the ONLY location that is 0-0-0 degrees incidence with respect to the thrust line, wings and stabs. It is critical to get this right to prevent a loop as the model comes off the launch wire.
- CG at AUW of 167g with a C6-3 in place should be no further aft than 1/8" ahead of the wing leading edge-fuselage junction point. If you need to add more weight, you can tape additional lead into the air intake duct.
Finishing:
Other than the launch lug, no finishing was needed.
Flight:
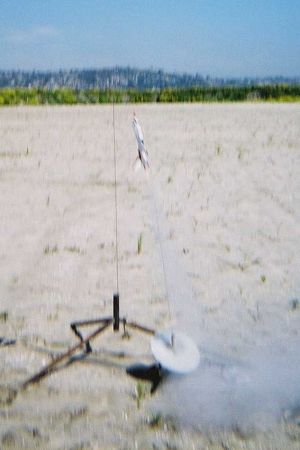
Simulation predicted for the C6-3 was a 300' climb at 98 mph and 8.4G, which was acceptable. No other motor is recommended. Test flight was at our Fiesta Island site in about a 8-10 mph breeze. I set the model on the wire, belly into the wind, and let it fly. The F-16 rose briskly about 75 feet and began to weather cock into the wind, rolling 180 degrees to wings level and canopy up, and climbing out at about a 30 degree angle. It was really moving and looked as scale-like as imaginable--just like an air show!
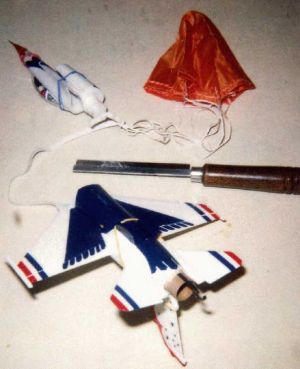
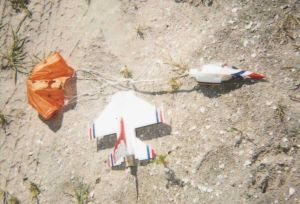
F-16 with "smoke on"! Amazing! Motor burned out at about 200', and F-16 snap rolled into a dive, with chute ejection coming nose down. Descent on the 9" chute was rapid, as I expected. The model survived, but the nylon chute was a little toasted (see photo)-- need more wadding next time. The importance of the tissue-epoxy fill to create a gas seal around the motor tube (absent a centering ring) is that without this, the ejection charge can pressurize the hull and split the glue joint (this happened on an earlier effort).
Summary:
PROs: this has to be the easiest first PMC of a jet aircraft, aside from a F-104 conversion, which is a much more expensive kit and is unpainted. It is easy to balance and ballast and comes pre-painted, so there is a low emotional investment. It has a neat scale-like flight and with a little extra effort, it could be a credible entry in a PMC contest event.
 CONs: Must make sure not to let weight build up, C6-3 is the only motor that will fly it, although a D21-7 would give a spectacular flight to about 900' and 220mph if they ever become available again. It is a tight fit for recovery system.

