Aerospace Speciality Products Jayhawk (Micro)
Aerospace Specialty Products - Micro Jayhawk {Kit} (KJAY-MM)
Contributed by Chan Stevens
| Construction Rating: | starstarstarstarstar_border |
| Flight Rating: | starstarstarstarstar_border |
| Overall Rating: | starstarstarstarstar_border |
| Diameter: | 0.28 inches |
| Length: | 3.75 inches |
| Manufacturer: | Aerospace Specialty Products  |
| Skill Level: | 2 |
| Style: | Scale |

Brief:
A beautiful micro scale (46.1:1) of the Navy's Jayhawk missile. Very affordable
($7.50), flies cheaply, and packs enough detail to be a respectable peanut
sport scale contestant.
Construction:
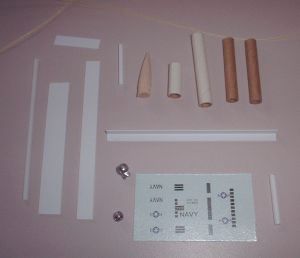
The kit contains:
- 2 7mm body tubes
- 2 tube couplers (1 serves as motor block)
- Styrene fin stock
- Styrene trim pieces (half round, standoff)
- Styrene launch lug
- Hardwood nose cone
- Lead shot nose weight
- Kevlar® shock cord
- Waterslide decal
Instructions were well written and easy to follow but tend to be a bit light on illustrations. This build is very much like a standard skill level 2 rocket with fins cut from stock and masked paint pattern, but I'd rate it a skill level 3 due to the challenge of working on such a small scale. Plus styrene is a little harder to work with than balsa.
Construction starts with sanding and marking the body tube. A styrene angle is provided for use as a marking tool in case you don't have any doorjambs that would work on a 7mm tube.
Fins are cut from assorted stock. There are two lower fins, two upper fins, and two "wings" or stabilizers bonded to the tip edges of the lower fins. The instructions suggest using two-sided tape to tack the styrene stock in place while tracing and cutting, which is a very good idea. I scored the stock using a sharp #11 X-Acto blade, then folded along the score line until the seam cracked. I then rounded the leading and trailing edges. All styrene was glued and filleted using Plasti-zap CA. Tacking the upper fins to the wood nose cone was very tricky and I cut small slots in the nose to hold the fins in place while doing this.
 The
next phase of assembly is the construction of the weighted bulkhead. To make
this, you tie the Kevlar®
cord into a knot, which slips through a slot in the lead sinker and catches.
The weight is then glued and wedged into the tube coupler, which is glued into
the upper body tube. The other end of the Kevlar®
is tied around a small section of coupler. This coupler is glued to the lower
body tube to also act as a motor block.
The
next phase of assembly is the construction of the weighted bulkhead. To make
this, you tie the Kevlar®
cord into a knot, which slips through a slot in the lead sinker and catches.
The weight is then glued and wedged into the tube coupler, which is glued into
the upper body tube. The other end of the Kevlar®
is tied around a small section of coupler. This coupler is glued to the lower
body tube to also act as a motor block.
Construction wraps up with making a styrene conduit, which runs along one side of the body tube. This conduit needs to be cut at the seam of the two body tubes.
Finishing:
Painting this one isn't too bad. After a couple of coats of white primer and
Elmer's Fill 'n' Finish to fill the tubes spirals, I applied two coats of alert
orange. I allowed the orange to cure for a full 3 days then masked off all but
the upper half of the nose for a gloss black accent.
There are some amazingly detailed water-slide decals provided with this kit, but you'll need a magnifying glass and tweezers to apply them accurately. Navy star/bar patterns, missile identity marks, stripes, everything is barely large enough to read. It's worth the work though, as this is a beautiful missile when finished with proper care.
Construction Rating: 4 out of 5
Flight:
There's zero variety in the MicroMaxx motor world--you get the same MMX motors
as everyone else and the same delay (less than a second usually) as everyone
else. Still, it's a great thrust/weight ratio and it's always a kick to see the
kids shock when they see such a tiny rocket zip at such high speeds beyond
typical sight range.
This one flew wonderfully, kicking off the pad on the first try (I have a lot of trouble getting MMXs to light right away, even when using a 12V system). As usual, I could not see the flight path or notice the apogee but did pick up a cloud of smoke when it ejected and followed the tumble recovery back to earth.
I managed to land on the driveway adjacent to the field, causing one wing tip to break off. It will be easily repaired.
Recovery:
PROs: affordable motors, pretty good altitude for a MMX.
CONs: no room for a streamer, definitely needs to fly over grass.
Flight Rating: 4 out of 5
Summary:
This is one of my favorite MicroMaxx rockets although I hate to call it
MicroMaxx for fear it would be associated with the RTF junk that's all over the
hobby stores out there. This is a very high quality kit, painstakingly
detailed, and a terrific value.
PROs: incredible detail, great looking missile
CONs: micro scale is challenging to build
Overall Rating: 4 out of 5
Other Reviews
- Aerospace Speciality Products Jayhawk (Micro) By Nick Esselman
(04/22/02) My new ASP Micro Jayhawk has officially become my smallest rocket that I have ever built and flown. It is only 3.75" tall and 0.282" in diameter. Wow! I've enjoyed these little Quest MicroMaxx motor rockets since I can fly them in our yard. But not only that, it is rather interesting to make something this small fly. The only thing smaller that I have ever ...
 |
 |
Flights
|
|