Qualified Competition Rockets Easy Slide 1/4A (Bumble Bee)
Qualified Competition Rockets - Easy Slide 1/4A (Bumble Bee)
Contributed by Clive Davis
| Construction Rating: | starstarstarstar_borderstar_border |
| Flight Rating: | starstarstarstarstar_border |
| Overall Rating: | starstarstarstar_borderstar_border |
| Manufacturer: | Qualified Competition Rockets  |
Brief:
This is QCR's 1/4A Sliding Wing competition rocket glider. I built this kit during my club's (ASTRE, NAR #407) winter build session in February 2004. I flew it in our local chapter NAR competition this summer, placing third. Not too shabby for an inexperienced competitor like myself.
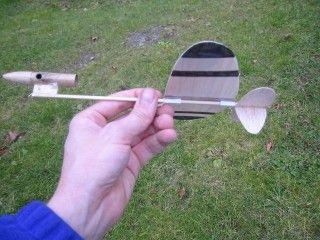
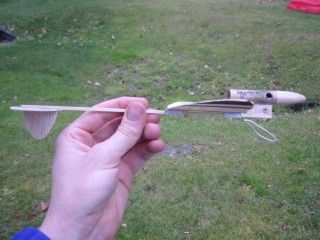
The R/G functions by having the wings tied as far back as they can during boost. Once the ejection charge fires, it burns the string holding the wings back. The rubber band on the wings then pulls the wings as far forward as the boom support. The motor is taped on to the motor tube. Thus, the entire Rocket/Glider glides to the ground in one piece.
Construction:
The kit comes with:
- Body tube and balsa nose cone
- Balsa for wings, rudder, etc.
- Spruce boom
- Wire hooks for string/sliding mechanism
- Launch lug
- Rubber band
- Clay (for trimming)
- Thread (for the first flight)
- Plastic sliding box pieces
- Photocopied instructions
The kit's contents are excellent quality. The first drawback though are the instructions. There are 4 sheets of photocopied paper with many handwritten corrections on them. I would probably have made quite a few errors if I wasn't at a building session. The good news is that once you build one of these gliders, you can build other QCR gliders without major problems.
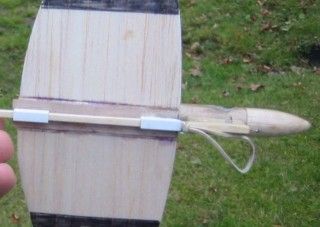
The first step is to shape the wings, stabilizer, and rudder. This is accomplished by sanding air foils, particularly on the wing. Then I had to cut the wings and create the appropriate dihedral. Next, I glued the plastic sliding boxes under the wing. Fortunately, the teacher of the build session told me how to use the plywood wing support, which is not mentioned in the instructions but is included in the parts. I used CA glue for all the gluing. After the sliding boxes are on, I placed the wing on to the spruce boom, then added the shaped stabilizer and rudder. The stabilizer has to be glued on at an incidence so that the R/G can recover from dives. This is achieved by either sanding the end of the spruce boom or by adding a paper shim to the other side of the stabilizer. I ended up doing a little bit of both. After this, I added the stand off at the other end of the boom, then glued on the body tube and the nose cone. I added all the wires to their correct location (1 on sliding box, one at rear of glider, one near the burn holes on the body tube, etc.)
 After this, I added the launch lugs and proceeded to do a little flight trimming.
PROs: Cool kit with sliding wing feature. The engineering on this glider is really neat.
CONs: The instructions seem to be for seasoned builders, not the casual beginner. It would be great if QCR considered rewriting their instructions.
Finishing:
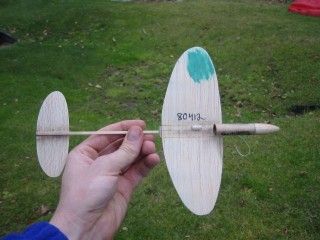
Since this kit is meant for NAR competition (doesn't mean it can't be for sport, too, but competition seems to be the main purpose for this kind of design), no painting is encouraged. I used a magic marker to create black stripes on the bottom of the wings, then added my NAR number.
Trimming is a little more tricky. I used the rubber band to pull the wing forward, placed an empty 13 mm motor in the body tube, and began to toss the glider around. I ended up adding a smudge of clay to the left wing of my glider (as recommended by the serious competitors in my club). I then covered the clay with a thin film of CA glue so that it would not get soft in the heat of the noon sun. The instructions for trimming the glider are actually pretty helpful and informative.
Construction Rating: 3 out of 5
Flight:
It takes some time to tie the wing to its launch position, tape the string to the body tube, tape the motor to its correct location (you know the correct location of the motor based on trimming the model), and then adding the rubber band to the wing and front of the spruce boom. It takes me perhaps 10 minutes or so to do all of this.
Because the wings are so far back and the motor is so far forward, the rocket has a very nice, straight ascent. Upon ejection, the wings slide forward immediately, shifting the CG, causing the rocket to glide. My first flight was a DQ because some CA from a hastily added launch lug dripped back onto the wing, gluing the wing to the stabilizer. Once I had loosened the wing, my second flight pulled in a time of 17 seconds or so. Unfortunately, Estes does not make a 1/4A3-1T. The three second delay is just a little long for the R/G event. The ejection occurs 2 seconds or so after apogee. It is really cool to see the rocket transform into a glider and glide to the ground.
After observing the flight, it was pointed out to me that my turns are a little tight. I need to re-trim the rocket again for better glide times.
Recovery:
The body tube does take a beating on the ejection charges. I followed more advice from my ASTRE group and coated the nose cone/body tube area with thin epoxy. Also, the body tube standoff needs epoxy because the wings can really slam hard into it during the transition to glide phase. I also added a cardboard half-ring inside the ejection holes on the body tube to prevent the string from cutting into the body tube (as what happened after the first two flights). This, of course, meant I had to re-trim the glider after adding a little more weight to the nose.
In order to get 25-30 second or more flights on this bird, it really requires major trimming and experience. It will certainly take me time to achieve this, but my Bumble Bee has held up well for over 4 flights now.
PROs: R/G is really cool, but requires patience, multiple flights, and major trimming.
CONs: The motor selection for this rocket is only 1: the 1/4A. The Bumble Bee would probably be too flimsy to handle a 1/2 A or A unless the glider was somehow strengthened with tissue paper or another lightweight material.
Flight Rating: 4 out of 5
Summary:
Well, you know how I feel about QCR instructions. I would have missed a lot of things had it not been for the build session. I still think the designs are cool, particularly if you are looking for competitive rockets for NAR competition.
I liked the design so much, I went ahead and also ordered the 1/2A Easy Slide I, QCR's larger R/G based on the similar designs of the Bumble Bee.
Overall Rating: 3 out of 5
 |
 |
Flights
|
|