| Construction Rating: | starstarstarstarstar |
| Flight Rating: | starstarstarstarstar |
| Overall Rating: | starstarstarstarstar |

Brief:
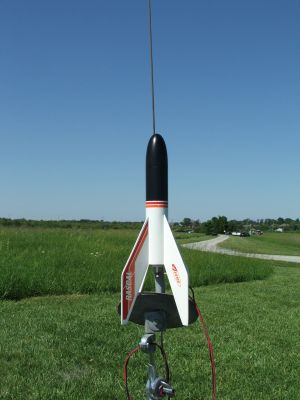
The Rascal is a 4FNC kit offered by Estes for a short time back in the early 90s. This is one of those projects that
I probably wouldn't have been tempted to build except for eBay. Back in 2001 I bought an assortment of Estes rockets
and launch equipment in an auction. Among the "goodies" in the old range box was a pocket knife, a badly
started body tube and engine mount, a Big Bertha style nose cone, and four fins that had obviously been cut out using
the aforementioned pocket knife. Also included was an untouched decal sheet for the 2021 Estes Rascal. I had a good
laugh at the previous owner's construction attempt then salvaged what I could for possible future use.
Construction:
The parts list:
- 7" length BT-60 body tube
- PNC-60L nose cone
- 2.75" BT-20 engine tube
- CR-520 centering ring for engine block
- CR-2060 centering rings
- Engine hook
- 3/32" balsa fin stock
- Launch lug
- 12" parachute
- 36" Kevlar® shock cord
- 36" length 1/8" sewing elastic shock cord
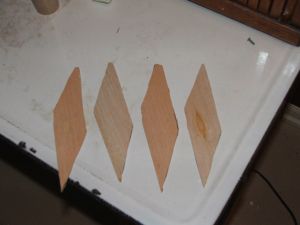
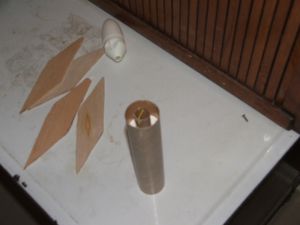
This is as 4FNC as a rocket can get, but I'll take something like this over anything E2X or RTF anyday. No "gotchas" here. Just make sure the fins are squared up. I attached the fins with LocTite Gel CA then secured them with double Elmer's White Glue fillets. White glue was also used in the construction of the engine mount, and the traditional shock cord mount was replaced by the now standard Kevlar® tied around the engine tube and glued in behind the forward centering ring.
Finishing:
After the glue had dried, the whole rocket was sprayed with Valspar primer. Tube spirals and balsa grain were then
eliminated using thinned Elmer's Wood Filler after which a second coat of primer was applied. The rocket was then
sprayed with Valspar gloss white then masked off and the upper portion sprayed with Valspar gloss black. The original
decal was sprayed with Testor's Decal Bonder and left to dry for two days before I attempted to apply it. I ran into
trouble almost immediately as the small wrap stripe that applies just below the gloss black tore as I tried to remove
it from the backing paper. I applied the large piece then carefully peeled off the smaller piece and worked it into
place. There are two spots where the ink refused to leave the backing paper but they're small and in the back near the
launch lug so they don't detract from the over all look. Pretty sharp if you like the Big Bertha profile.
Construction Rating: 5 out of 5
Flight:
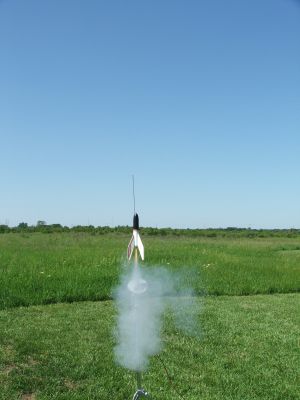
The Rascal was the second out of eight first flight rockets that I dragged out to the VOA Park for an afternoon of
flying with some fellow QUARKers. Both flights were C6-5 flights and had almost identical flight paths, windcocking
lightly into the steady breeze and ejecting almost perfectly at apogee. Future flights are planned for B6-4 Field,
first on an A8-3 and then on a B6-4 if I decide that the risk is low enough.
Recovery:
Recovered using a $0.10 chute and two sheets of Estes recovery wadding. (I forgot my dog barf.) The 12" chute
was perfect and could have even used a reef hole in the breezy conditions.
Flight Rating: 5 out of 5
Summary:
PROs: 1) The Rascal launches with authority and looks like a Baby Bertha on steroids. 2) Plenty of chute and wadding
room in the body tube. 3) Adaptable for large and small fields.
CONs: Very few people are aware that the Rascal existed. I left it sit for almost eight years before building and flying it.
Overall Rating: 5 out of 5
 |
 |
Flights
|
|
|
|
Hank Helmen (March 12, 2012)
I've built 3 Rascal's so far~! Good flying bird indeed. The first one was built and flown right in the neighbor hood for the enjoyment of the local kids. It was thrown together quickly and painted rough! Flown and repaired many times it finally parachuted down and was caught high in a very large tree. The tree had poisen ivy vines and prickers all over it. So we left it there to blow in the wind. It flew so well that I had to have another one. Found the original instructions and templates on Mike Z's rocket plan site. and bought a replacement plastic nose cone from the local hobby shop. Tried to make this one "bullet proof" So we built it very carefully, gave it 3 or 4 coats of paint over epoxy primer and used fiberglass cloth to reinforce the fins!
Came out very nice and it flew many times. Finally during a rockt exhibition at the local county recreation park a group of children was helping me carry all the rockets and gear back to the car. One very young little boy didn't have anything to carry so I asked him if he would like to carry my Rascal for me he nodded yes. After driving home we waited to clean out the car until the next day. There was NO Rascal ! I then realized that the little boy must have carried the Rascal back to his parents car! Oh well se la vie. I hope he gets to fly it again!