| Construction Rating: | starstarstarstar_borderstar_border |
| Flight Rating: | starstarstar_borderstar_borderstar_border |
| Overall Rating: | starstarstar_borderstar_borderstar_border |
| Published: | 2012-10-18 |
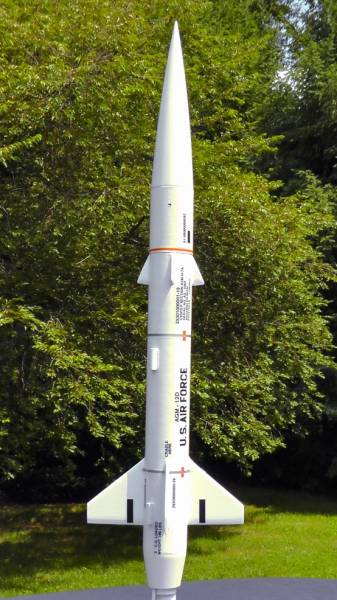
| Diameter: | 1.33 inches |
| Length: | 15.60 inches |
| Manufacturer: | Estes  |
| Skill Level: | 2 |
| Style: | Scale |
 Brief
Brief
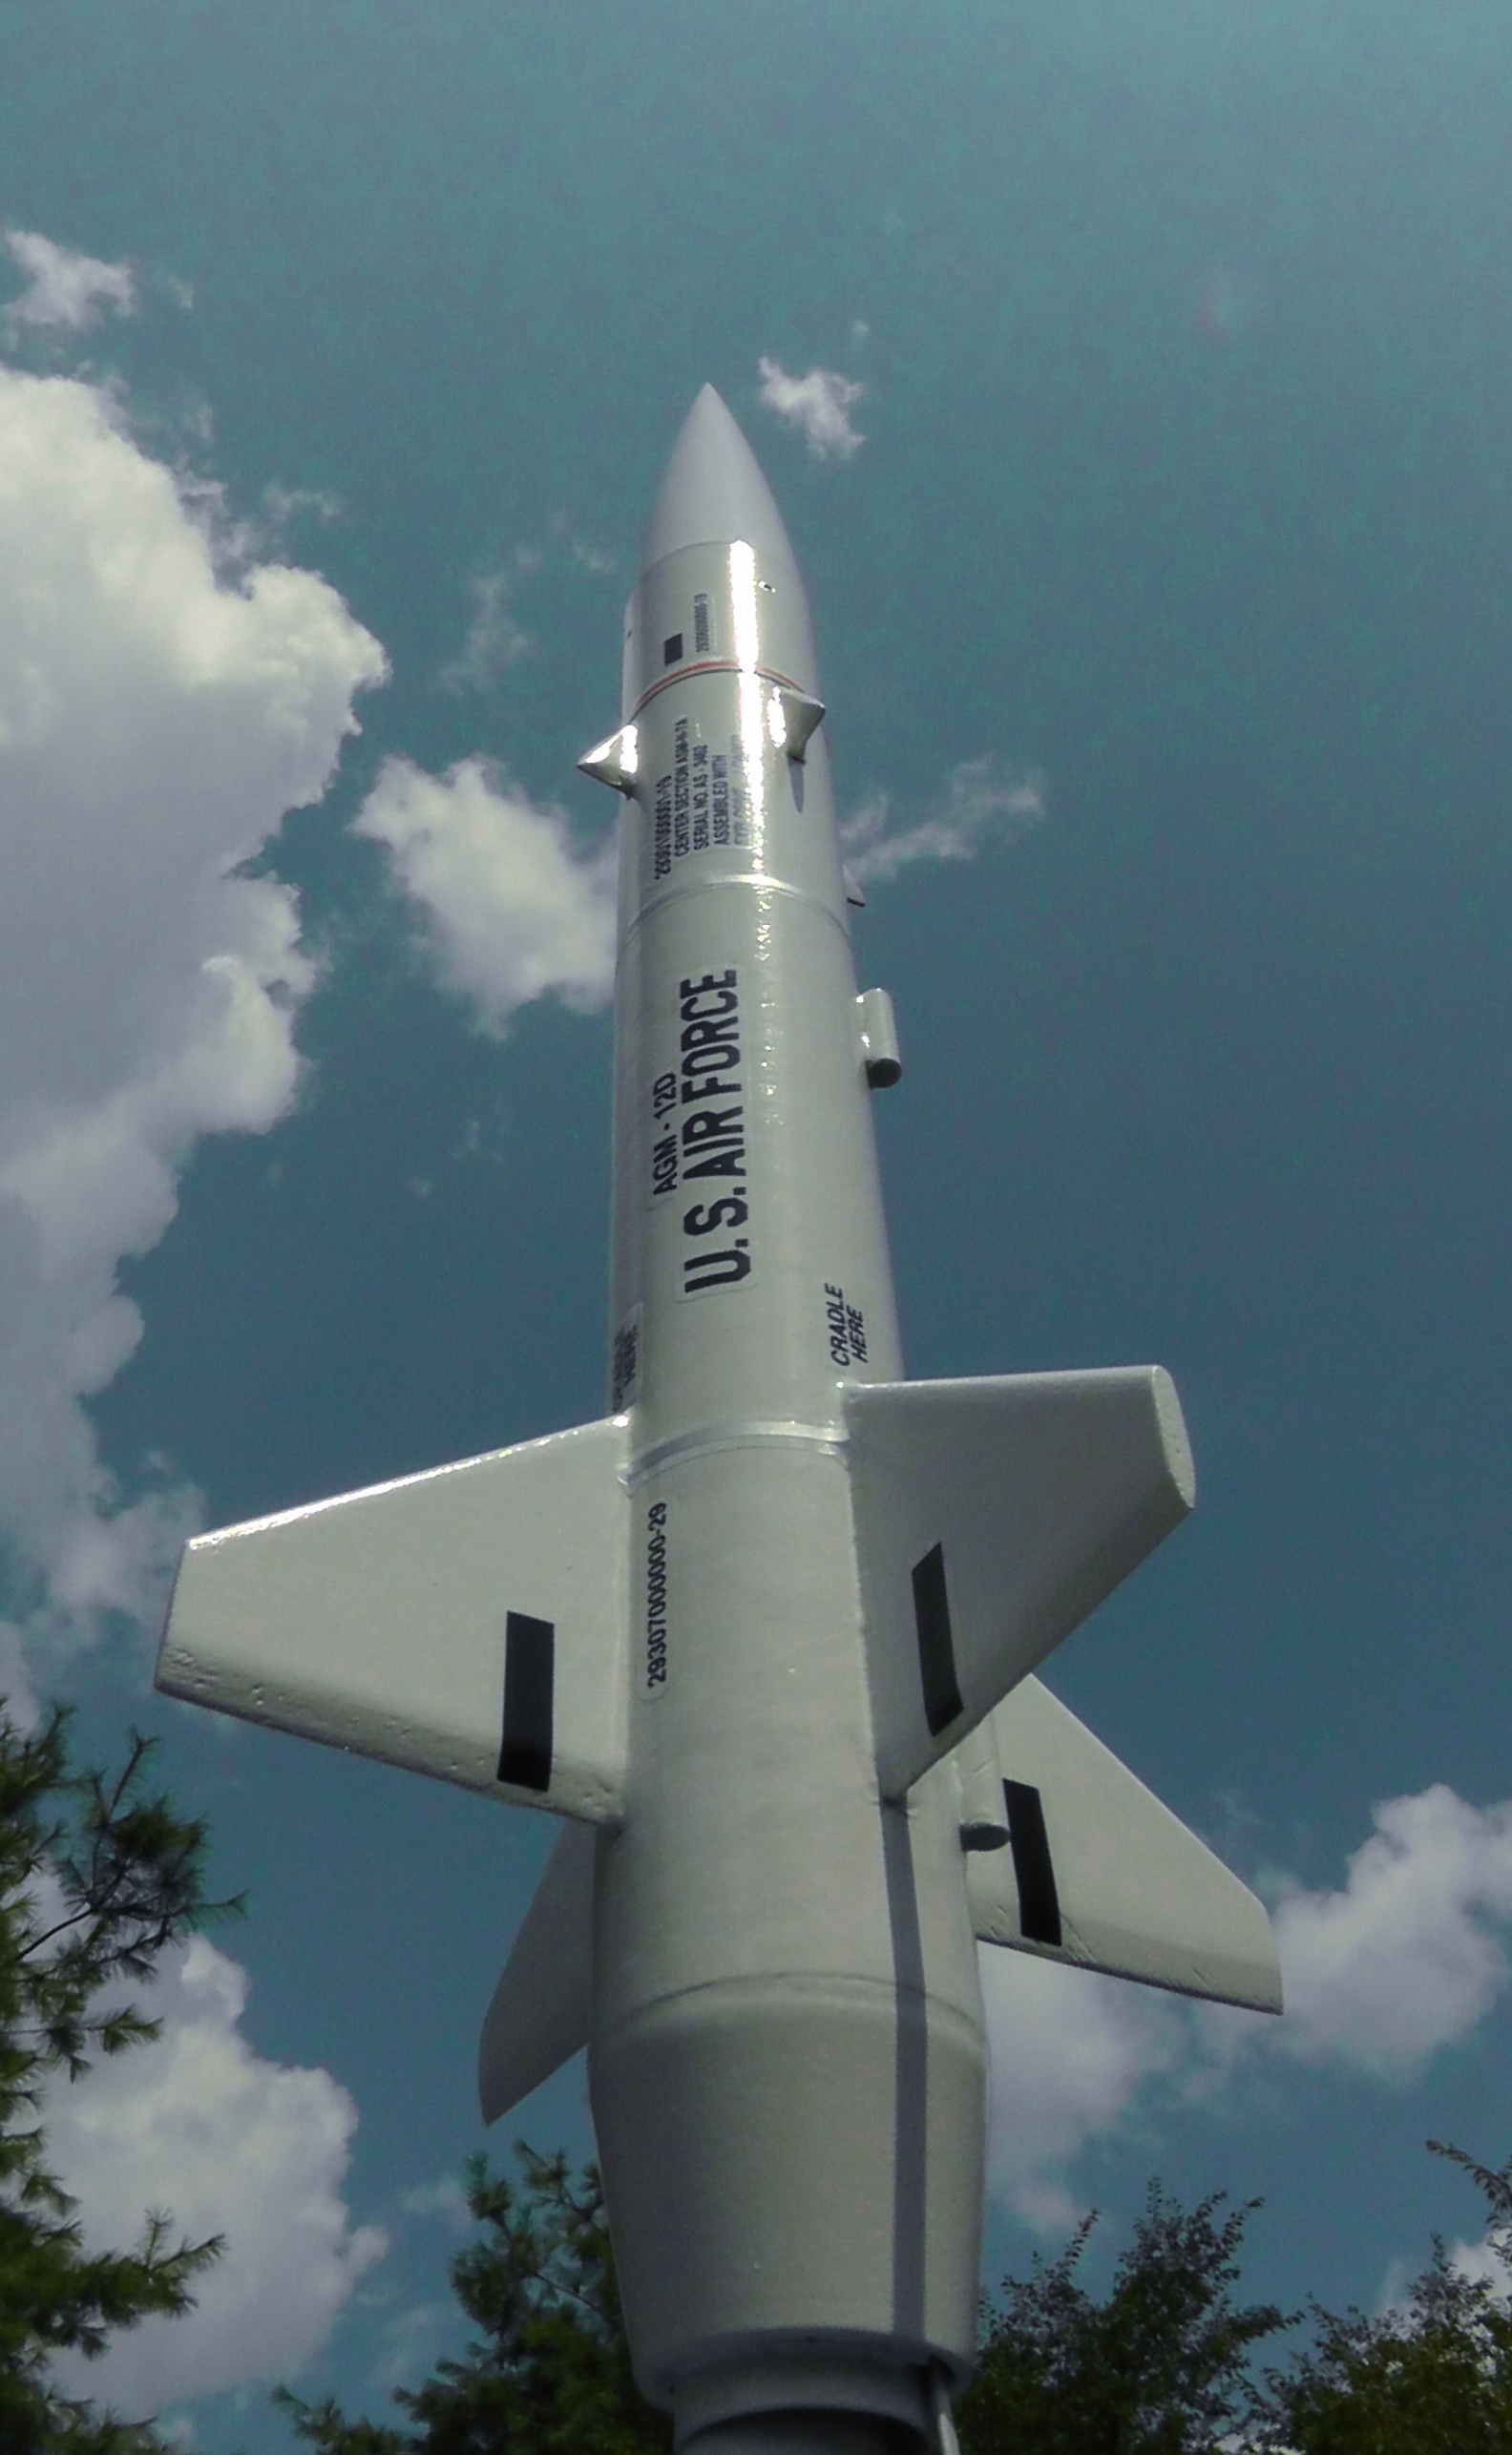
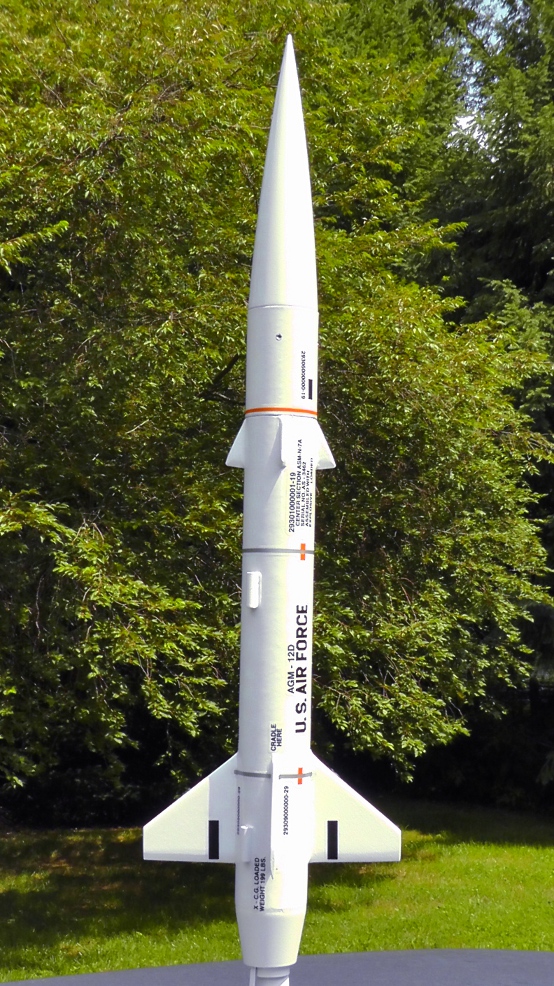
The Estes Bullpup 12D is a sport-scale model of a 30-some year old air-launched guided missile. The real thing came in several varieties that outwardly appear different; the 12D is just one of those types. The real thing was guided by a "pilot" who remotely steered this missile onto the target. This particular model of the 12D is a relatively small "Alpha" sized rocket, just over a foot in length but a few ounces more in weight and wider in diameter. I would have to say while this Estes implementation of the kit is not bad, it is lacking in several significant ways for me so I can only give it a moderate endorsement, unless it would have proved to fly particularly well.
It is heavy, and although it flew OK, it did not achieve very significant altitudes. Granted, I did add a small payload section, but that added only 2 inches to it's length and 13.4 grams of weight, or just under 17% weight. I don't dismiss the results of my flight tests because of the payload addition; I have done this modification to all my rockets that didn't have an included payload section, and so I think it is fair to compare the performance of this kit with the many other kits I have built. I suppose the performance loss was partly because of the 13 grams of clay noseweight from the kit, which of course is needed to keep the length to scale and remain stable, and partly due to the weight of the plastic tailcone. As can be expected, there is a performance penalty for being a scale model. To be fair, perhaps I didn't need to add the clay since I added the equivalent amount of weight just below the nose. However, I would rather have it over-stable than have it wreck on its maiden flight. Regardless, my reservations with this kit is not with the flight performance so much, and not with the quality of the parts, but in the choice of parts used in this particular design.
Components
The supplied parts were all good quality, as I come to expect from Estes. However the overall kit has several flaws in my opinion. First: the use of tacky-looking stick-on decals instead of waterslide. Second is Estes insistence on using a way-too-short rubber shock cord attached with glue to the body tube. Third, the lack of a motor clip when this model can easily use one. Concerning the stick-on decals, I assume the self-stick-on kind is easier for younger kids. If they want specifically to make these kits extra kid-friendly, they should just say so on the package and catalog. It seems it's always a suprise with Estes as to which kind of decals you get! To be fair, for stick-on decals they are pretty good, they are thick enough to not wrinkle easily, seem to have a strong adhesive, and appear to have a tough, glossy finish to them. (...but I still don't like them!)
Where Estes does excel is in the included instructions, the quality of the molded nose cone, and many other parts such as the parachute material. The balsa and body tube(s) were pretty good, and that is what I have come to expected from an Estes kit. They were nice enough to include an already built parachute, however I like to use longer shroud lines because they seem to work better for me, so I tend to re-make them anyways. Two of the design features I like in this smaller rocket kit are the boattail which looks sharp and does a lot to reduce drag, and the reasonably wide body tube.
Construction
As usual, I made several modifications to the basic rocket during construction. I do not like friction-fit motors, so I added my own motor clip. To do so, I either had to cut out a portion of the boattail (ugly), or in my case I mounted the motor tube just a little more (about 3/8") aft in the centering rings than the instructions state. Of course this means the motor clip sticks out very noticeably in the back. This was necessary to give the spring clip room to flex outwards without being held in by the stiff plastic boattail piece. The actual supplied boattail piece is really part of a plastic transition, and you have to cut off the ends of it yourself. Easy if you have an X-acto saw, not so easy if you don't (so just go get one now, you'll never know how you lived without one).
The transition from the boattail plastic to the body tube was a little off but not much, so I had to use a bit of body filler to smooth over the joints. Since the end of my motor tube was further aft and therefore might be a bit unsupported in the end, I took a strip of thin corrugated cardboard and CA glued it just inside the rather wide gap between the motor tube and the transition end. Then I filled in the small gaps with wood glue. The cardboard and glue both filled in the gap and provides a stiffer support for the end of the motor tube if it needs it.
Normally I would scrap the Estes paper-fold shock cord mount idea and attach some Kevlar to an ejection baffle, but since this rocket is a bit short I though I'd skip the baffle to save more room for a parachute. I chose to use a piece of Nomex instead of wadding though. For this rocket, I attached a small loop of Kevlar string tightly glued to the inside body tube about an inch and a half down from the top end of the body tube. To prevent zipper damage, the Kevlar does not quite reach out past the end of the tube. That loop is used to tie the shock cord rubber to the rocket body. Both ends of the Kevlar thread was frayed to give the Kevlar more gluing surface against the body tube. I've used this method on at least four other rockets now and (knock-wood) never had a problem with it yet. I will also use a much longer (3 or 4 feet) shock cord rubber to prevent the inevidable dings and gouges when the nosecone springs back. Why all the trouble? Some day the rubber will deteorate and need replacing even if it doesn't break sooner. It is a major pain to sand out the old cardboard/glue mount just to put another one in. With the Kevlar loop and a fishing swivel, I can change it daily if I want to with no fuss.
I also added a short 2" section of payload tube to the top of the rocket, using a tube coupler with a disk of thin plywood glued into it to act as a bulkhead. The coupler/plywood saves space over a solid balsa bulkhead, and makes it easy to insert a very secure small loop of Kevlar to act as a lightweight and flexible screw-eye. I did screw up a bit with the payload section though. In my haste to get the rocket built, I glued the forward fins onto the main body tube end, and not further up on the payload end where I wanted to, so my rocket will not have the front fins just behind the nose cone as the real missile appears. Eh, it was only sport-scale anyways. To keep the kit length to Estes scale, I could have cut 2 inches off the main body tube instead of adding another 2 inches, but since this is a rather short rocket, I didn't want to use up some of the small parachute space.
Lastly, another modification I started doing to my rockets is to split the launch lug in half and spread the lugs apart on the body tube a few inches or more fore and aft. This makes the model stay straighter on the launch rod while thrusting off the pad. After seeing a lot of slo-mo video of my single-lug rockets twisting all sorts of ways during launch, I'm pretty sure I'll get better, straighter launches with the wider set lugs. It's way to fast to see with the naked eye, but some of those launch videos looked pretty ugly with those models using a single, short launch lug.
Finishing
To save some finishing labor, I cover my balsa fins with plain paper secured with photo-mount adhesive. In a matter of minutes I get a very smooth surface without the endless cycle of balsa fillercoat sealing and laborous sanding. I believe it may add just a little strength to the fins also.
Finishing this model is pretty easy. If you are careful to not get any plastic cement on the nosecone or boattail, the plastic parts are pretty smooth and required only very light sanding on the seams. I did need to fill-in the boattail-to-body tube joint though. Although I personally don't care, the body tube's spiral seams are certianly visible after three coats of primer and three paint coats. If this model had good quality water-slide decals then I might be bothered to fill them in, but those stick-on decals will look so ugly you won't notice the tube spirals.
Painting is easy because there is only one color: white. No masking is required. I do recommend using at least three coats of clearcoat after the stick-on decals are applied, to help keep them on tight.
Construction Score: 3
Flight
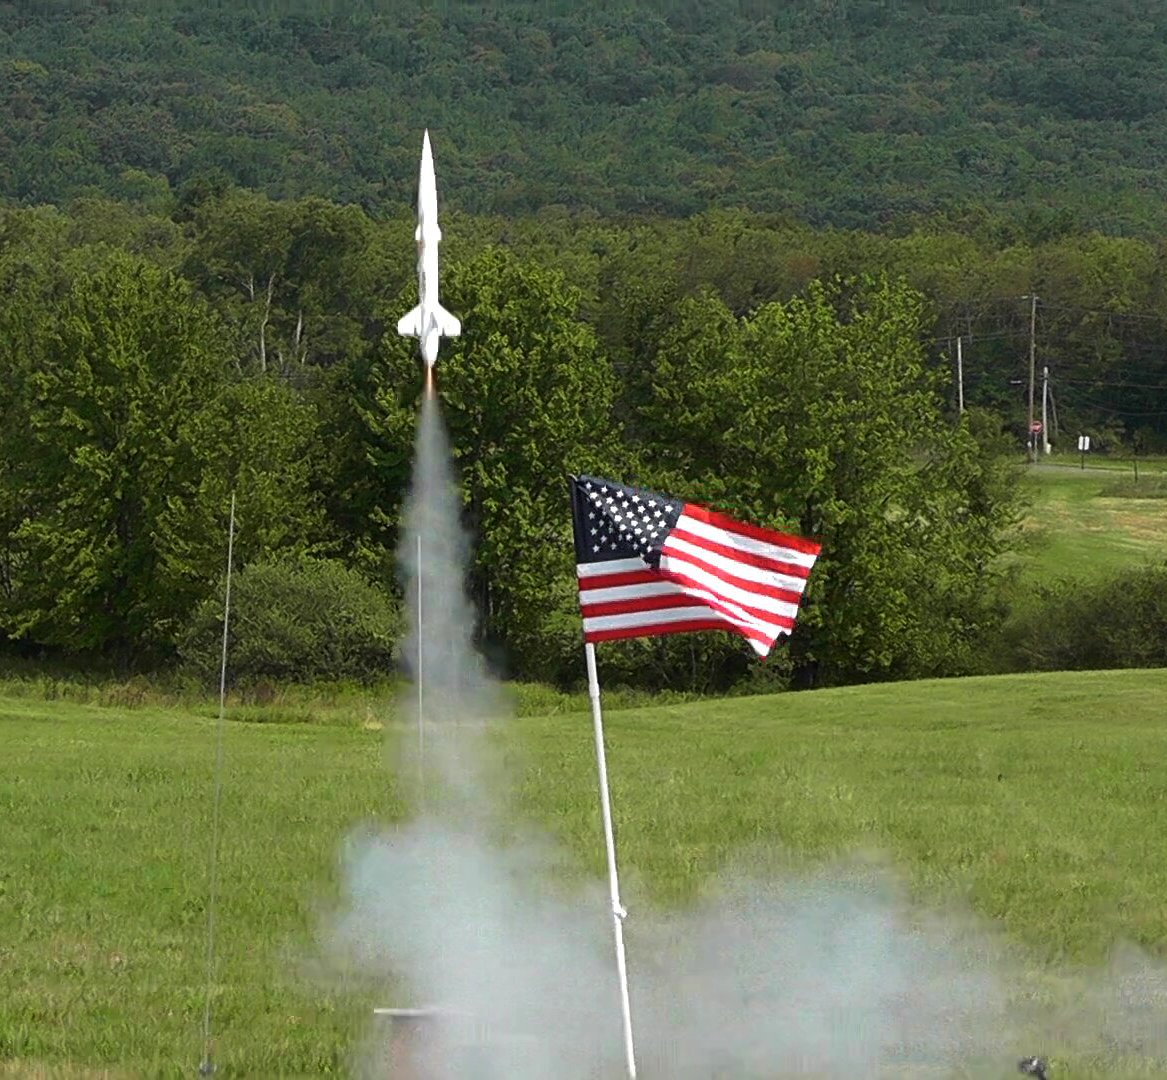
I thought that the 'pup would fly pretty well. It's small size makes me believe it is light, so it should go up fast and high even on smaller motors, right? In reality it is quite heavy for its size, so don't expect high altitudes. I also thought the 12" chute would be a little much for such a small rocket on B and C motors though, but because it can't go very high its chances of getting lost are very small.
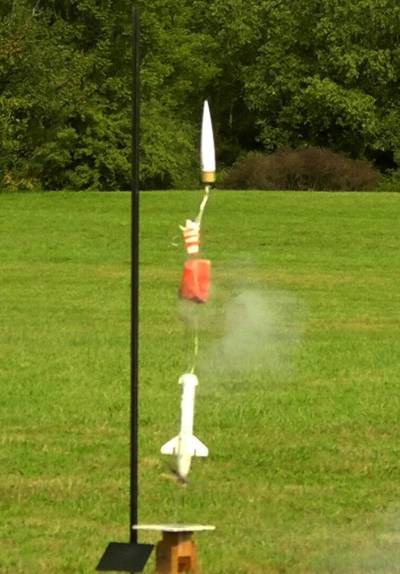
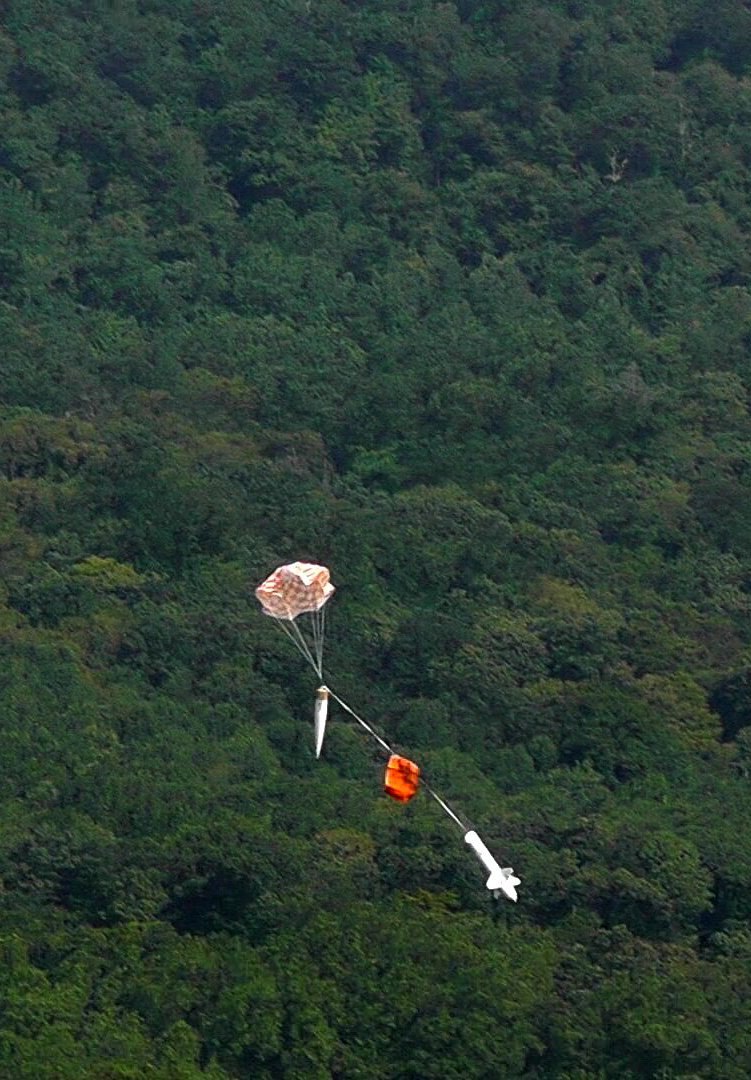
On my initial test flight, the motor hook got snagged on the clothespin used to hold the model above the blast deflector, so it only went 4 inches at best! It never left the rod. Oops, my bad. (Is that why Estes didn't put a hook on this model? I'm kidding.) I re-tried it with another B6-4 and was suprised to see it only reach 124 feet apogee and made a maximum speed of 55 mph. Ejection occurred 1-1/2 seconds after apogee, and it descended 37 feet in that time so the parachute only deployed at 87 feet. Not only did I learn that the B6-4 is not too powerful for this rocket, but it also told me NOT to try the A8-3 even though Estes recommends it. I recommend using the B6-2 unless you built it very light, but I'll need a few more test flights to be sure of that.
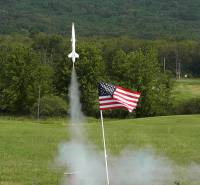
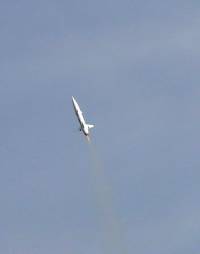
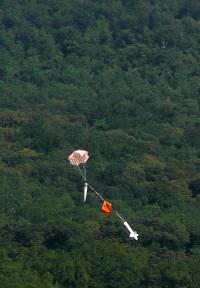
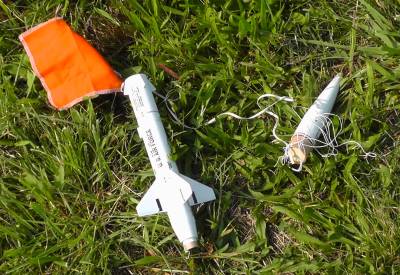
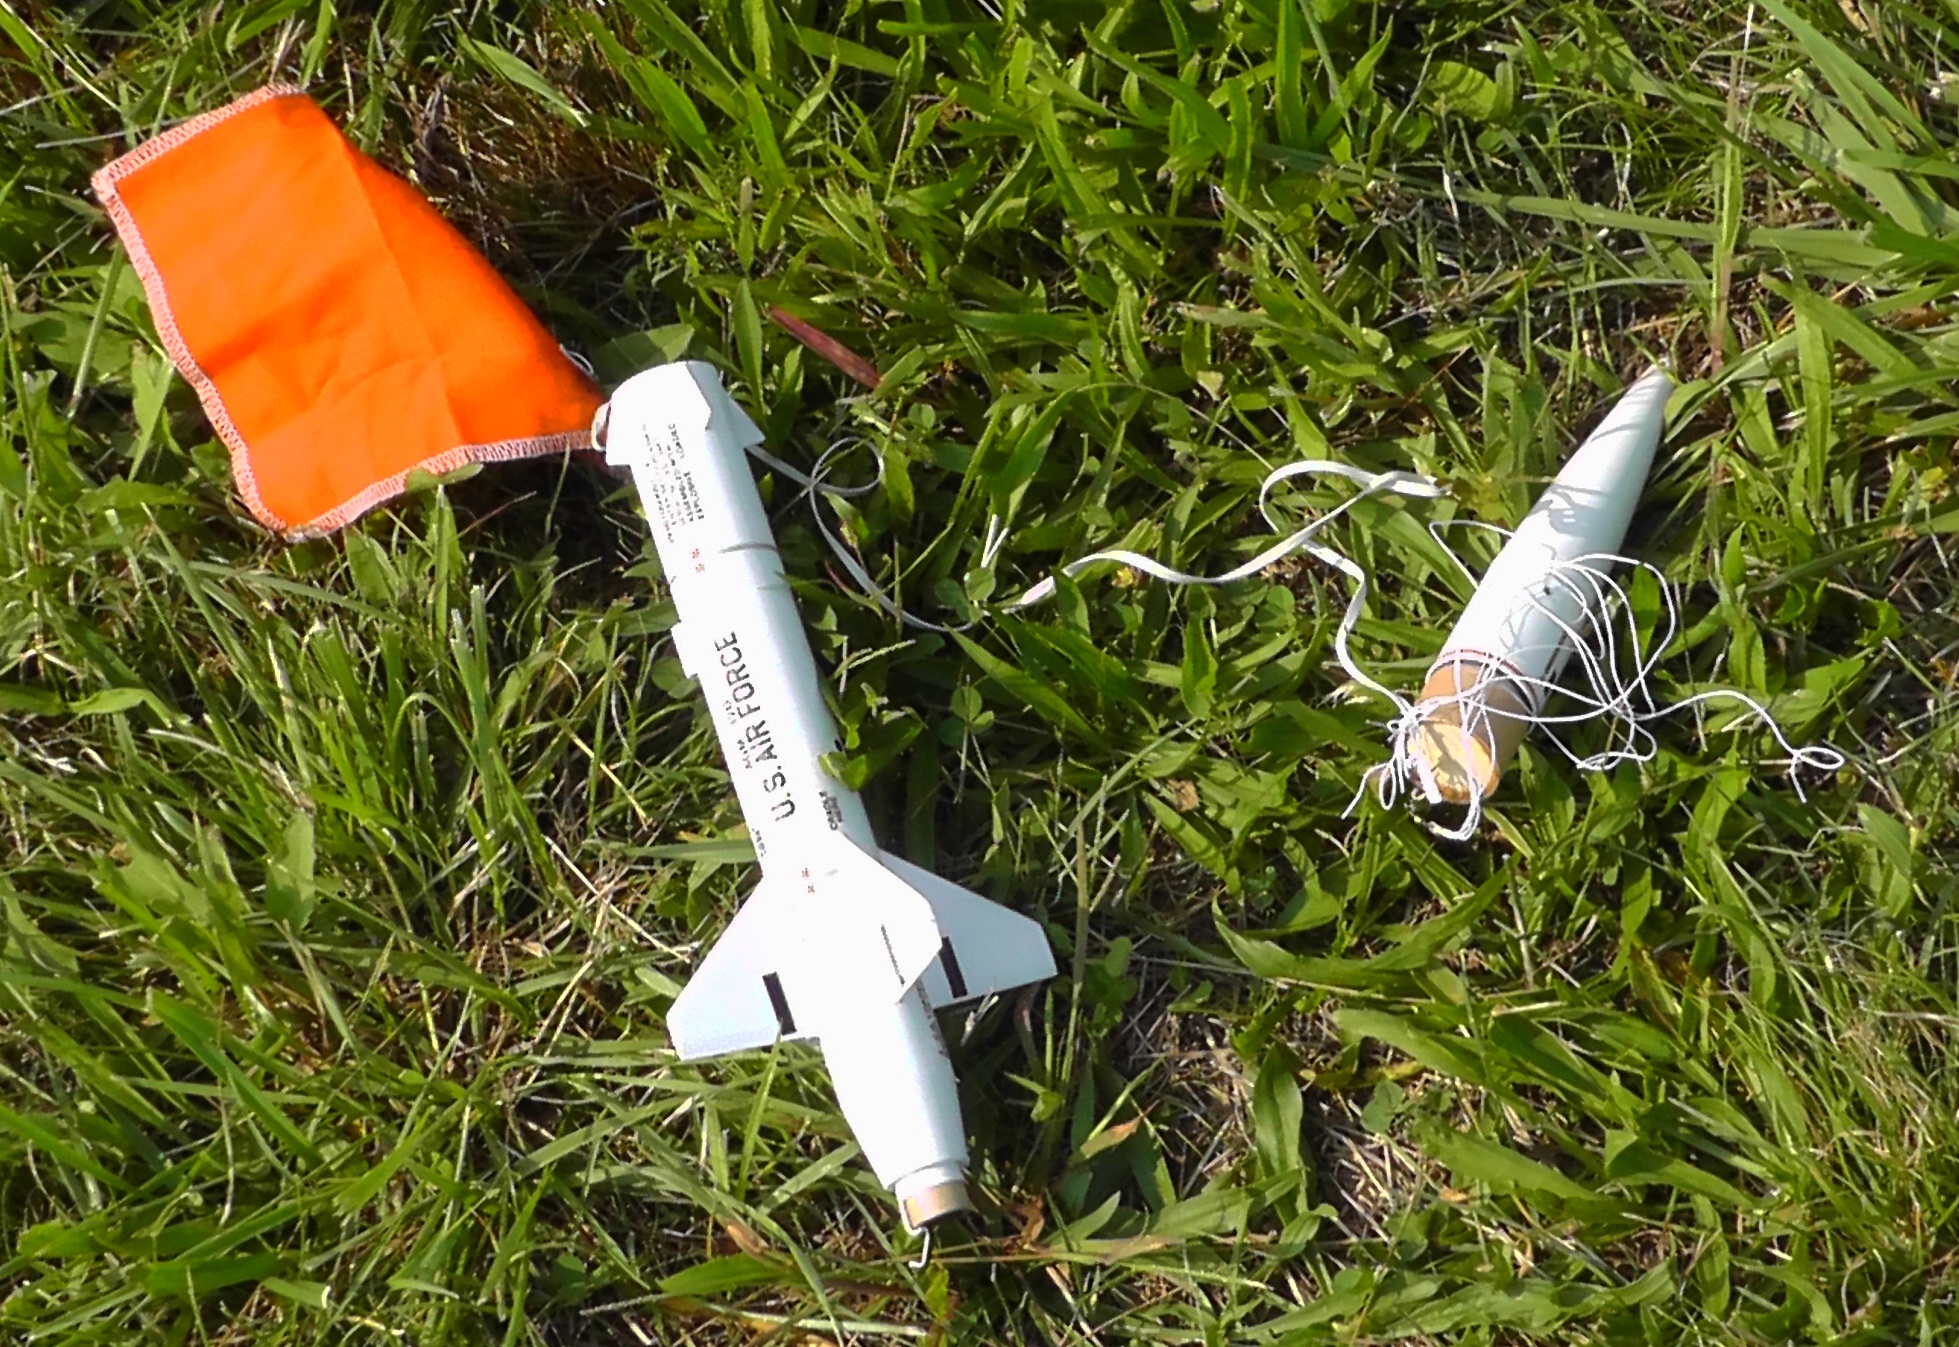
For the next test flight I used a C6-5, also recommended by Estes. It reached a just-acceptable apogee of 300 feet exactly while going as fast as 83 mph. It was a bit windy on this launch day, and the rocket also weathercocked into the wind and flew almost horizontal for about 300 feet. Most significant about this flight: the 5 second delay was way too much. The actual motor I used had a real-life delay time of 6 seconds, allowing the Bullpup to plunge 118 feet before ejection at 182 feet. The speed of the descent caused all six shroud lines to tear from the stock Estes parachute (I didn't modify it), and the rocket came down without the parachute material after only a 13 second flight. The good news is that it struck the grass at about 48 mph and survived without any damage because of its small size. I would definately recommend a C6-3 motor instead, as this rocket reached its apogee in 2.9 seconds. Take this with a grain of salt however, as my model is a bit heavier and longer so it is likely a bit too over-stable and it weather-cocked into the wind significantly. It might fly a bit higher and faster in calm conditions and need more delay, but my gut says it still won't need that much delay; stick with the B6-2 and C6-3.
Recovery
Recovery materials is Estes weakness. Not only did they seem to discontinue other parachute sizes, (they used to ship with 8", 10", and 14" 'chutes at least), but they offer a lousy mounting method for a much too short shock cord. They need to provide longer shock cord rubber and a more useful mounting method.

Summary
Pros:
Overall quality of parts is high. The plastic nosecone was very good. Other plastic parts, parachute, balsa and body tube was certianly OK, but not overly remarkable, they were the usual decent quality Estes stuff. Instructions were very clear, except for having to cut them up and destroy them to make the tube marking guide (I don't have a Xerox at home!).
Cons:
Shock cord mounting - lame at best. Shock cord length - so short it's almost comical.
Lack of a motor clip - subjecting us to tape-friction fitting is just cruel, but easy to modify. I understand that they may have tried to keep the tail cone looking scale-like though.
Major con: stick-on decals
Heavy for such a small rocket, altitudes are not very impressive. It apogee'd at 124' on a B6 and 300' on a C6. Might do better in calm/light wind though.
Overall Rating: 2
 |
 |
Flights


|
|
Rich DeAngelis (November 26, 2012)
I sent the reduced-weight Bullpup 12D Iris up again, with a C6-3 motor. This time it was able to make an apogee of 430 feet (good enough!). It also broke the 100 mph barrier. The delay of 3 was a good choice for this flight.
The next test flight was a B6-2. This flight was even more disappointing than the B6-4. The 2 second delay was good, but it only made 102 feet going up to 66 mph. Not too impressive, and barely enough altitude to know with confidence that the parachute will unfurl and work. The B6 didn't handle the wind very well either, turning a lot.
I would recommend sticking to a C6-3, and use the -5 only if it is extremely calm.
Peter Balchunas (June 24, 2015)
I just received this rocket with a few others, that I bought off of Ebay from a seller. I too was surprised to find "NO Engine Hook". Reading the above comments, will go with the C6-3 engine. Even though it says to use
the recommented engines.
|
|
Rich DeAngelis (November 21, 2012)
I'm not giving up on the Bullpup just yet. I have modified it and removed about 13 grams of noseweight clay - co-incidentally almost exactly the amount of weight I added with the 2-inch payload tube and bulkhead. So now my rocket is about equal to the "stock" weight but still just a bit longer. It is now using a 14" parachute. I hope to get closer to 400 feet with the C6-3 motor, and over 100 with the B6-2. Waiting for a good day to launch these next test flights.