| Construction Rating: | starstarstarstarstar_border |
| Flight Rating: | starstarstarstarstar_border |
| Overall Rating: | starstarstarstarstar_border |
| Published: | 2010-08-21 |
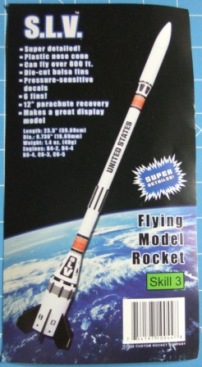
| Diameter: | 0.74 inches |
| Length: | 23.50 inches |
| Manufacturer: | Custom Rockets  |
| Skill Level: | 2 |
| Style: | Scale-Like |
Brief: Construction: Opening the bag, I laid out the parts and took inventory. The first thing that I noticed was the lack of any motor retention. Oh, joy, my first friction-fit rocket kit. The instructions were printed on both sides of a single sheet of legal-sized paper, folded into a pamphlet. Reading through the build details, I realized that this was a dressed-up minimum-diameter rocket, and as such, I had no separate motor mount to tie my Kevlar to. That was gotcha #2.
Once the gotchas were past, the rest of the build was fairly easy, sand the fins, double-glue the fins with Titebond, assemble the upper half with the card stock shroud and the smaller centering rings, and join the 2 halves with the BT-20 coupler. I had fillets on the fins and launch lug drying before bedtime, and the next day after work, I was ready for finishing. Finishing: Construction Rating: 4 out of 5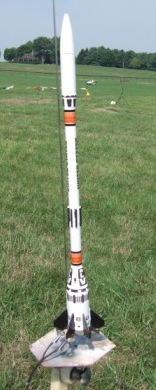
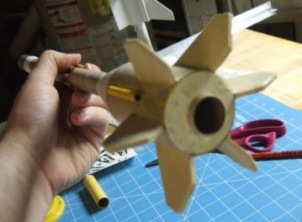
The Custom Rockets S.L.V. is a futuristic rocket kit with three different sizes of body tube, two different card stock tube transitions, and six small fins. The manufacturer lists it as a Skill Level 3, and I feel that it is more of a 2, with a few tricky spots.
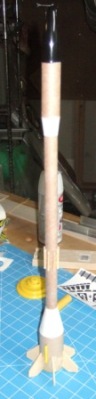
 I followed the instructions, and soon found gotcha #3, the measurements for the spacing of the aft centering rings are just shy of 1/8" off, and as such, the 3" BT-60 did not cover all the centering rings like it was supposed to. With some creativity concerning the mounting of the lower shroud, I avoided a complete mess.
I brushed thinned Elmer's Wood Filler onto the fins, sanded them when dry, and painted with 2 coats of primer and 2 coats of Rustoleum Painters Touch gloss white. After 48 hours of drying, I masked off everything but the fins and added 2 coats of Painters Touch gloss black to the fins. Testors gloss black (tiny glass bottles) was brushed onto the small dowel details, and I was ready for the stickers. I was surprised to see that the shroud details were printed on a sheet of vinyl, rather than the cheaper paper stickers, and that there were no pre-cut edges, so that they could be tailored to the exact shrouds installed on the model. The rest of the decals were ordinary peel and stick, and they went on fairly easily. Two more coats of clearcoat, and I was ready for launch. The only trouble I had was the adhesive on the upper shroud decal was a bit weak, and I needed to add a drop of CA to keep the decal in place.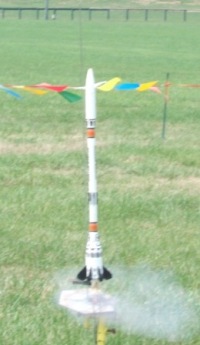 Flight:
I flew this little missile three times at the NOVAAR August monthly launch, and aside from some recovery annoyances, and the fact that I don't trust friction-fit motor retention, all three launches were picture perfect. On a C6-5 each time, boosts were almost straight up, with a slight spin from most likely a slightly crooked fin. With a rocket this small and light, the C6-5 sent it high enough that it was tough for me to track, but I saw the ejection event each time, and each time it was right at apogee. The only negative about flight that I can think of is the launch lug is a bit tight on the smallest launch rods we have. Otherwise, the SLV is a solid little performer, and I would not hesitate to launch on anything from an A motor up to a C motor.
Recovery:
This is a small rocket, with minimal internal space, so I went with the trifold shock cord mount, rather than trying to rig up an extended Kevlar cord attachment. On the plus side, the shock cord was fairly long and made of sewing elastic which should outlast any similar sized rubber-band shock cord. The drawback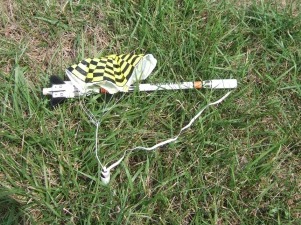 to the recovery system is the "coil the shroud under the sticker on the corner of the parachute" which never fails to lose grip on one or more shroud lines during descent. If there were space, I would replace it with a nylon 'chute, but as it is, if I choose to continue flying this one, I will substitute a mylar parachute. Stuffing dog barf into the thin center tube from either end provides a damage-free recovery, even with the loose shroud lines making it more of a streamer than a parachute. After three launches, the only damage to the rocket is the shroud lines that won't stick.
 Flight Rating: 4 out of 5
Summary:
This rocket kit is a nice change from the mass-produced kits from the dominant firm in the industry. The parts are all good quality materials, and the instructions are mostly straightforward. It is a good flier, and rugged enough to streamer down if half of the shroud lines decide to let go. The only changes to the kit I would make are a longer upper tube, and a small nylon parachute to fit in there.
Overall Rating: 4 out of 5
Other:
Overall, the low price and high quality puts this near the top of my "buy" advisory list, once someone is ready to graduate to the skill level 2 kits.
 |
 |
Flights
|
|