| Manufacturer: | LOC/Precision  |
 Show anyone the shape of a V-2 and they will immediately recognize a real rocket! That classic outline has been the love of some people to the extent that they establish websites dedicated totally to the V-2. These sites cover every possible topic related to the "vengeance" weapon. Its popularity continues in sport rocketry today with a number of companies producing V-2 kits. Public Enemy, Maximum Thrust and LOC/Precision are several that come to mind. Two of the more popular kits come from LOC/Precision in 5.38" and 7.67" versions.
Being a fan of sport-scale rockets, I chose to build the 5.38" version with a 38mm motor mount. I was originally looking for a neat-looking rocket that I could launch with relatively little prep work. You know, insert the motor and fly. I didn' t want to spend an hour just getting it ready to fly on electronics with multiple black powder charges. But more on that later.
Make it durable. With a big 5.38" body tube and big plywood fins, I was concerned about durability of the rocket over time. So, the first step was to apply a layer of 1.7oz Kevlar and 6 oz fiberglass to the body tube. The LOC BT is non-phenolic cardboard so it really soaked up the epoxy. I also coated the top 4 inches of the inside of the BT with West Systems. I did that for two reasons: one, the NC fit was a bit sloppy and I wanted to take up some of the slack, and, two, I wanted to limit the deterioration of the cardboard near the NC when the wet conditions of Monroe caused the layers of the cardboard tube to unravel.
I sanded the fins using 100 and 150 grit to smooth the flat surfaces and to round the leading and parallel edges. I vacuum bagged the fins with 1.7oz Kevlar wrapped over the leading edge and then applied two layers of six oz 'glass sandwiching each fin. Although I used a vacuum, a hand layup would be fine for this rocket. I just like to keep my hand in, I suppose.
LOC' s directions are very good for assembling the rocket. I assembled the fincan per the instructions with the exception of adding an AeroPack 38mm motor retainer to the MMT. Although the retainer is pricey, it is perfect for this application where the motor mount extends beyond the bottom centering ring. And the retainers are really, really cool!
From here, I made a few changes.
Those stubborn plastic nosecones. The first change concerns the tenaciousness of molded nosecones in wanting to shed paint. It seems no matter what one does, it' s difficult to get paint to stick to the slick plastic. Well, boys and girls, try what I do. I use 100 grit sandpaper to rough up the whole NC. Yes, that' s right. Rough it up. Scrub it with soap and water and let it dry. There will be a lot of fuzzies but paint will stick when the preparation is finished. After the first sanding, go back and fill the mold seams and whatever other imperfections that might exist. Let the filler dry and sand lightly with 100 grit. Use gray Plasti-Kote Spot Filler & Primer for a first coat to identify the big imperfections (gray primer makes imperfections easier to see than white primer). Wet sand with 320 grit. Fill again as necessary. Prime again with Kilz white primer (white is good to use now as a base for the paint). Use a couple or three light coats of this stuff; it comes out very heavy. Let dry and wet sand again with 320 grit. I' d be surprised if you see any fuzzies now. Prime again if needed and/or wet sand with 400 and you' re ready to paint. Try it.
NC Shock Cord Attachment. The NC has a big extrusion on it to be used for securing an eyebolt. It certainly would work but there' s an alternative. The V-2 requires nose weight due to the center of pressure those fins create on a short rocket body. The instructions suggest drilling a 5/8" hole in the side of the base of the nosecone to be used to pour an epoxy/steel shot mixture into the nosecone. I decided not to do that. I drilled out the plastic extrusion with a 3/4" wood spade bit. I like to use a toggle bolt to hold onto a 1/4" eyebolt for fastening the shockcord to the NC. Plus it adds weight to the nose in a rocket where nose weight is critical.
Adding Noseweight. The kit comes with 8 ounces of steel shot to be inserted with epoxy into the nosecone. A finishing nail is to be used as a retention device for the steel shot/epoxy mixture by drilling a hole crosswise through the tip of the NC and inserting. The steel shot/epoxy is then poured over this nail and holds everything in place. The ends of the nail are then filed or ground down to fit the contour of the nosecone. LOC recommends flying the V-2 on nothing larger than an I-284 and the weight is calculated accordingly. But my construction isn't stock. I' e added epoxy and fiberglass weight. Not a lot of weight but it should be considered. I've also added a motor retainer. Light, to be sure, but still to be considered. With the rocket built and primed, I used Rocksim to determine the Barrowman and Rocksim centers of pressure. There was a big difference in these calculations but I knew the real Cp was somewhere about 2" ahead of the fins. I then took the biggest motor (J350) that I thought that I would fly and taped it to the rear of the rocket. I put the casing into the motor tube and fastened the retainer. I installed the parachute I'm going to use (60" Top flight after weighing the V-2 ), 20' of 9/16" military spec nylon tubing, Nomex® shields and quicklinks. I then taped the 8 ounces of steel shot to the tip of the nosecone. Finding the center of gravity, I added another 6 ounces (overkill) of steel shot after repeated measurements designed to move the Cg farther away from the Cp. I wanted 1.0+ calibers for safety and feel I'm pretty close to that.
Once I felt comfortable with the weight, I mixed the epoxy/steel shot and poured it into the nosecone and let it cure.
"I Don Wan No Stinkin' Launch Lugs!" Lose the 1/2" cardboard launch lug and put on a couple of Black Sky (or similar) Delrin rail guides. Once you use them, you'll never go back. They attach nicely to the boattail/body tube overlap and to a spot 5" down from the top of the body tube. Epoxy a 1/2" square piece of body tube at the 5" mark on the inside of the BT to give the rail guide screw something to bite on.
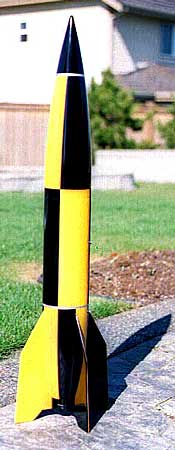
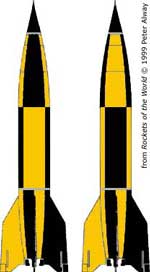
Painting. V-2 paint schemes are widely varied. There is a paint scheme for everyone, to be sure. One of my favorites is the dark yellow and black of V-2 No. 2 flown at White Sands, New Mexico in 1946. I got the painting detail from Peter Always's Rockets of the World, 3rd Edition. If you don't have this book, put it on the 'ol birthday or Christmas wish list. It's a necessity.
After prepping the rocket for painting as described with the nosecone, I found Plasti-Kote "School Bus Yellow", "Gloss Black" and "Silver" for painting the rocket. Strictly on an opinion basis, I think P-K paints are a bit more durable than Krylon. Can't substantiate it, but I think so. Use whatever you' re comfortable with, however, but you may want to try P-K paints.
Other than spending an enormous amount of time (and blue detail tape) taping the rocket for the paint scheme, the painting wasn't bad at all. AND! I did not pull any paint away from the nosecone when I pulled the masking off. What could be better than that?
And One Final Thing. Remember I was talking about building a rocket that would be easy to prep and launch? Well, I've back-tracked a bit. I made provision to put in a 38mm tube that will accommodate a BlackSky AltAcc accelerometer. This piece of electronics screw mounts to the side of the airframe and is armed by turning an arming screw. It won't be used for dual deployment; it will just fire the main at apogee. I don't know if I'll use it, but just in case.... Creature of habit, I guess.
All in all, a great rocket kit and something different for me. Don't expect a lot of altitude on this model, though. 1250' on an I357; 1500' on an I211; 1900' on an I300; 2700' on an I435 (if I dare). But those altitudes are plenty for a short wide-bodied rocket with a parachute at apogee. Lift-offs should be great.
 With 55,000 lbs of thrust generated from a hydrogen peroxide-methanol motor, the real rocket traveled at over 4400 ft/second. It was first fired operationally by the Germans with a 1 ton warhead on September 6, 1944, aimed at Paris. After two firings on the 6th, the target was switched to London on September 7th.
The reality of the V-2 was as the progenitor of the space race between the U.S. and the U.S.S.R. The United States managed to ship parts for 100 V-2s and most of the Peenemunde scientists out of post-WWII Germany while the U.S.S.R. captured the production facilities and most of the missle technicians. What each country acquired was a rocket test bed capable of reaching an altitude of 52 miles with a range of 225 miles. The V-2 had a throw weight of about 2,000 lbs which amounted to a lot of scientific instruments. The United States fired some 70 V-2s between 1946 and 1955. From Rockets of the World by Peter Alway.
Other Reviews
- LOC/Precision V2 (5.38") By John Coker
Loc/Precision just came out with a V2 kit in two sizes. I bought the smaller one at the April LUNAR launch. Apparently, I got one of the first few produced. I like sport-scale rockets and hadn't built anything like a V2 before, so this was great timing. This rocket flew for the first time on an I357, although I had my first burn-by of the Aerotech delay sleeve. The ejection ...
 |
 |
Flights
|
|
|
|
J.T. (September 19, 2001)