| Manufacturer: | FlisKits  |
 Brief:
The Alien8 design came to us from a very private race of beings who inhabit the Horse Head Nebula. Their xenophobic nature has lead to much speculation but little real information about their biology, science, or philosophies. While very aggressive, this race until recently has seemed to accept a lasting truce with her surrounding neighbors. They have spawned a new class of starship, the Xtermin8. It has been witnessed wreaking havoc, conquering the weak planetary systems and devastating the strong. The Xtermin8 is the aggressively styled warship that the mysterious aliens are using to dominate and annex all of the territory of the nebula!
I've been fascinated with the designs of Shrox since I first saw them at NARCON many years ago. When the 2006 EMRR Challenge had the Alien8 as one of the selections for kit bashing, I knew that it was the kit I would select. I wanted to produce a rocket that still had the flavor of the Alien8, but with a more aggressive look. After months doodling and rearranging of the parts, the Xtermin8 took shape on the workbench in the span of an afternoon.
Modifications:
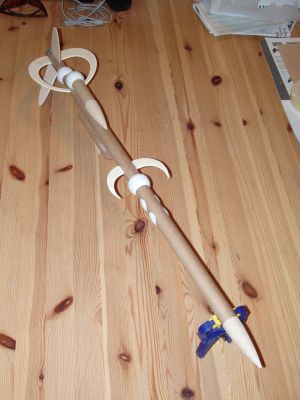
I started construction in the standard order by starting with the engine mount and built it pretty much stock. However, the addition of the tail cone required slightly different spacing of the centering rings. The tail cone pattern and the pattern for the bevel of the outboard tube were created with VCT, a complimentary piece of software from the makers of VCP. The tail cone was cut from paper from one of the many sheets included with the kit. After gluing it in position, it was liberally coated with several coats of thick CA. This allowed the cone to be sanded smooth and gave it a good deal of strength since the rocket would be landing on it.
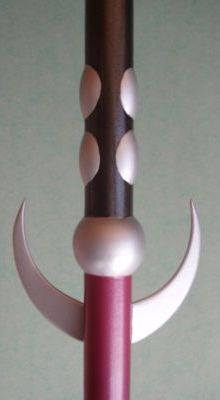
Since I was using the ping pong balls to give the Xtermin8 the signature look of a Shrox design, I knew I was going to have to either use a launch lug stand off or cut openings in the balls for the launch rod to go through. Luckily, I recognized that I could hide the lug inside an outboard tube! Gotta love a design with no apparent (and distracting) lug hanging off of it!
Construction:
The components that came in the kit were:
- 2 NCB-50AB nose cone, balsa
- 2 BT-50-18 body tube, 18"
- 1 BT-50-04 body tube, 4"
- 1 BT-20-0275 body tube, 2.75"
- 1 CPL-50-01 stage coupler
- 2 FSB-3-4-9 fin stock, 3/32" balsa
- 2 FSW-SHX01 laser cut fins, 3/32" plywood
- 1 PCP-16 16" parachute
- 3 PPB-01 ping pong balls
- 1 SE-M screw eye, medium
- 1 SLK-90-36 Kevlar shock line
- 1 SC-2-24 elastic shock cord
- 1 SLCA-96 shroud line
- 1 TD-1-6 tape disk
- 1 LL-1-2 2" launch lug
- 1 EH-0275 engine hook
- 2 CRP-20-50 centering ring
- 1 EB-20 engine block
- 1 DCW-SHX01 decal sheet
- 1 FPS-SHX01 fin pattern sheet
- 1 INS-SHX01 instruction sheet
- 1 header card
- 1 plastic bag that contained the kit
- 1 NAR insert
The quality of the parts was great! Nice firm balsa sheets and cones with tight grain. Nice laser-cut ply. Tubes and rings that fit without sanding.

Finishing:
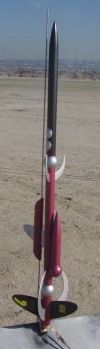
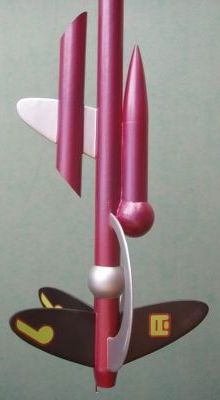
The Xtermin8's fins were coated with a light coat of Elmer's Fill 'n' Finish and a heavy coat of Kilz. After sanding, it was smooth and ready for paint. It took several rounds of masking and painting, waiting several days between each coat so that there would be no "orange peel" effect. The first color to go on was a base coat of red over the whole model. While this was still wet, it got a dusting of metallic purple to give the model a mottled look. The silver areas were masked and painted next, followed by the metallic black. The Fliskits decals were mainly discarded, but a few of them added a nice touch to the model as they are really good quality waterslides. They were easily positioned and not so thin that they disintegrated if you looked at them too hard like those that come on some kits...
Flight and Recovery:
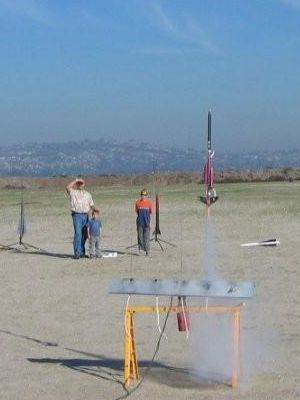
(Photo Credit to Eli Selig) It took several rounds of swing testing to get the model to balance properly for flight. The only thing that was added that was not included in the kit was a stack of washers tied to the shock cord to make the model stable.
After a good morning of flying, it came time to launch the Xtermin8 naked for its first flight. The motor I chose for the first flight was an Estes C6-3. Plenty of power to get the rocket moving and hopefully a delay that wouldn't zipper with all of the extra draggy bits glued to the airframe. After the countdown, the rocket leapt off the pad and flew rail straight to apogee and ejected perfectly!
The stock chute and recovery harness worked perfectly and seemed to be sized appropriately for the modified kit as it landed softly nearby.
After a couple of months that it took to get the rocket masked and painted and masked and painted and masked and painted and decaled, the Xtermin8 made it's second showing. I got many compliments on the paint job and the unusual design. The C6-3 made two more good flights, boosting nicely in a clear blue, still sky.
The third flight had the parachute get tangled up in the shroud lines and it came in without the chute deploying. The front end of the body tube got slightly crumpled, but only a 1/2" or so. It should be safe to trim the tube and keep on flying!
The Kevlar and elastic combination shock cord is tough and durable. I will probably use this combination on my future scratch builds.
Summary:
The Alien8 is a fun design and a great kit to kit bash. I enjoyed transforming it into the more aggressive look of the Xtermin8. The quality of the components from the kit is top notch and a pleasure to work with. There were really no CONs to this build other than the minor annoyances of the slitting ply (my fault for trying to cut it too thinly) and the deep grooves in the ping pong balls that needed filling.
 |
 |