Art Applewhite Rockets Flying Saucer 29mm (10.25")
Art Applewhite Rockets - Flying Saucer 29mm (10.25") {Kit}
Contributed by Dick Stafford
| Manufacturer: | Art Applewhite Rockets  |

(Contributed - by Dick Stafford - 11/15/02)
 Brief:
I don't know what Art is feeding his saucers, but they just seem to keep
gettin' BIGGER. His latest offering is 10.25 inches in diameter and flies on
29mm motors. The construction is almost identical to his 7.5 and 9-inch
saucers, with a few components beefed up a bit. This one is fluorescent orange,
but he also offers a 'Texas Special', USAF, Stas and Stripes, Smiley Face, and
several other solid colors.
Construction:
The parts are simple, are all of good quality, and include:
- Preprinted card stock for the top and core assembly.
- One thick 10.25" plastic picnic plate for the bottom.
- One thick walled 29mm motor tube
- One 3/16" launch lug
- 3/32" basswood fin stock
Tools and materials required:
- Scissors
- Exacto knife
- Elmer's white glue
- Devcon. 2 Ton Epoxy or clear, 30 minute epoxy
- Clear enamel (Rust-Oleum Crystal Clear or equivalent)
- Tape (clear or masking)
- 150 grit sandpaper
This saucer is another easy build. There are five pages of detailed instructions with plenty of diagrams. White glue is used to assemble the conical top and core assembly. I will re-emphasize the construction notes about using thin layers of white glue. More does not help and will only warp the paper. If you follow this guidance, the results will be nice. Art has added some notes about using plates and bowls to hold the pieces together as they are assembled. These techniques worked great, taking advantage of the geometry of the structures to keep them uniformly in contact with one another. Once the top and core are assembled, it is time to add the plastic plate to the bottom. He provides a template to cut out the center. Unlike its smaller cousins, the plate is epoxied to the top assembly. You first sand the plate to fit, and then spread a thin layer of epoxy over the entire inside of the top and core. You reinstall the plate and clamp it down with a suitably sized bowl. I know this is an odd statement coming from me (Mr. UseWhatYou'veGot), but use the Devcon 2-ton epoxy recommended in the instructions. In a previous experiment, I found that Bob Smith epoxy would bleed through the cardstock. The fin can assembles with white glue (I used carpenter's glue for this step) like any other set of fins. The basswood fin stock is nice and easy to work with. Unlike the smaller saucers, the fin unit is glued in place, completing the assembly.
Finishing: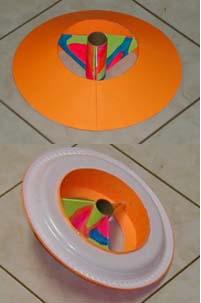
I sealed the fins with Fill-and-Finish and painted the fin can in a camouflage
pattern with various day-glow colors. I painted 99.9% before installation, and
touched up around the fillets after it was glued into the body. Finally, per
the instructions, I sealed the cardstock with clear enamel. Looks pretty good
if I do say so myself.
Construction Rating: 5 out of 5
Flight:
The recommended motors list includes the Ellis G35, all Aerotech 29mm SU, and
all RMS 29/40-120 reloads. I flew the model on a G38 with the ejection charge
removed. I angled the rod slightly away from the crowd and almost parallel to
the to the light wind. The flight was a real crowd pleaser, with lots of black
smoke. The boost started straight (with the wind) and the saucer did a
half-corkscrew turn into the wind. It gently landed maybe 20 feet from the pad.
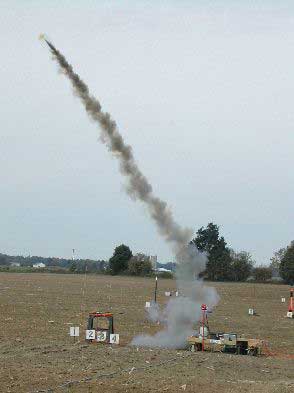
I didn't catch a launch shot, but you can see the flight of a beta-test
version at the top of this review,
also on a G38 (the materials were identical except for the decoration). On this
flight, the winds were stiff so it weathercocked quite a bit, as is to be
expected. Nevertheless, it was also a cool flight.
Flight Rating: 5 out of 5
Summary:
Once again, Art has shown himself to be a master of simple, elegant designs.
This saucer is mostly made out of common household materials, yet it looks
great and holds up to G motors! This is a far cry from my first attempt at a
mid-power saucer, which was built like a tank and flew like one too.
Overall Rating: 5 out of 5
Other Reviews
- Art Applewhite Rockets Flying Saucer 29mm (10.25") By Bob Goffena (November 30, 2009)
Brief: Won this Art Applewhite saucer kit as part of the 2009 EMRR Rocket Video Contest . www.artapplewhite.com offers numerous cool oddrocs in various styles (saucers, pyramids, monocopters, hourglass/spools, etc) and sizes (i.e. 4" to 18" diameter saucers). I had been thinking about scratch building a saucer for sometime, and am glad I got hold of this kit first. The ...
 |
 |
S.S. (October 25, 2003)
|
|
DAU (July 21, 2003)