| Construction Rating: | starstarstarstar_borderstar_border |
| Flight Rating: | starstarstarstar_borderstar_border |
| Overall Rating: | starstarstar_borderstar_borderstar_border |
| Diameter: | 0.75 inches |
| Length: | 12.50 inches |
| Manufacturer: | Starlight Rockets |
| Skill Level: | 1 |
| Style: | Sport |
Brief:
This is a single stage Level I rocket with a fairly basic assembly. Quality of my first kit impressed me and looked great on the pad, but the second kit made me think one of the two was packaged incorrectly and was a completely different rocket. Quality control appears to be an issue.
Construction:
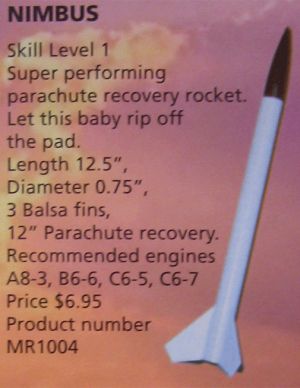
I initially bought this kit because I wanted to add a third rocket to my son's fleet. As well, I wanted to practice some techniques before my other rockets arrived in the mail. The kit comes in the basic clear hang bag with a “retro” style cardboard picture on the front. It included all the parts (fins, tubes, etc.), which were in fine condition. The instructions used a small font and the diagrams were hand-sketched, but both were easy to follow. I can't give too many more details because from here on the kit took a few unexpected turns...
As I indicated above, I have assembled two Nimbuses (Nimbusi?). “Nimbus I” made me very impressed with the company. For a basic “Level I” kit that cost under $6 (incl. tax), the fins were sturdy, the tube felt strong, the spiral shallow, and the balsa nose cone symmetrical. It used a metallic mylar streamer that was attached to a screw eye in the nose cone. The shock cord was strong and appeared to be Kevlar or something similar.
 The components for "Nimbus II" were quite different. All components were accounted for, but the quality was notably inferior to the first kit.
What caught my eye as I assembled "Nimbus I" was that it had four fins on such a small body tube. I was eager to see how this would look. I rounded the leading edges and tapered the trailing edges, applied skins, and used 5 minute epoxy for the fillets. (Remember I said I wanted to practice techniques?) The nose cone was balsa and required little sanding. I experimented with using spackling joint compound to seal it because it was handy and within reach. This had surprisingly good results, but sealer would be better.
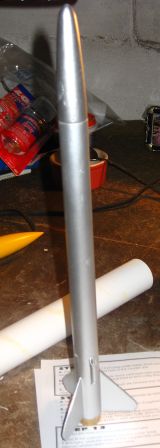
When assembled, this rocket looked like it meant business. Four swept back fins on a short, narrow tube looked pretty cool on the pad. I painted it silver so it kind of had a Buck Rogers type look to it. The rocket was lost after launch (story below) and my son was really sad to see "Silver Star" go bye-bye. So back to the store...
“Nimbus II” cost 2 bucks more, had a 12" parachute instead of a streamer, and three fins instead of four. Further, these fins were thinner and quite flexible. They could be bent 45 degrees or more and not show a sign of breaking. Lastly, the body tube for “Nimbus II” had markings for three fins while the body for “Nimbus I” had markings for four.
All these differences made me think I had a completely different rocket. A totally different design with lower quality and a higher price was completely unexpected. The package did indeed say Nimbus, and the website's picture was the same as that on my bag. The picture was too vague to see if it had three or four fins.
I initially didn't plan on applying skins this time, but I felt I had to in order to ensure integrity during flight. The nosecone was not symmetrical and had a divot in the tip so required sanding to make it look right and fly well.
Once all was said and done, the rocket was sturdy, and the marks for aligning the fins were straight. Needless to say, I liked the look of "Nimbus I" better.
Finishing:
Finishing was straightforward. Unfortunately I forgot to take pictures of "Nimbus I", but believe me, Krylon metallic/chrome silver is the perfect color for this rocket. It gave it a retro look and also appeared to be a little more than a beginner's entry-level rocket.
“Nimbus I” looked great after 2 coats of primer and wet sanding followed by 2 coats of topcoat. “Nimbus II”, however, showed the spirals after 3 coats of primer so I hoped the topcoat would cover them. They did as long as you were more than 5 feet away.
Construction Rating: 3 out of 5
Flight:
For the first flight of “Nimbus I”, I used the recommended A8-3. Because of my big fingers, I found the narrow body a little tight for the rolled up streamer but got it all in there. It was a perfect launch. It took off really fast, went quite high, and perfectly straight (even in a 5-10mph breeze).
Unfortunately, I forgot masking tape to pressure fit the engine. We had launched some other rockets first (this was my first launch in about 30 years), and my son, some friends, and I were having so much fun that my judgment was impaired. I tried wrapping some grass around the engine and wedging the engine in. It seemed snug enough but wasn't. “Nimbus I” was never seen again.
In regards to “Nimbus II”, I felt that getting the 12" mylar chute in the body required more finagling than should be necessary. The streamer for “Nimbus I” was much easier. For the engine, I used the A8 and I'm glad I did. The flight was perfect: fast, straight as an arrow, and high. It was too high for me to see how the chute came out, but it appeared the timing was correct. Even in a very light wind and the launch rod angled slightly, my son and I walked around 750 feet (double checked on Google Pedometer) to retrieve it. I didn't have scissors to cut a spill hole so launched it only once. I really wanted to try the B or C engine. She would have been out of sight for sure.
Recovery:
Recovery of "Nimbus II" was straightforward. I used 2 sheets of Quest wadding, and the outer sheath of shock cord was a little singed. It will require a replacement after a few more launches and I’ll use 3 sheets of wadding for future flights. I would say a 12" chute is too big for this rocket. It drifted further than any of the other rockets launched that day (750' vs. 300-500 for the others). I will definitely cut a spill hole in the chute or retrofit a streamer. A metallic chute/streamer is perfect as the Nimbus is easily lost in the sky.
Pulling the engine out is proving to be very difficult, even with pliers. I'm concerned that the heat of the engine may have melted some of the adhesive on the masking tape and fused it to the body. I will use my favorite online search engine to see if I'm not the only one experiencing this and find some "tricks of the trade" so to speak.
Flight Rating: 3 out of 5
Summary:
This is a good beginner rocket. If you get the four-fin version, be happy. If you get the three-fin version, I highly recommend applying skins on the fins. A big pro is that the body is pre-marked for fins and launch lug. This is great for simplicity and young assemblers (my son is just under 5 yrs old). A con is quality control. I bought two Nimbuses in under a week and they were drastically different in quality, design, and price.
I would buy another Starlight rocket if one caught my eye. But I would first try to find the balsa in the bag to see how it is.
Overall Rating: 2 out of 5
 |
 |
|
|
Jeff Curtis (December 23, 2019)
I picked up a Nimbus cheap on Ebay. I got the three fin version but with none of the issues you mentioned. The fin balsa was excellent. My only complaint with the nose cone was the shoulder piece was extremely hard plastic and difficult to sand down as the fit was too snug. I move the fins to about an 1/8th inch from the bottom of the body tube so I can do the tape wrap motor retention. Just got the fins glued on today.