Vertical Force Rocketry Odin's Spear
Vertical Force Rocketry Odin's Spear
Contributed by Art Applewhite
| Construction Rating: | starstarstarstarstar |
| Flight Rating: | starstarstarstarstar |
| Overall Rating: | starstarstarstarstar |
Brief:
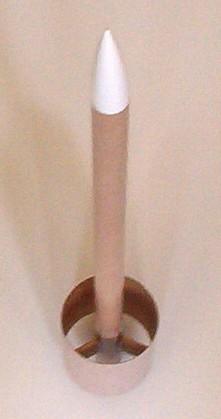
Odin's Spear is a single stage, tube finned, 18mm, minimum diameter rocket with
parachute recovery.
Construction:
The kit contains:
- 18.25" BT-20 brown body tube
- 3" BT-20 Nosecone, 2 piece
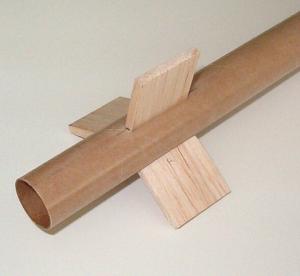
- 3" BT-80 brown Tube fin
- 4" x 15/16" x 1/8" Balsa
- 25" Kevlar®
- 24.5" Elastic
- 18mm Engine block
- 1" x 1/8" launch lug
- Decal & Decal instructions
- 8" Rocketman Rocket pre-assembled parachute
- Empty engine casing for engine block installation
 Odin's Spear is Vertical Force's
first kit and they are off to a good start. The kit arrived by Priority Mail
just 8 days after it was ordered. It was well packed in a sturdy 4"x
4"x20" cardboard box. All the parts are good quality and fit well
together. The tubes are precut to length. Particularly nice is the
pre-assembled Rockethead Rockets 8" red mylar parachute. It came with
Kevlar®
shroud lines with reinforced attachments and a brass snap swivel.
Odin's Spear is Vertical Force's
first kit and they are off to a good start. The kit arrived by Priority Mail
just 8 days after it was ordered. It was well packed in a sturdy 4"x
4"x20" cardboard box. All the parts are good quality and fit well
together. The tubes are precut to length. Particularly nice is the
pre-assembled Rockethead Rockets 8" red mylar parachute. It came with
Kevlar®
shroud lines with reinforced attachments and a brass snap swivel.
There is an entertaining story at the beginning of the clearly written and well illustrated, 8 page instruction booklet. The steps were presented in a very logical order and it is for anyone who has built a rocket with balsa fins. It takes about 4 hours to complete and most of that time is waiting for the glue to dry.
The shock cord made from a generous 25" piece of Kevlar® cord and a 24" piece of elastic. The fins are 1/8" thick balsa and require a single straight cut for each. The leading and trailing edges of the fins are rounded before they are attached to the body tube and then the 3.5" long, BT-80 ring fin is glued to them. The precut length of the fins was perfect for the tube fin to fit without any additional sanding. The base of the nose cone is glued to the nose cone top with CA and the shock cord tied to the nose cone.
Finishing:
I elected not to paint mine and I didn't apply the distinctive, water slide
decal.

Construction Rating: 5 out of 5
Flight:
With burn bans in effect in most Central Texas counties this Summer I had to
wait nearly a month to fly it. The first opportunity was the Austin Area
Rocketry Group's launch at Hutto, Texas on August 20, 2005.
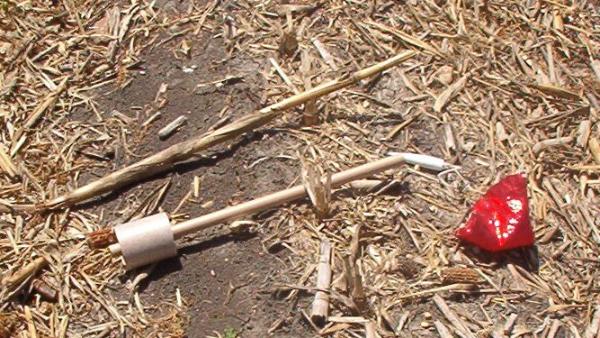
It was quite windy so I elected not to use the long delay motors the instructions recommended. The rocket was prepared like most small, parachute-recovery types with 3 squares of recovery wadding and friction fitting the motor. It jumped of the pad and flew very straight but the A8-3 don't carry it very high. Ejection was just before apogee and recovery was quick, close to the pads. The second flight on a B6-2 was about twice as high with ejection well before apogee and an easy recovery. The third flight on a C6-3 went much higher with ejection while the rocket was still going up. The wind carried it into a recently harvested cornfield about 1500 feet from the pads. I was very glad the Rocketman Rockets parachute was a bright metallic red, otherwise I might have had some difficulty finding the unfinished rocket among the short, brown corn stalks.
All the flights were very straight with very little weathercocking despite 10-15 mph winds.
Recovery:
The combination of Kevlar®
and elastic cord is very durable. The 8" parachute was easy to pack into
the BT-20 body tube and the rocket is so light it could use a streamer for
recovery instead.
Flight Rating: 5 out of 5
Summary:
Pros: Good instructions, easy to build, unique design, great parachute
Cons: None
Overall Rating: 5 out of 5
 |
 |