| Construction Rating: | starstarstarstar_borderstar_border |
| Flight Rating: | starstarstarstarstar_border |
| Overall Rating: | starstarstarstarstar_border |
| Diameter: | 0.74 inches |
| Length: | 15.37 inches |
| Manufacturer: | Custom Rockets  |
| Skill Level: | 2 |
| Style: | Contest, Payload |
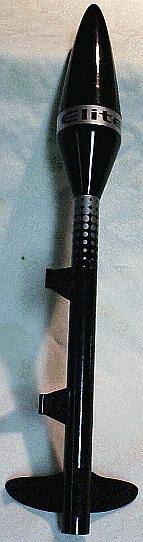 Now this is an egg lofter! Custom has trimmed the weight and size of its new Elite down to the bare essentials required to get an egg as high into the air as possible. The light-weight payload section with its power series nose cone (often mistakenly called "parabolic") is its most prominent feature and is reminiscent of the old Nova Egg Cone once found on Apogee's Hydra. The minimum diameter body tube and hard balsa fins further cut weight, and the sparing water slide decals keep surface finish smooth while adding just the right touch of class. The Elite could be painted just about any decent color (red springs to mind as a good choice), but the suggested basic gloss black touted on the bag art makes for a serious-looking bird. Performance is terrific for a kit egg lofter; on a C6 engine, the Elite shames my Estes Omloid by over 100 feet! Her pre-cut 18" diameter mylar 'chute makes for some good duration, too.
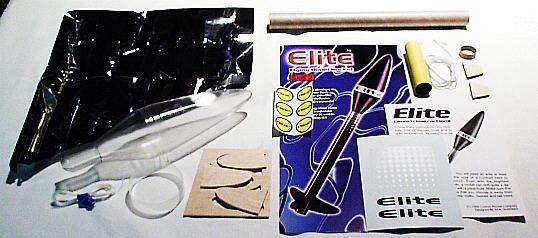
The fin material is the hardest I've ever seen in a model rocket kit, and the launch lug standoffs are made from tough, laser cut plywood, also very unusual for a kit under $10. The die cutting on the fins was superb, they practically fell out of their stock. Parts count is minimal, and the instructions are clear and easy to follow. A goodly amount of technique is discussed, but a few steps (and parts) need work.
There is no wrap-around fin alignment guide, and the stand-up one does not provide a location mark for the launch lug stand-offs. Separating the payload sections is done after the model is pained, and without careful handling, the paint can chip or scratch. The payload section has a lot of flash, and though it can be removed fairly easily, a lot of sanding is required to get a good finish after paint. The fit to the body tube was very loose, requiring two wraps of masking tape to come right. (Granted, its probably supposed to be a little loose so the engine core is retained, but it was really loose, folks.)
The shock cord and 'chute mounting hole in the transition is way too small; I cut another though the interior taper and used that to attach an 18" length of 1/8" shock cord, the included length being way too short. The mylar 'chute uses the old tape disk method for attaching the shroud lines (which are very thin and tough to work with), notoriously unreliable, especially for a payload-carrying rocket. I punched holes in the disks and tied the lines on a la the current Estes system.
Painting the plastic parts was a bit of a challenge; the interior of the payload section jointing ring must be masked to prevent over-spray. The payload section must be sanded thoroughly for the paint to get a good grip. Not much chance of keeping it in its clear state. (NOTE: Later production Elites have black payload sections.) The water slide decals have a lot of clear border, and required a bit of trimming to look right on the model. No mention is made in the instruction for airfoiling the fins (the unusual semi-ellipse form would have made this tough to do, anyway), and the blunt edges make for a rough appearance. If I had this bird to do over, I'd design and attach my own fins.
Why are the good looking ones always such pains to build? I'd rate the Elite a 2½ on the Essence scale, needs some improvement.
As I said, this bird is a real go-getter! A quick check in VCP told me that she wasn't stable enough to fly empty, so for her first flight I loaded her with an egg and an Estes B6-2. Empty she only weighs about an ounce, so the addition of a two ounce egg doesn't hurt her performance that much. My C6-3 flight with a grade AA egg more than doubled the altitude of her B6 effort, and it sure was impressive! The Elite isn't going to beat the one-off or high-end birds you see at meets, but she'll take anybody's Scrambler or Omloid at your club shoot, and quite convincingly, too. (If the manufacturer can be believed, she'll beat (no pun intended) Aerospace Speciality Products' 18 mm Eggstravaganza, too.)
Just a couple very minor complaints about operations; packing foam isn't included, I had to scare up some old open cell stuff to cushion the egg. I was also disappointed that she wouldn't fly empty and with the absence of a motor retaining clip.
If you're looking to get into egg lofting on a budget, the Elite is the only way to go. I'd rate her a 4½ on the Essence scale for flight, as close as you can get to perfect for $7.95 (MSRP).
Custom needs to improve the build of this kit, but they've got a solid handle on looks and performance here; I'd rate the Elite a 4 overall on the Essence scale, above average.
Other Reviews
- Custom Rockets Elite By Thomas Tweedel (September 24, 2009)
Construction: Parts included: 1 18mm ID tube 2 part nose cone it splits in half along the horizontal axis and is held together with a mylar ring 3 Die cut fins elastic shock cord Engine stop ring (no hook) 12 inch parachute. First off the quality of the kit was mixed. The body tube was the same. The Fins were die cut out of a very lightweight but somewhat ...
- Custom Rockets Elite By Ken Johnson
A lightweight, minimum diameter egg lofter with an efficient aerodynamic design. The kit comes in the typical "hanging bag" style package. As such, it doesn't protect the kit from any damage incurred in shipping, and this one was indeed damaged in shipment, though I couldn't tell until the package was open. The kit featured a length of 18mm tubing, a very unusual plastic nose cone, a ...
 |
 |
Flights
|
|
L.S. (November 1, 2000)
KRE (June 9, 2003)
T.T. (September 24, 2009)
|
|
D.K. (August 1, 2000)