| Construction Rating: | starstarstarstarstar_border |
| Flight Rating: | starstarstarstar_borderstar_border |
| Overall Rating: | starstarstarstarstar_border |
| Manufacturer: | Estes  |
Brief:
Estes has brought hydrogen-powered rocketry to the masses in a simple and affordable kit. Within 30 minutes of opening the box, you can be launching these things in a very small field.
At $50, the price might scare away a few folks, but I managed to score one at a half off sale and at least one national hobby shop offers frequent 40% off coupons. At that discount, I'd jump on one just for the innovation factor.
Construction:
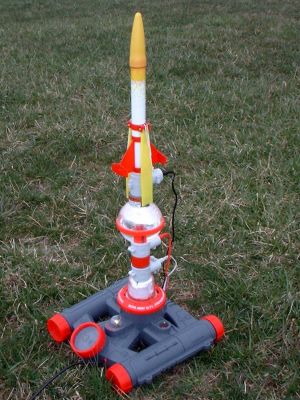
The set is mostly pre-assembled (almost RTF) and includes the following modular components:
- Base unit/stand
- Hydrogen generation tank
- Launch tube
- 15-foot launch cord
- Citric acid crystals
- Spare washers/gaskets/rubber bands
- 1 RTF helicopter recovery rocket
- 1 RTF boink recovery rocket (foam head)
You will need to supply your own D-cell batteries (6 of them). Given the likely drain on them, rechargeables might not be a bad investment. The assembly of the launch system is very straightforward, and the instructions are fairly decent. It actually took me a lot longer to undo all the twist ties securing the components than to complete the actual assembly.
Since each of the components have mistake-proof design features, it's hard to mess this up. For example, the hydrogen charge unit has two different sized tabs that need to lock in place. You can't get them backwards.
Assembly consists of inserting and twist-locking the hydrogen charging unit into the base then inserting and twist-locking the launch tube onto the hydrogen charging unit. You should skip this step until launch time though, as you need to pour the water/citric acid solution into the tank first. Batteries are inserted into the feet of the base unit. I found all parts fit snugly, and had no problems assembling everything.
Finishing:
The set, including the rockets, is RTF so no finishing is required. The fins on the boink rocket are flexible foam and attached to the body tube using clear tape. I would ding the design just a bit for this, as mine were bent in the box and not well aligned.
Construction Rating: 4 out of 5
Flight:
Flight prep on this is a bit funky, and I'll admit to a certain degree of stupidity that detracted from my experience.
First step to flight prep is to prepare the "fuel" solution. This is pretty easy as you just pour a pre-measured packet of citric acid crystals into the furnished mixing bottle then fill it with ordinary tap water. Shake it a bit and you're good to go. The solution is reusable and can be stored for a long period of time, so I would imagine the furnished crystal packets will last for hundreds of flights. Even if you run out, this is a fairly common and easily obtained material. Heck, you don't even need a BATFE permit to store this stuff!
Once you pour the solution into the tank (carefully so as not to soak the ignitor coil cleverly placed at the top of the tank right in front of the opening), you twist-lock the launch tube onto the tank and then insert your rocket onto the launch tube. The rocket fits snugly on the tube and forms a seal thanks to an O-ring on the launch tube.
There are 3 wire leads to connect, all color coded and each a different length, again making it hard not to hook up correctly (though not impossible to simply forget them). With the leads attached, you turn on the power to the base unit, where a red light goes on indicating the system is powered.
Next, you need to "charge" the solution, which is just an electrolysis process. If you were wondering what all those D-cell batteries are for, this is it. As a safety feature, the base must be absolutely level in order for the charge process to begin (there's a bearing that rolls onto a contact switch on top of the base). A simple yellow light indicates when the charge is taking place and is replaced by a green light when the cycle is complete. I believe there's a cutoff mechanism in place to prevent overcharging.
The initial charge might take 5-10 minutes, but subsequent charges are fairly quick--two to three minutes per flight.
When the light goes green, all that's left is to push (and hold, up to maybe 10 seconds) the launch button and watch the rocket pop. At least, that's the theory...
I bought mine about a year ago when they first came out, took it out to the field on a fairly cold day, waited for the charge, pushed the button, and nothing happened. I tried 2 or 3 more times with no luck. Figuring maybe it was just too cold, I stashed everything in the basement until summer, bought fresh batteries and tried it again. Nothing. Very frustrated by the experience, I tossed the set in my junk pile, where I queue up vendor returns.
After gathering dust in my junk pile for about 6 months, I finally sent it back to Estes, along with the wreckage from my Cosmos Mariner (see my review on that one), and a D12-7 CATO that destroyed a beautiful Semroc SLS Skyhook. A couple of weeks later, I got a replacement hydrogen set, fresh pack of D12-7s, and over $40 worth of new rockets. (I specifically told them they could keep the Cosmos Mariner, as I wanted no part of that beast ever again.) I was absolutely delighted with Estes customer service, as they clearly went above and beyond to try to convert me back to a satisfied customer.
I carted the new hydrogen set out to the field on a nice warm day, charged it up, pushed the button, and...nothing. At this point, I was beginning to think I'm missing some very stupid/silly thing, as it's unlikely that I would have gotten a dud replacement kit. I then surfed over to The Rocketry Forum, and started a thread asking for advice on getting this kit to fly. Within a few hours, I had gotten a number of helpful responses, a few of which pointed out a safety feature I was completely unaware of--the launch cord must be "completely extended" in order to launch. This is noted on the cord as well as in the instructions, but I missed the line that pointed out that there is a safety switch where the cord goes into the base. I looked at my set and sure enough there is a small red bushing that pops out a bit when you pull the cord tight. I was too paranoid that I might pull the base off-level, so I had just enough slack on my cord for the safety to prevent ignition.
Armed with this new knowledge, I went back out and gave it one last effort. This time with the cord taught, I pressed the launch button and within 2-3 seconds, the rocket popped up, peaking at about 50 feet.
Subsequent flights fared much better with my highest flight around 100 feet.
Recovery:
The boink rocket flew straight as an arrow and tumble recovery was fine. It's light, soft, and Nerf-like, so even landing in a crowd is no big deal. In winds of about 6-8 mph, my first flight peaked at 50 feet and landed about 25 feet downwind. The second flight peaked about 100 feet and landed about 10 feet further away than the first.
For my third flight, I went with the helicopter recovery rocket. The blades are only held in place by the launch tube, so they deploy immediately on the way up. Mine arced over and came straight down without even a single rotation for a boink recovery. I have no idea why it didn't spin. I suspect it's because the blades have no tilt to them.
Flight Rating: 3 out of 5
Summary:
While I had a fairly difficult experience with this kit, I attribute it entirely to my own stupidity (although I wish there were a warning label pointing out the safety on the base unit). The assembly is simple, the design is very good, and you can't beat the cost per flight.
PROs would be the innovation factor, as it's definitely a cool toy. I would also put the cost per flight as a nice pro as well.
CONs would be the relatively feeble flight performance, though this could be a great demonstration kit for flying on a school playground. Launch from a pitcher's mound, and you won't probably won't leave the infield.
As well, I can't say enough about the Estes' customer service. I do knock them occasionally on some of their clunkers, but there's no doubt that without this company, there would be no model rocketry today. Even where the problem was with the customer (me)--not the product--they did an outstanding job of making things right.
Overall Rating: 4 out of 5
 |
 |
Flights
|
|
Sara Giesmann (September 24, 2018)
I have a second-hand hydrogen rocket set that doesn't have the citric acid packets. I have tried to contact Estes several times - no response. Does anyone know how much citric acid is in the packets, and can I just buy some citric acid crystals and measure out the amt I need?
Thanks for any help.
|
|
M.K.W.G. (April 19, 2006)