Scratch Dart Original Design / Scratch Built
Scratch - Dart {Scratch}
Contributed by Kyle James Yawn
| Manufacturer: | Scratch |

Brief:
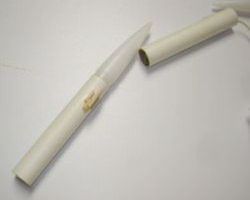
This is a minimum diameter rocket at its core with two parallel staged boosters
which attach at the front end of the rocket rather than the aft end. It was
made for the duration requirements for the NARTREK Bronze and Gemini levels and
for the parallel staged requirement of the 2006 EMRR Challenge.
Construction:
The core rocket is made up of a 14-inch long BT-20 body tube with a BT-20 ogive
nosecone which is 4 inches long. A 12-inch long length of Estes elastic shock
cord, a streamer, and two small scraps of paper are needed for the recovery
system. A sheet of 1/16 inch balsa wood to make fins and to hold the boosters
on. It needs a BT-20 engine block too. It also requires two 1-inch long
1/8-inch diameter launch lugs.
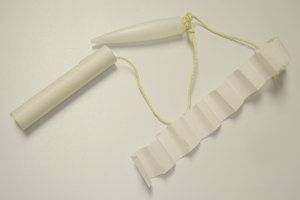
The two booster pods are made from 3 inch long lengths of 13mm motor tubing with matching nose cones. They also need a 13mm engine block. The recovery system is made of a 10 inch length of Kevlar® with two scraps of paper and small paper streamers. I also used some scraps of balsa wood to make the mounting hooks.
I began construction by inserting the motor block in the core rocket. I used a scrap balsa stick to spread wood glue around the inside of the tube then I used a spent 18mm motor casing and pushed the block up inside the tube until about a 1/4 inch of the motor casing stuck out the rear of the tube. I then cut three triangular fins out of the 1/16 inch balsa sheet I had. These were each 4.75" on one side, 3.25" on another, and 2.25" on the third. Alignment lines were drawn on the body tube with three evenly spaced for the fins and a fourth drawn in between two fins for the launch lug. The fins were all surface mounted on these lines with the 4.75 inch side being glued to the body tube and then aft end of the fins flush with the aft of the body tube. The nose cone I used did not have a hook for recovery device connection so I used a scrap piece of paper and the elastic shock cord and made an Estes style shock cord mount using super glue inside the nose cone. I used the other scrap of paper to make another shock cord mount the same way inside the body tube using wood glue. I tied a loop in the middle of the cord for the attachment of the recovery device. I also cut the launch lug in half and glued one flush with the aft end of the body tube, and the other 6 inches up the body tube.
The boosters were made in much the same way. The engine block was glued in place using a spent 13mm motor casing. The nose cones did not have attachment points for the recovery system, so I put Estes style mounts in the nose cones and the body tubes. This time I used lengths of Kevlar® instead of the elastic shock cords. I used a strip of paper to make small streamers for both boosters and taped them directly onto the Kevlar® cord.
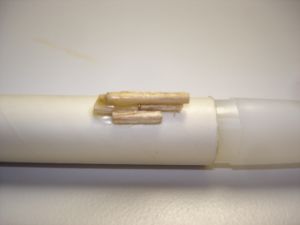
For the attachment of the boosters to the main body tube, I used scrap balsa pieces and a launch lug. The launch lug was cut in half and the halves glued flush with the forward end of the main body tube on opposite sides of the body tube and not inline with the main launch lugs. These are forward attached boosters rather than being mounted between the fins. I began by cutting two thin pieces of balsa which would be a snug fit inside the lugs. I used two more pieces of balsa to offset the first pieces from the side of the body tubes of the boosters. I glued these on so that the front of the booster was flush with the front end of the core body tube. I then glued two other pieces of each side of the main piece so that the boosters could not turn by twisting inside the lugs. I then gave all of this a thin coat of wood glue to hold it all together. After it dried, I inserted a spent engine casing and slid them into the lugs and marked on the main body tube where the bottom of the motor casing was. I then cut out two small pieces of balsa and glued them just below this mark so that the boosters can rest on this and not fall off of the rocket while on the pad.
The construction was very simplistic for the common parts. The process of cutting and sanding down all of the balsa parts to form the hooks to hold the boosters onto the core was very tedious and hard work, but in the end, they are a perfect fit. That's one area where it definitely pays to take your time.
Finishing:
To finish the core booster I only painted it red. I wasn't feeling anything too
special in the finishing of this rocket. I didn't even get around to painting
the boosters at all before I flew them. Perhaps I will someday. I would prefer
them to be painted different colors with a corresponding dot on the side of the
main body tube they attach to.
Flight:
While I was still in the process of building the boosters, I flew just the main
rocket part by its self for the NARTREK Bronze and Gemini duration
requirements. It flew perfect and I completed all the requirements on just two
flights. It's a great, small, minimum diameter rocket without the boosters for
duration events.
For the parallel staged flight, I flew the main body tube on B6-6s and the boosters flew with two A10-3Ts. I would suggest flying it with any A8, B6, or C6 motor in the core and A10-3Ts in the boosters.
All three tubes require wadding and have standard preparation, except it's just like prepping three rockets instead of one. Then pack the streamers in all three parts. For motor retention, I friction fit all of the motors using masking tape. I don't like this method, but since all the tubes were minimum diameter, I didn't put any type of hook of anything else on them. Then insert the igniters and motor plugs in all three motors.
Once I got to the pad, I slid the main body tube over the launch rod then slid the hooks on the boosters up inside the launch lugs at the top of the rocket until the boosters come to rest sitting on the balsa blocks which were glued in place. Next, I attached the alligator clips to the igniters. A clip whip is necessary for the rocket. I used another launch rod stood up next to the pad so the wire leads clipped to it would prevent the weight of the clip whip wires from pulling them out.
I was a little worried that it may not fly stably with the forward mounted boosters, but I was proved wrong. Upon takeoff, it flew straight up. All three motors lit and it looked amazing. Just before the booster motors burned out, they peeled off. There was still a visible flame in them just after they detached. The delay was rather long and the deployment change fired when they were only around 30 or 40 feet in the air. They were both recovered with no damage though. The core motor kept burning after the boosters separated and took the main rocket even higher. The only problem was since we were so busy watching the boosters, we all forgot to follow the core rocket. We lost it in some trees across the neighboring field. Oh well. It was a good looking flight for my first parallel staged rocket, even though none of the pictures of it turned out well. Perhaps I'll build another main body tube for the boosters and fly it again. I especially enjoyed the forward mounted boosters since I haven't seen too much of that design around.
Recovery:
The Kevlar®
shock cords held up just fine in both of the boosters. They came back down of
their streamers without any burned cord or damage. The only thing was that the
deployments were a little too close to the ground for my liking, but they got
the job done and I didn't have any repair work to do.
The recovery device of the main booster held together, but I didn't get to inspect it since it got eaten by that rocket eating tree. This part of the rocket had flown before for the NARTREK certifications and worked perfectly every time with no damage so I am certain that there is no damage to the recovery system this time either, it's just wrapped around a limb.
Summary:
I really liked building and flying this rocket. The main PROs about it are the
forward mounted booster pods and the minimum diameter construction for high
performance flights. These combine for a very unique and eye catching flight.
The only CON I would have is the fact that I lost the main part. Just don't fly it too close to trees because they know how to catch them.
 |
 |