Estes Pro Series II Panavia (clone)
By Jeff Curtis
Published: 2024-01-06
| Construction Rating: | starstarstarstarstar_border |
| Flight Rating: | starstarstarstarstar_border |
| Overall Rating: | starstarstarstarstar |
The Panavia was a kit that was available briefly via the Estes web site. It was composed of left over parts from other Pro Series II kits. The Panavia used the same fins as the Argent. The Estes kits are almost never seen, but clone kits are available from Bad Boy Rocketry and Launch Lab Rocketry. This is a review of the Bad Boy Rocketry clone kit of the Panavia.
The Bad Boy Rocketry kit includes:
2 2.5" tubes, one slotted
29MM motor tube
3 1/8" plywood centering rings.
3 1/8" fins
6 ft of 550lb kevlar cord
2.5" nose cone
2 1/4" launch lugs
2.5" coupler
You have to provide the parachute and hardware to mount the recovery harness. Quality of the components is top notch. I do believe the shock cord needs to be a bit longer.
Instructions are minimal and assume you have built other mid and high-power rockets. I started with the motor mount. None of the centering rings were drilled for the harness attachment point. So I drilled a 3/16" hole in one centering ring and added a eye screw. I applied JB Weld clear 5-minute epoxy to both sides of the screw. I then sanded the motor tube and used more epoxy to glue the centering rings to the tube. I had not built high-power rockets and the time I built the Panavia and did not add internal fillets. Once the epoxy set up I tied the kevlar cord to the eye screw. Then I used a fiberglass chop stick to add epoxy inside the tube above the fin slots and slid in the motor mount. After that set up I glued in the fins. I did not round the leading edge of the fins as I'm not really an altitude junky and our filed isn't all that big for larger rockets. I had to bevel the fin tabs a bit to get them to fit into the slots. I then added the external fillets using Titebond II. I had a spool of 550 lb. kevlar and extended the 6' cord another 4; I then joined the two body tubes with the coupler. Next I added an Estes Pro Series 24" parachute.
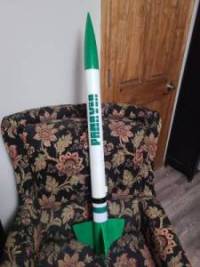
The paint scheme is pretty straight forward. Rustoleum Meadow Green was used for the nose cone and fin can. I ordered the vinyl decals from Stickershock23. He offers two varieties. I used the Stickershock design. The vinyl went on great and looks good.
So far I've flown the Panavia once using an Aerotech E24C-7. I included a Jolly Logic Altimeter 2. Altitude was 579'. Open rocket predicted 578'. Can't get much closer than that. The flight was not without excitement. My maiden flight of the Panavia and the JL Altimeter 2 landed in a tree. I was seriously bummed out. Fortunately, as a club member was leaving the park, it came across a Xfinity bucket truck. He asked the driver if he would help retrieve the rocket and he agreed! Man was I happy when I got that message after I arrived home.
Open Rocket sims show about 1000' for F motors and 1500' for a G. I'll verify those predictions when the 2024 flying season kits off.
I've enjoyed building a few of the Pro Series II kits and was happy to see the clone kits available for this rarer member of the Pro Series line up. I recommend you check out the Bad Boy Rocketry clone kits for some rockets whose original kits are hard or impossible to find. He sells the Panavia clone kit for $46.99, which I think is quite the bargain.
Flights
Estes Panavia Reviews
 |
 |