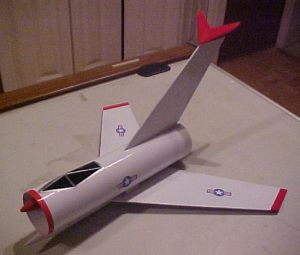
1.5X Mach 10 Upscale
Centuri - Mach 10 {Kit} (5004, KA-4) [1971-1979]
Contributed by Drake "Doc" Damerau
 Brief:
This is a 1.5X upscale of the classic Centuri rocket. This rocket appears in the early 1970's Centuri catalogs. Mine flew perfectly but many people had trouble with theirs.
Construction:
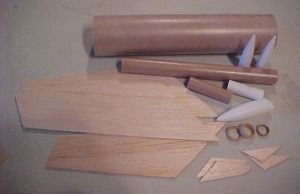
Here is what you'll need:
- 12" BT-80 tube
- 2.25" BT-20 tube
- 9.75" BT-50 tube
- 4" x 36" balsa sheet
- 2 PNC-20 nose cones ("Pod cones")
- 1 PNC-50 nose cone ("large cone")
- Motor mount assembly
- Clay
- Streamer
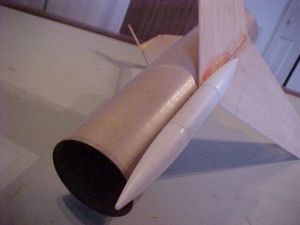
All of the nose cones must be hollow so that you can add clay to them. I used a 3.6:1 ogive nose cone for the weight pod because that's all I had in my parts box. I recommend using a shorter or elliptical one if you can.
Whenever building an upscale, I recommend downloading all the instructions and things found on Jim Z's website. I've done many upscales and this is how I get started and build every one of them.
The engine choice is critical. You can build this to use either an 18mm or a 24mm motor, but you'll have to stick to the motor choice. The weight of the burnt out motor is critical for this to fly properly, so an adaptor may not work without having to completely rebalance it between engine sizes. I went with an 18mm version.
The hardest part of this build is up scaling the fin patterns. To upscale mine, I printed various copies of the fin pattern found at JimZ's site until I measure them at 1.5x. These big fins fit perfectly on the 4" width of the balsa sheet. I used a 4" by 36" sheet and had plenty left over for another project.
Draw lines on the body tube 180° from each other. One will be the attachment point for the wings and pod and the other will be the attachment point for the tail.
Glue the two larger fins together to make the wing and allow to dry. I laid mine on wax paper butted together and used CA to glue them. Allow to dry. Glue wing assembly on to the body, 2 1/16" from the motor end. This needs to be done carefully to keep the alignment perfect. This is a glider and all the fins must be straight. Add the launch lugs to the wing assembly. Glue one on each side. This will keep it aerodynamically balanced and helps to support the wings.
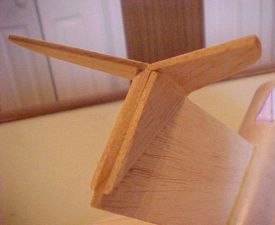
Glue the tail "tip" assembly onto the tail as shown. The rear of the tail fin should be 3/8" from the aft of the main tube. Make sure everything is square. Use generous fillets to strengthen the completed assembly.
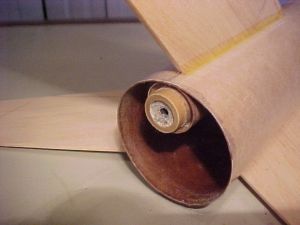 Build your motor mount as you would any kit. Glue this assembly into the BT-50 tube. Once this is dry, glue it into the main body tube underneath the tail. It must be square with the wings and tail. The only other important thing here is that the motor needs to stick out 1/4" from the back of the rocket. This helps balance the rocket.
Glue the pod assembly to the front of the body as shown. Since I did not use the correct pod cones, I had to place mine further back. The thing to know here is that the further back you glue it, the more weight will be needed to balance it for flight.
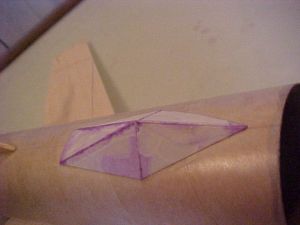
Assemble the window assembly and glue it 1/2" from the front on the top, aligned with the tail assembly. Give it a good soaking with thin CA.
Finishing:
The original kit had two color schemes. One was all blue like a Navy fighter and the other was white like an Air Force fighter. I went with the white scheme.
Balancing must be done after all the painting and finishing is complete. Remove the large nosecone with the streamer and set it aside. This is how the Mach 10 will weigh when it's flying. Add some clay to the front nose cone in the pod. Holding it by the tank pod, gently throw it. If it turns up and stalls, you need to add more weight. If it takes a nose dive, you have too much weight. Keep playing with it until it glides straight. Once you have it balanced and flying well, take note of the CG.
Now install a new motor, the streamer, wadding and the large nose cone. Add clay to the larger nose cone so that it balances about 2" in front of the CG you had in the previous step. The further forward it is, the better it will fly in the "rocket mode"
With everything in place, the CG is forward of the CP. When the motor ejects the nosecone and streamer, the CG shifts back over the CP and it becomes a glider.
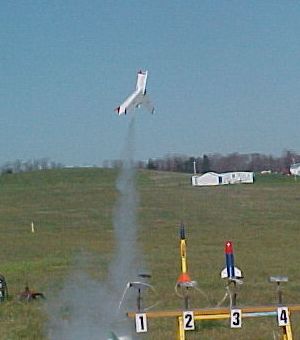
Flight:
I launched this rocket several times before this review with C6 motors. I found that the 3 second motor worked better than the 5 second delay. I recommend launching it in as little wind as possible because the wind can catch it and flip it over during the boost phase.
 |
 |
Flights
|
|