Scratch Avenger Original Design / Scratch Built
Scratch - Avenger {Scratch}
Contributed by William Beggs
| Manufacturer: | Scratch |
| Style: | Multi-Stage, Payload, Clone |
 Brief:
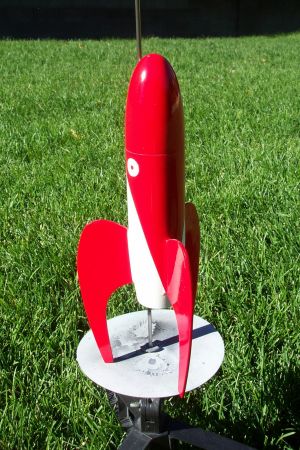
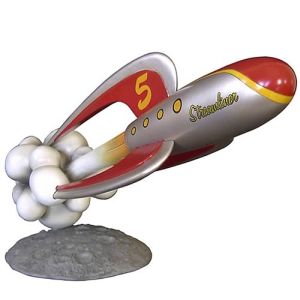
This is my attempt at designing and building a retro Spaceship that closely resembles one of the displays that CoolRockets has. The one I decided to replicate was the “Streamliner”. Since this is my first time attempting this I figured this design was fairly basic. The name I have given mine is the Avenger.
Construction:
The materials include:
- 1/16” Balsa for fin set, strengthened with carbon fiber
- Shock cord
- Launch lug, 1.25 inch long
- 3” BT-60 body tube
- BT-60 elliptical nose cone
- BT-60 Ogive nosecone, cut down for a boat tail using a BT-50 to mark how much.
- Estes 18 inch parachute (Originally a 12 inch but in flight tests came down too quickly)
- Shroud line
- Tape discs
- 3.25” BT-20 engine mount tube
- 18mm engine hook
- Plastic retainer ring
- Engine block
- BT-60 to BT-20 centering ring
- BT-55 to BT-20 centering ring
- 30g of lead shot for nose weight
Additional supplies:
- Two part epoxy
- Hobby knife
- White glue
- 3/8” wooden dowel
- 100 grit sand paper
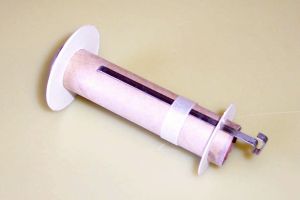
The first part to do is to assemble the engine mount. This is a typical design and includes marking the engine mount tube at 2 1/2 inches, ¾ inches, and 5/16 inches from one end. Cut a 1/8” slit at the 2 1/2 mark. Insert the engine hook and slide the plastic retainer ring over the motor tube and engine hook. Apply a little bit of glue just ahead of the ¾" mark and slide the plastic ring up to the ¾" mark. Next, notch the BT-55 to BT-60 centering ring to have room for the engine hook to be moved so that a motor can be installed easily. Then apply a little bit of glue just below the 5/16” mark and slide the BT-55 to BT-20 centering ring up to the 5/16” mark. Next, insert the motor tube assembly into the tail cone until the BT-55 to BT-20 centering ring bottoms out then slip the BT-60 to BT-20 centering ring over the motor mount and push down until it bottoms out on the coupler portion of the tail cone. Apply glue to secure the centering ring. Then apply glue to the inside of the body tube and to the lower portion of the tail cone coupler. Slide the body tube on to the tail cone. Wipe away any excess glue.
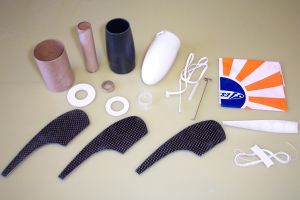 You will now need to make the fins. Use the template supplied. The supplied template drawing is 1:1 in scale with the fins being approximately 5 inches in length and 1 3/4 inches high.
Now mark the locations for the fins. You should make three equally spaced marks around the body tube. You can then use a fin jig to ensure that the fins are straight up and down. The front root edge of the fin should be located where the body tube meets the tail cone. The fins are surface mounted as opposed to a “through the wall” assembly and are attached to the tail cone using two-part epoxy. (Note: I started off with 1/16 inch thick balsa for the fins but since they extend out so much I wanted to stiffen them up a little so that they wouldn't be damaged on landing.) I applied 1 layer of 6 oz carbon fiber cloth with West Systems epoxy and sanded them down to their original shape. The carbon adds a lot of strength without sacrificing too much weight. It also increased their width from 1/16 inch to 3/16 of an inch. If you don't plan on adding either carbon or fiberglass, I would suggest using 3/16” balsa and adding thin CA or some other type of super glue to strengthen the fins. The process of using carbon or fiberglass will add about a day to your assembly considering the time it takes the epoxy to fully cure and the time it takes to sand the fins back down.
 Next, mark the location for the launch lug. The launch lug should start where the tail cone meets the body tube. Make sure that when you attach it that it is perpendicular to the body tube.
Now take the BT-60 Elliptical nose cone and cut down the reduced portion of the coupler and make sure that the shock cord attachment point is still intact. This allows the nose weight to be inserted more easily and makes more room for the recovery components. Next, take a piece of 100 grit sandpaper and wrap it around a 3/8” dowel and thoroughly rough up the inside of the nose cone so as to make the nose weight adhere better. Next, take the nose cone and place it in a holder so that the nose portion is pointing down. Mix up some epoxy with the lead shot and pour it into the nose cone. The lead weight can be secured with some expanding foam but just remember that there isn't a whole lot of room for the recovery components.
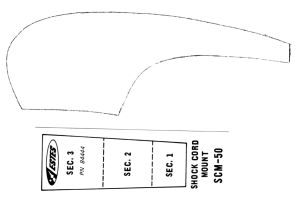 Attach the shock cord to the inside of the body tube by using the shock cord mount SCM-50 template and tie the other end of the shock cord to the nose cone. Attach the parachute about two inches down from the nose cone attachment. This will ensure that the parachute is deployed properly and not stuffed up in the nose cone due to the force of the ejection charge.
Finishing:
I applied a coat of Rustoleum Painter's Touch gray primer and sanded everything smooth. I then made sure to fill in any imperfections with modeling putty and sanded it smooth again and applied one more layer of primer. I then applied Rustoleum Painter's Touch glossy white to the entire airframe. Finally, I applied the red to make it really stand out. Not too bad.
To give the Avenger an even more similar look to the CoolRockets design, I could of made another set of smaller fins to build up onto the main fins but this would have added more weight than I was wanting to attempt with this design.
Flight:
Recommended motors: Estes B6-2, C6-3, C6-5.
My first flight used a B6-4 motor with three loosely crumpled squares of recovery wadding. The winds were calm and the Avenger flew straight up and started coming back down before the ejection charge went off. The delay was a little long. The Avenger could probably use a larger parachute. Maybe an Estes 18 inch parachute. No damage to the rocket.
The second flight used an A8-3 which was not enough power. As with the first flight, it went straight up and started coming back down before the ejection charge went off. No damage to the rocket.
The third flight used a B6-2 motor and was a good flight but the ejection charge went prior to apogee. No damage to the rocket.
The fourth flight used a B4-4 motor and was a good flight but the ejection charge went way past apogee. Rocket landed in the street and popped off a fin. This was easily fixed with some thin CA.
The fifth flight used a B6-2 motor and was a good flight but the ejection charge is still a little early. I did change the parachute to an Estes 18 inch and that seems perfect. I need to launch it where I have the recovery room for a C motor. No damage to the rocket.
The sixth flight used a B6-2 motor and was a good flight but the ejection charge went prior to apogee. No damage to the rocket.
The seventh flight used a B6-2 motor and was a good flight but the ejection charge went prior to apogee. No damage to the rocket.
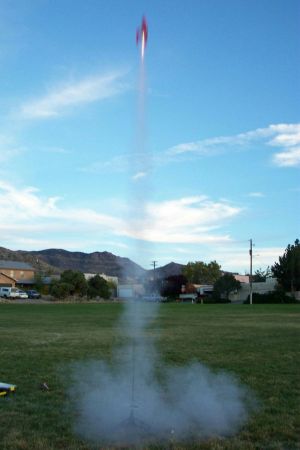
The reason for so many B6-2 motor flights is that it took 4 times just to get a picture of it in flight.
The next few flights will use a different set of motors and delays to determine what is best. I plan on flying the Avenger on a C5-3, C6-3, and C6-5.
Recovery:
Recovery is by a 18” parachute.
Summary:
This is a great little scale retro spaceship. It was relatively inexpensive to build and will take a good afternoon to assemble. It is very stable and flies straight. The Avenger could possibly use a little less nose weight which would open it up to other motor possibilities. It might also perform better with the motors that have already been tested with a little less weight. You could also use a “through the wall” fin attachment that could increase the strength of the fin attachment. The con to implementing the “through the wall” construction would be that it would add extra weight to the back end which would ultimately require more weight to be added to the nose cone to balance everything out for stable flight.
Other Reviews
- Estes Avenger Clone By Bill Eichelberger (September 28, 2012)
The Avenger wasn't the first two-stager I'd ever built, (that would be the Beta,) but it was the first one I ever flew as a two-stager. When I got back into the hobby in 2001, I quickly realized that much of what I wanted to build from my 1977-80 heyday no longer existed. My solution to this was to buy an Estes Builders Special, only to find that it had become a corporate ...
 |
 |
Flights
|
|