Scratch Big Ugly Bug Original Design / Scratch Built
Scratch - Big Ugly Bug {Scratch}
Contributed by John Nordlie
| Manufacturer: | Scratch |
 Brief:
This project was my second attempt to scratch-build a model rocket with available materials. I decided early in the project that I would try not to use any materials made expressly for building rockets. This was to keep costs down and give me some bragging rights among the other rocket club members.
After the success of the Ugly Bug, I wanted to stick to the Estes Mosquito design plan. Despite it's rather unpleasing proportions, I like the design. I built (and lost) many Mosquitoes in my youth, since they were the smallest and cheapest kit you could buy. I also liked the fact that they were almost all engine, and were therefore a 'muscle-rocket' design despite their diminutive size.
 Construction:
The first component I found for the BUB was a spiral-wound cardboard mailing tube. This was about 3" in diameter. I located pictures and plans for the original Mosquito on both the Estes/Cox and JimZ Rocket Plans websites. From these images I measured the rocket specs as well as I could, and obtained approximate aspect ratio and fin dimensions. I cut the tube to the proper length and was on my way.
The fins were an area I did the most thinking on. The Ugly Bug had done very well with fins made from brown paper, soaked with glue, laminated over corrugated cardboard. I didn't feel the material was strong enough for the scaled-up design, however. The Mosquito has very long fins compared to the root edge length, and therefore can't depend on the glue joint to keep them stiff. I decided to use a lamination of fiberglass over a corrugated cardboard core for both strength and cheapness. I bought some cut-strand-mat fiberglass cloth and resin from Wal-Mart, and located a sturdy cardboard box to cut cores from.
To serve as a sort of primitive mold, I used two sheets of glass coated with car wax. I cut the mat to fit the cores, mixed the resin, painted a coat on to the core, applied the mats (one per side), and another coat of resin to saturate it. This was then placed on one sheet of glass, and the other sheet placed on top to sandwich the fin in between. Some heavy books helped keep the fin squeezed between the glass sheets. This eliminates air bubbles and keeps the fin straight.
When you work with fiberglass, you should wear gloves to keep the cut ends from getting on your skin. The resin is also super-gooey and difficult to remove from fingers. Some cheap PVC painters gloves work very well. By the way, the resin also really stinks, so be aware of that when choosing a place to work with fiberglass. For more info on fabricating fiberglass parts, check out Bryan Feldman's site. It refers to carbon fiber cloth, but fiberglass layup is identical.
After about half an hour the resin had cured enough to remove the weights and gently pry the glass sheets away from the fin. The fin was then set aside to dry and cure fully while I built the next one. Three were required for the BUB. After each fin cured, I sanded the edges with a belt sander. The corrugated edges were plugged up with Bondo auto body filler, which is chemically very similar to the fiberglass resin, but has talcum powder added to give a paste-like consistency. The filler was added to all edges except the root, where the fin would attach to the rocket body. After curing, the filler was sanded to a rounded shape. The fins were then set aside to dry fully.
To build the motor mount, I first decided on the size of motor I wanted to use. The 24mm Estes 'D' casing was my choice. Later, when the BUB turned out heavier than I had expected, I ended up using an Aerotech 24mm reloadable composite motor. This could be loaded with kits with either E or F power ranges, enough to lift the rocket safely. Anyway, I cut more brown paper bags in to strips, soaked them in glue, and wrapped them on an dowel that was 24mm in diameter and had been wrapped in plastic to keep it from sticking. I removed the dowel, let the tube dry, and cut it to length (the length of a D motor plus about an inch). For a motor retention hook, I used a steel street sweeper bristle I found in a gutter. This was cleaned with steel wool, cut to length, and bent to form the hook. For a thrust block, I used a chunk of the same dowel I had used as a form to build the tube on. I drilled a hole in this to allow the ejection charge gasses to escape. I mounted the hook and block in the motor mount so that a D casing would extend about 3/4" from the bottom. The hook was strapped to the tube with another wrap of glue-soaked paper, and the block simply glued in.
To mount this assembly, I measured and cut centering rings from the same cardboard I had used for the fin cores. This was a bit tedious but worked well enough. When everything fit, I glued the motor mount to the rings, and when this was dry, glued the rings in the end of the body tube. The BUB was starting to take shape!
After the motor mount was dry, I lightly sanded the body tube to remove the shiny coating, so the adhesive would stick properly. I marked the tube for a three-fin configuration and epoxied the fins in place. I used a paste-like marine-rated epoxy that allowed me to make fillets at the fin roots. The launch lug was a plastic soda straw, which was laminated into one fillet for strength.
It was now time to build the nose. Not wanting to wimp out and buy one that would fit (which would have been very difficult anyway since the Mosquito uses a blunt, nearly hemispherical nose), I decided to turn one out of white foam. A friend donated some foam packing blocks, which I glued together and mounted on a hardwood dowel. This dowel I put in the chuck of a drill press, and I used a combination of files and sandpaper to shape the foam to the correct form. This works well, but really makes a mess! To make the section of the nose that slides into the body tube stronger, I used a section of body tube cut from the spare piece and trimmed a section out of it so it would fit inside the body. This I glued over the foam shank of the nose. I applied a protective layer of wood glue to the entire nose, then put more Bondo over the exterior section (the resin in Bondo will dissolve white foam without the glue layer). Some sanding and I had a nice, smooth nose, ready for painting. To finish off, I cut the exposed part of the dowel off, drilled a pilot hole, and installed a screw-eye for parachute attachment.
I mounted a long shock cord made from cotton clothesline rope, and a parachute cut from garbage bag material completed the rocket. I now popped it on the scale and discovered it weighed nearly a pound (16 oz)! The Estes D wouldn't do for that. Now was the time I decided to use the Aerotech composite 24mm reload. When I bought the motor, I discovered that it wouldn't fit: the ejection charge tube was too big to go through the hole in the thrust block. With no way to remove the mount from the rocket, I used a rat-tail file (and lots of curse-words) to enlarge the hole in the block until the casing would fit.
Finishing:
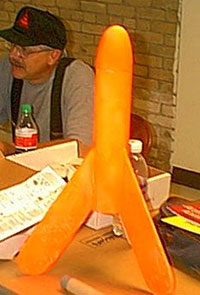
With all major parts done, it was time to paint. Like the UB, I decided to
paint the BUB blaze orange. The bigger rocket didn't really need it, but I
figured I had to go with tradition.
Flight:
The BUB was ready for its first flight in July of 2001. It would be my first composite motor launch, as well as my first high-power rocket. Others double-checked the balance point on the model with the motor in place to be sure it would be reasonably stable in flight. Even so I was nervous and said a silent prayer as the Range Safety Officer (RSO) counted down. At zero, I pressed the button on the Aerotech controller, and the motor lit! The BUB came off the launch rod at a slight angle, but still well within safe limits, and hissed skyward. The four-second delay I chose was perfect: the rocket was just turning over at about 500 feet when we heard the ejection charge pop. Unfortunately, the nose stayed firmly on the rocket! All I could think was, "Oh No!" as the model turned over and began its death-dive to the ground. The RSO shouted "Heads-Up!" on the PA system over and over as the BUB executed a perfect ballistic dive towards the parking area. With a resounding SPLAT the rocket hit the ground, shattered its nose, and all three fins tore off and bounced several feet in the air. As the kids present charged for the crash site, the RSO shouted at them not to touch anything. I arrived at the site to see it was hopeless: the rocket was a total loss. The fins were ok, but the nose and body tube were crushed beyond any hope of repair. I was also not happy to see that my expensive 24mm motor casing was gone. The retention hook had failed and the motor had ejected. Luckily one of the other club members found it sitting in the grass near bye.
Disappointed as I was about the crash, I still laughed with amusement and relief that everyone was safe and my first high-power rocket was mostly a success. The crowd gave me a standing ovation for the most spectacular crash they had seen, and others teased me about using the original Mosquito motor-ejection and featherweight recovery system on the BUB.
Summary:
This episode hasn't soured me on scratch-builts nor the Mosquito design. In
fact, I started work on the Big Ugly Bug II in the winter of 2001. Instead of
'junkyard' parts, this one is incorporating bought parts like body tubes, motor
mount, thrust rings, parachute, and launch lug. I will still have to fabricate
the fins and nose, but the store-bought parts will help things go together more
quickly. And yes, this time I'm using a commercial motor retainer system, so
hopefully the parachute will come out!
 |
 |